Virtual Server Cloud: Repair Current Kernel Version (Ubuntu/Debian)
If it is not possible to migrate your server even though you have installed the latest kernel, it may be corrupted. This can occur, for example, if the boot partition on your server had less than 100 MB of free space before the migration. There can also be a variety of other reasons.
If the Linux kernel is corrupted, this can have various symptoms that indicate that something is wrong with the system. You can use the following signs and methods to recognise whether the kernel may be damaged:
Boot problems: The most obvious sign of a corrupted kernel is boot problems. The system could get stuck in a boot loop, crash with error messages or not boot at all.
System crashes and error messages: If your Linux system crashes frequently or has unexpected kernel panics, it may be a sign of a corrupted kernel. Kernel panics are often accompanied by an error message on a blue or black screen.
Dmesg and system logs: Check the logs, especially the output from dmesg immediately after booting. dmesg provides the kernel-related messages that can be helpful in identifying specific errors or problems.
root@localhost:~# dmesg | less
You can also use journalctl to check system logs:
root@localhost:~# journalctl -xb
Faulty modules: Another possible symptom of a corrupted kernel is problems with kernel modules. Check whether all modules can be loaded or whether error messages are displayed:
root@localhost:~# lsmod
root@localhost:~# modprobe yourmodulename
Inconsistencies in functionality: If certain system-related functions (such as network operations, file system access, hardware interactions, etc.) become unreliable or inexplicable errors occur, this could also indicate problems with the kernel.
Booting from an older kernel and repairing the latest kernel version
If an older kernel is installed on your server, you can boot your server with one of these kernels to bring it online and perform troubleshooting.
- Log in to your IONOS account.
- Click Menu > Server & Cloud in the title bar. If you have multiple server contracts, select the desired contract.
Click on Actions > Open remote console.
The remote console opens in a new tab.
- Immediately switch to Cloud Panel and click on Actions > Restart.
The connection to the console is interrupted during the restart. - Switch to the remote console.
- Click on Options > Reconnect in the top left-hand corner until the following message is displayed:

- Press the ESC key immediately and hold it down until the following window appears.
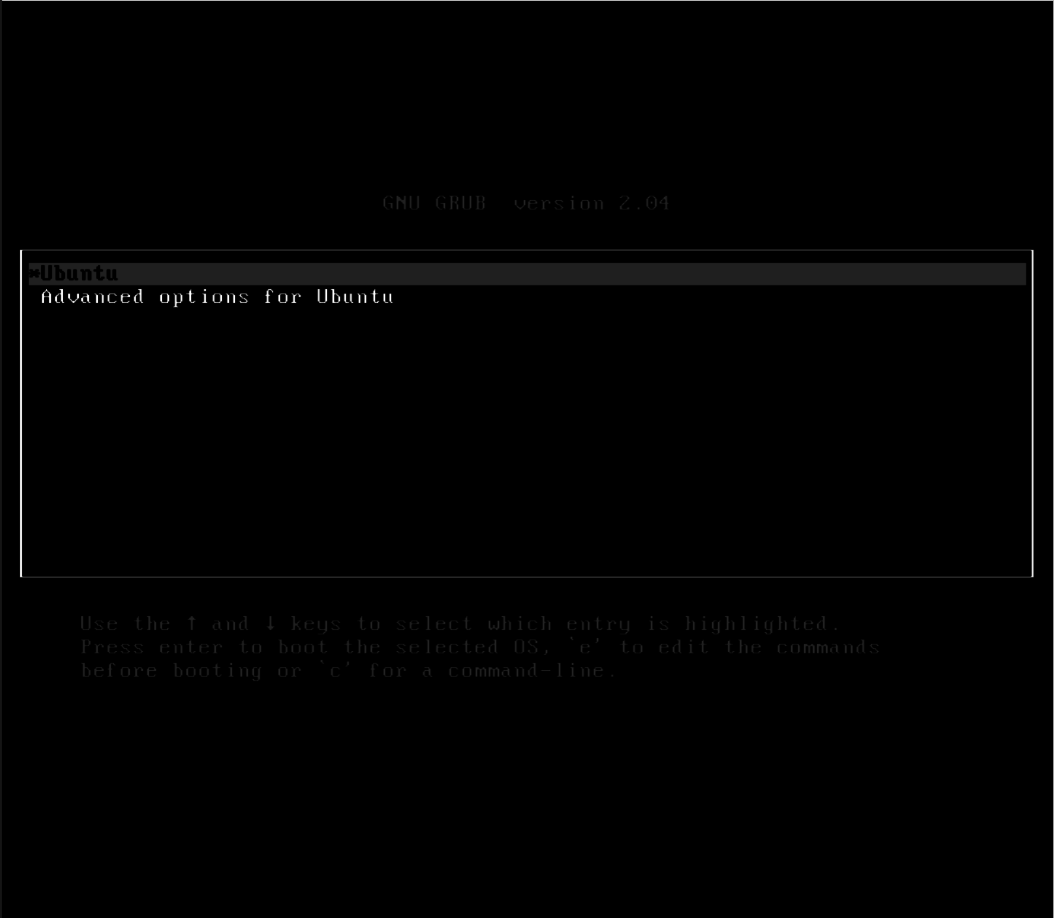
- Select Advanced Options for Ubuntu and press Enter.
- A list of available kernels will be displayed with the latest kernel at the top. Select the second newest kernel and press Enter. If this kernel is working, your server will now boot normally and take you to the login prompt.
Note
Do not select a recovery mode kernel
- Enter your login data.
- To check whether you have booted the server from an older kernel, enter the following command:
[root@localhost ~]# uname -r
Back up your server data
Back up your server data before you repair the kernel. You can either use the paid cloud backup or save the data locally on your computer with Filezilla.
You can find more information about cloud backup in the following article:
Repair kernel
Use the following command to check which kernels are currently installed on your server:
[root@localhost ~]# dpkg --list | grep linux-image
Example:
root@server:~# dpkg --list | grep linux-image
rc linux-image-5.15.0-105-generic 5.15.0-105.115 amd64 Signed kernel image generic
ii linux-image-5.15.0-106-generic 5.15.0-106.116 amd64 Signed kernel image generic
iF linux-image-5.15.0-107-generic 5.15.0-107.117 amd64 Signed kernel image generic
ii linux-image-5.15.0-97-generic 5.15.0-97.107 amd64 Signed kernel image generic
rc linux-image-unsigned-5.15.0-107-generic 5.15.0-107.117 amd64 Linux kernel image for version 5.15.0 on 64 bit x86 SMP
root@server:~#In this example, linux-image-5.15.0-107-generic is the latest installed kernel. The linux-image-5.15.0-97-generic kernel is the oldest. The status of a kernel is indicated by the package status codes:
| Package Status Code | Meaning |
|---|---|
| ii | Correctly installed and configured |
| iU | Installed, but not configured |
| iF | Installed, but configuration failed |
| iW | Installed, but possibly waiting for something else (rare) |
| rc | Removed, but configuration files still present |
Note
For remote kernels that still have configuration files (rc), the configuration files can be purged with the following command:
apt-get purge $(dpkg -l | grep '^rc' | awk '{print $2}')
- In this example, the linux-image-5.15.0-107 kernel has the status code IF. This status code means that the configuration has failed.
To rectify this, reinstall the corresponding kernel. To do this, replace the placeholder in the following command and then enter it.
[root@localhost ~]# apt-get install --reinstall IMAGE NAME
Example:
[root@localhost ~]# apt-get install --reinstall linux-image-5.15.0-107-generic
To check whether the reinstallation was successful, enter the following command:
[root@localhost ~]# dpkg --list | grep linux-image
rc linux-image-5.15.0-105-generic 5.15.0-105.115 amd64 Signed kernel image generic
ii linux-image-5.15.0-106-generic 5.15.0-106.116 amd64 Signed kernel image generic
ii linux-image-5.15.0-107-generic 5.15.0-107.117 amd64 Signed kernel image generic
ii linux-image-5.15.0-97-generic 5.15.0-97.107 amd64 Signed kernel image generic
rc linux-image-unsigned-5.15.0-107-generic 5.15.0-107.117 amd64 Linux kernel image for version 5.15.0 on 64 bit x86 SMP
root@server:/#The Linux-image-5.15.0-107-generic kernel now displays the package status code ii, which means that it is installed and configured correctly. To complete the process, reboot the server. The latest kernel will be loaded automatically.
To complete the process, restart the server.
[root@localhost ~]# reboot
Repair kernel if there is not enough space on the boot partition
If there is not enough space on the boot partition, reinstalling the kernel using the method described above will fail. In this case, the following information is displayed:
[root@localhost ~]# apt-get install --reinstall linux-image-5.15.0-107-generic
Read package lists... Done
Build dependency structure... Done
Reading status information... Done
The following packages were installed automatically and are no longer needed:
amd64-microcode libdbus-glib-1-2 libevdev2 libimobiledevice6 libplist3 libupower-glib3 libusbmuxd6 linux-headers-generic thermald upower usbmuxd
Use "apt autoremove" to remove them.
0 upgraded, 0 reinstalled, 1 reinstalled, 0 to remove and 2 not upgraded.
You need to get 0 B/11.5 MB of archives.
After this operation, 0 B of additional space will be used.
(Reading the database ... 203704 files and directories are currently installed.)
Preparing to unpack .../linux-image-5.15.0-107-generic_5.15.0-107.117_amd64.deb ...
Unpacking linux-image-5.15.0-107-generic (5.15.0-107.117) via (5.15.0-107.117) ...
dpkg: Error processing archive /var/cache/apt/archives/linux-image-5.15.0-107-generic_5.15.0-107.117_amd64.deb (--unpack):
cannot copy extracted data for './boot/vmlinuz-5.15.0-107-generic' to '/boot/vmlinuz-5.15.0-107-generic.dpkg-new': Write operation failed (No more space on the device)
No report is written because the error message indicates a full data carrier
dpkg-deb: Error: Paste sub-process was terminated by signal (Broken pipe)
Errors occurred during processing:
/var/cache/apt/archives/linux-image-5.15.0-107-generic_5.15.0-107.117_amd64.deb
needrestart is skipped because dpkg failed
E: The subprocess /usr/bin/dpkg returned an error code (1)
root@server:/#
To solve this problem, it is necessary to free up memory. Proceed as follows:
Enter the following command to display information about the memory used.
[root@localhost ~]# df -h
- Then release the storage space. You can find instructions on releasing storage space in the following article:
Releasing storage space on a Virtual Server Cloud
Manual installation of the kernel if the new installation fails
If reinstalling the kernel fails for a reason other than insufficient space on the boot partition, you can try to manually remove and reinstall the kernel.
Warning
Never remove the kernel you are currently using, as this can lead to serious errors on your server. Always use the uname -r command to check which kernel you are using.
To remove the kernel and then reinstall it, proceed as follows:
Use the following command to check which kernels are currently installed on your server:
[root@localhost ~]# dpkg --list | grep linux-image
To check which kernel you are using, enter the following command:
[root@localhost ~]# uname -r
To remove the kernel package linux-image-5.15.0-107-generic -, enter the following command:
[root@localhost ~]# apt-get purge linux-image-5.15.0-107-generic
To check whether the kernel package has been removed, enter the following command:
[root@localhost ~]# dpkg --list | grep linux-image
To reinstall the kernel, replace the placeholders in the following command and enter it:
[root@localhost ~]# apt install --install-recommends kernel-VERSION
Example:
[root@localhost ~]# apt install --install-recommends linux-image-5.15.0-107-generic
Check that the kernel package is installed correctly.
[root@localhost ~]# dpkg --list | grep linux-image
To restart the server, enter the following command:
[root@localhost ~]# reboot