Exporting Data from IONOS Email
Please use the “Print” function at the bottom of the page to create a PDF.
You can export data, such as emails or contacts, from IONOS Mail Basic/Mail Business accounts at any time. Simply follow the step-by-step instructions provided below.
Exporting from Email Programs
You use an email program on your local computer, such as Thunderbird or Outlook, and retrieve your emails via POP or IMAP? If so, the following articles will show you how to export data:
For other email programs, please consult the program help or the manufacturer's website for information on how to export the data you want to send.
Exporting Emails from Webmail
To export one or more emails from Webmail:
- Log in to Webmail.
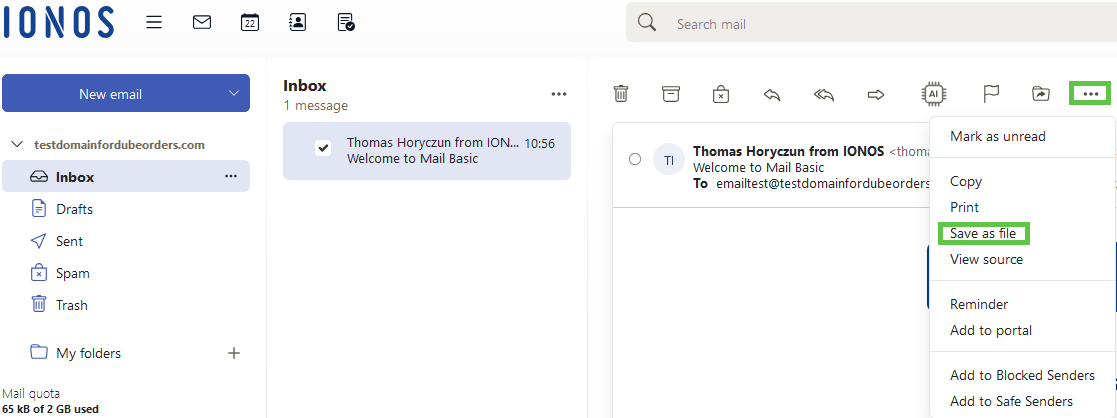
- Select the emails you want to save. As soon as you have selected one or more emails, an additional toolbar is displayed.
Optional: To save an entire folder, such as the entire Inbox folder, click on the desired folder. Select any email, and then by pressing Ctrl+A, all other emails in the folder will also be marked. - Click on the icon Other actions > Save as file. A dialog box opens.

- Select Save file and finish the process with OK.
The file will now be saved on your computer in the download folder, unless you have made other settings for this.
If you have only selected one email, it will be saved as an eml file. If you have selected several emails, they will be saved as a zip file.
Note
When saving several emails or entire folder contents, the resulting zip file is always named mails.zip. To avoid accidentally overwriting it during another backup, change the file name of the zip file after saving it on your computer.
Exporting Contacts from Webmail
To export your contacts from Webmail:
- Log in to Webmail.
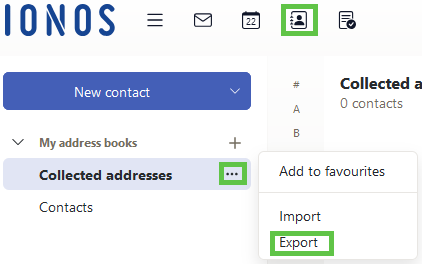
- In the menu bar, click the Address Book icon.

- Right-click on an address book under My Address Books.
- Choose Export from the context menu. Note that at least one address must be contained in the address book.
- Decide whether you want to export as a CSV or vCard file. You can optionally export your distribution lists as well.
Exporting Calendar Entries from Webmail
To export your calendar entries from Webmail:
- Log in to Webmail.
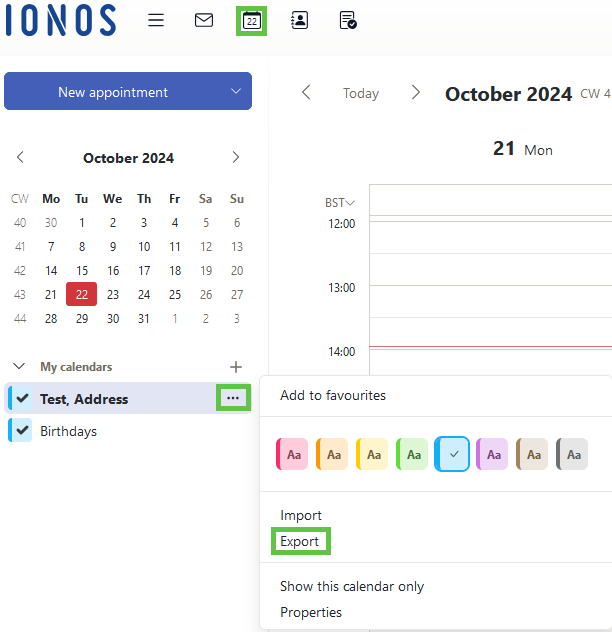
- In the menu bar, click on the Calendar icon.

- Right-click on the calendar that you want to export.
- Choose Export from the context menu. A dialog box appears.
- Save the ics file with the calendar data.
Exporting Tasks from Webmail
To export your tasks from Webmail:
- Log in to Webmail.
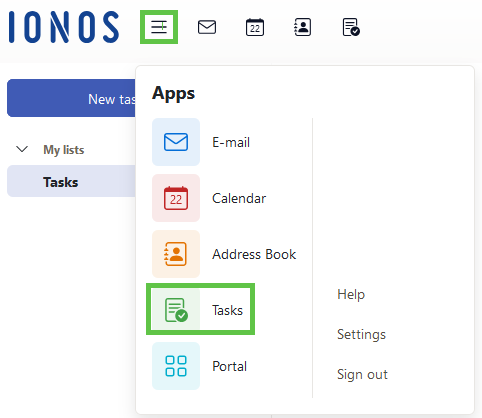
- Click on Webmail Components > Tasks in the menu bar.

- Right-click the task folder that you want to export.
- Choose Export from the context menu. Note that at least one task must be created in the folder for this to work.
- Save the iCalender file containing your tasks.