Podman Tutorial
Container virtualisation has become more important in recent years. Having become popular thanks to Docker released in 2013, the technology is now a basic component of a wide range of tools for managing virtual namespaces. One of the most interesting solutions is Podman. Originally designed as a debugging tool for CRI-O that was intended to make it easier to work with Kubernetes clusters, the software has quickly become an extensive engine for managing containers in its own right.
Namespaces enable you to group selected code elements (e.g. classes) in a container.
Learn more about what makes Podman so special and how to use the container tool.
What Is Podman?
Podman (short for Pod Manager) is a container engine that was first released in February 2018. It was developed by the American software company Red Hat, which is primarily known for high-performance enterprise solutions for a range of open-source projects such as Red Hat Enterprise Linux (RHEL) or OpenStack. Building on experiences with Docker, Podman was not originally designed as a standalone engine but intended as a debugging tool for CRI-O. This plan was quickly discarded.
The container software is similar to Docker in many aspects and uses the same command line interpreter as the industry standard. This enables you to use typical Docker commands in Podman – the alias simply needs to be set to alias docker=podman. Switching from Docker to Podman is therefore relatively easy in most cases. The key difference is that Podman does away with a central daemon as the control instance for the individual containers. This allows you to access the various virtualised applications without root rights.
A daemon refers to a program in Unix/Linux operating systems that runs in the background and provides certain services and processes.
Podman runs on all common Linux distributions such as Ubuntu, Fedora, CentOS, Debian, and RHEL as well as Raspbian (Raspberry Pi operating system). Here, the engine can usually be installed directly via the package management of the respective system.
In our Digital Guide, you will also find information on "Podman vs. Docker – what is the future in the container world?".
Podman: structure and function
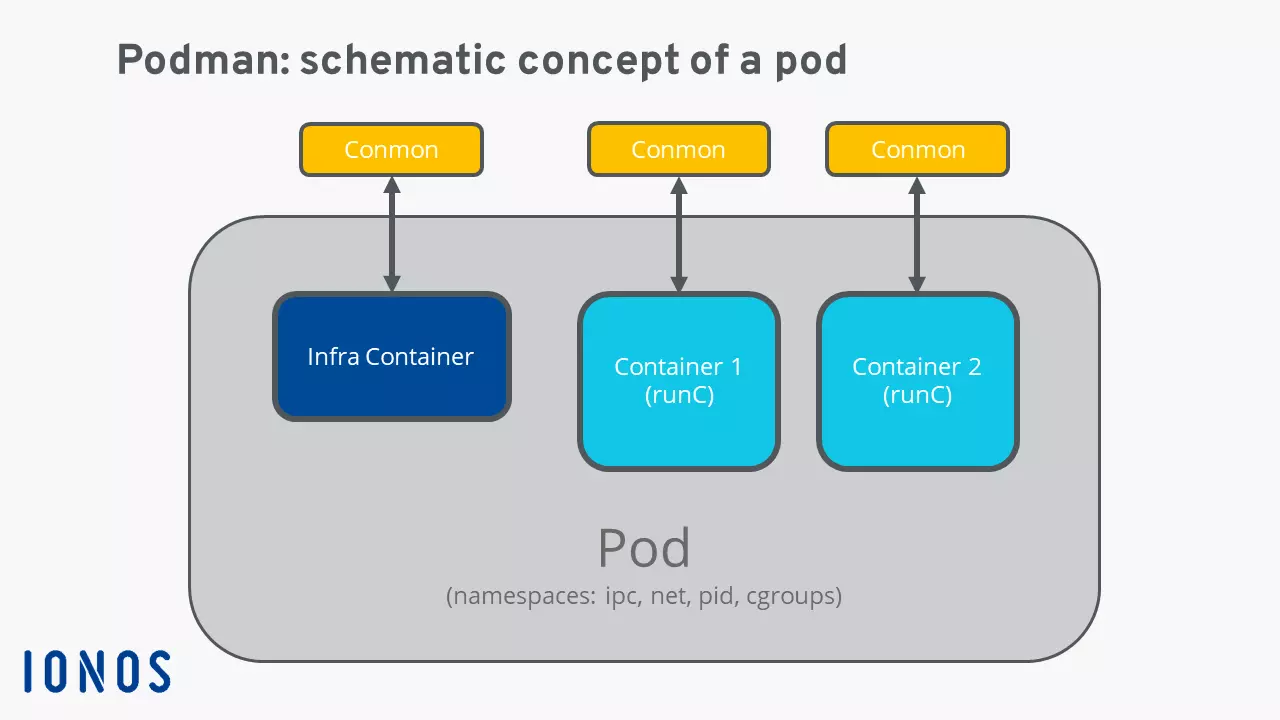
Besides doing away with a central daemon, the key distinguishing characteristics of Podman include the “pods”. These pods – based on the Kubernetes pod concept – refer to groups of multiple containers within a shared Linux namespace which share certain resources. This way, a wide range of virtualised applications can be flexibly combined.
As mentioned earlier, it’s possible to run the individual containers on the host as a normal user without root rights – the processes are only root-controlled within a container. This is possible since Podman accesses the user namespaces of the Linux kernel which assign special rights and user IDs to the processes. The fact that the containers are actually run as administrator gives the virtualised Podman environment a high level of security.
Infra Containers represent the heart of a pod. They are exclusively responsible for pod functionality and therefore manage and ensure the individual resources such as namespaces, network ports, CPU, working memory etc. What’s more, Podman utilises the Conmon monitoring tool, written in C, for pod management. This tool monitors the individual virtualised components and secures logs, for instance. The tool also acts as an interface with the terminal of the respective container. Podman uses the software runC as runtime for the containers; it is also used in many other solutions like Docker or rkt.
Podman tutorial: first steps with Podman
After having introduced the basics of Podman, we’ll now summarise the key points for getting started with the container engine in the following Podman tutorial.
Installing Podman on Linux
Podman is a software program for running Linux containers. The tool is quick and easy to install on Linux distributions such as CentOS, Ubuntu, Debian, and others. In most cases, the installation packages can be found directly in the package management of the respective system software and installed using the typical terminal commands.
As an alternative to native packages in the system repository, the Kubic project on opensuse.org provides different Podman installation packages for various distributions and releases.
Debian, Ubuntu, Raspbian:
sudo apt-get update -qq
sudo apt-get -qq -y install podman
Fedora, CentOS, Amazon Linux 2, RHEL 7:
sudo yum -y install podmanOpenSUSE:
sudo zipper install podmanInstalling Podman on Windows and macOS
Podman is at home in Linux environments. But you can also use the container engine on devices that use the Windows or macOS operating system. This requires access to a Linux installation on these devices, either via a virtual machine on the host or via the network.
If you have access, you only need a Podman remote client in order to establish an SSH connection with the Podman backend.
Information regarding the SSH connection needs to be entered in the configuration file podman-remote.conf. The following Podman remote client tutorial on GitHub provides extensive information about setup and use.
How container image management works with Podman
In terms of features and syntax, Podman is primarily based on Docker. When configuring the desired containers, you can therefore use the vast pool of ready-to-use Docker images – also known as Docker Hub. For instance, using the pull command, you can download application images such as the latest version of Ubuntu:
podman pull hub.docker.com/_/ubuntu:latestThe official storage path for individual images is the local path /.local/share/containers/; here each user has their own namespace, meaning the container setup is separated from the root setup, for example. Get an overview of the locally stored images with the following command:
podman imagesUse the “sudo” prefix typical for Linux for a list of root images:
sudo podman images

