Reverse proxy server – core components in security architecture
The secure operation of web or Exchange servers is a problem for network administrators: it is true that online services such as the using web or e-mail services should be available via the public network. However, a direct connection to the internet makes the systems vulnerable to malware and manual attacks. Therefore an intermediary network component is used, known as a reverse proxy.
What is a reverse proxy server?
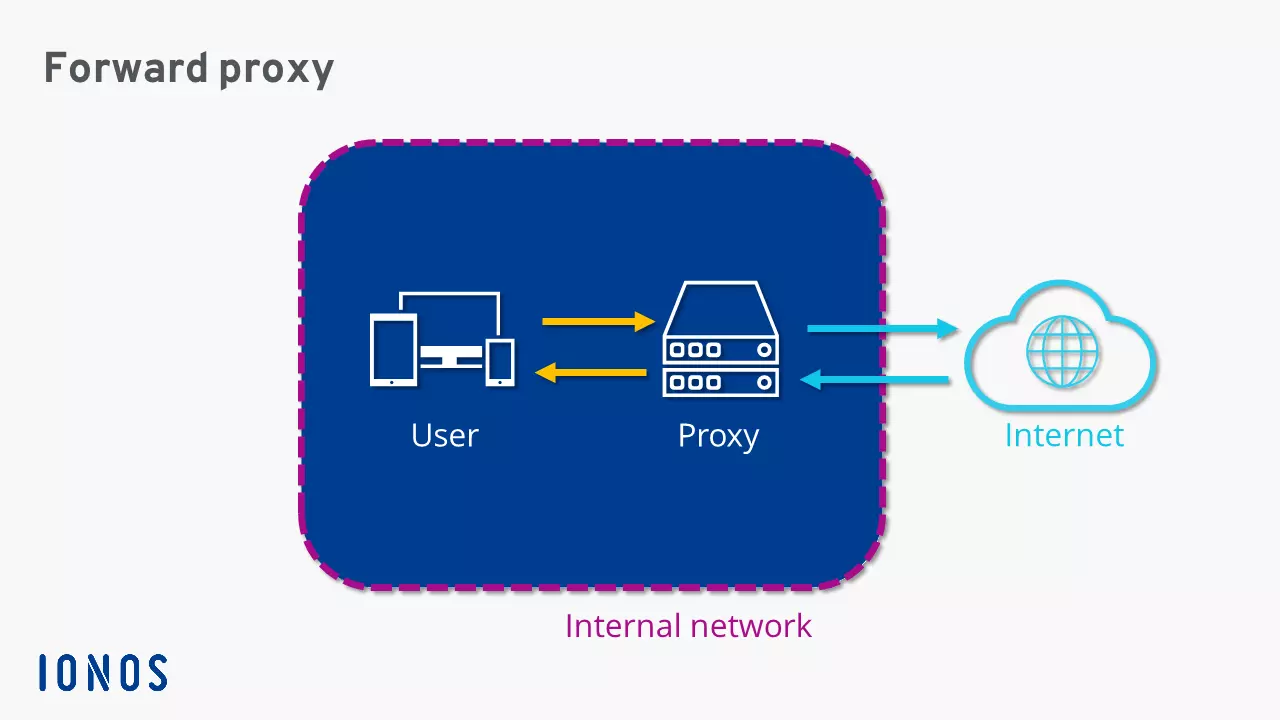
Basically, a proxy server is a communication interface in the network that accepts requests and forwards them to a target computer. In enterprise networks a set-up like this is used to provide client devices with controllable access to the internet. The server configured as a proxy in this case represents the only connection to the public network. This is referred to as a forward proxy.
A forward proxy channels all requests from the internal network and forwards them with their own sender address to target servers on the internet. Server responses also reach the proxy before they are distributed to the appropriate client devices. These remain anonymous – unless the proxy in use is a transparent proxy. In order to save bandwidth and speed up web page retrieval, proxy servers are usually programmed in such a way that they can buffer frequently requested content in the cache and then display it directly without a new server request.
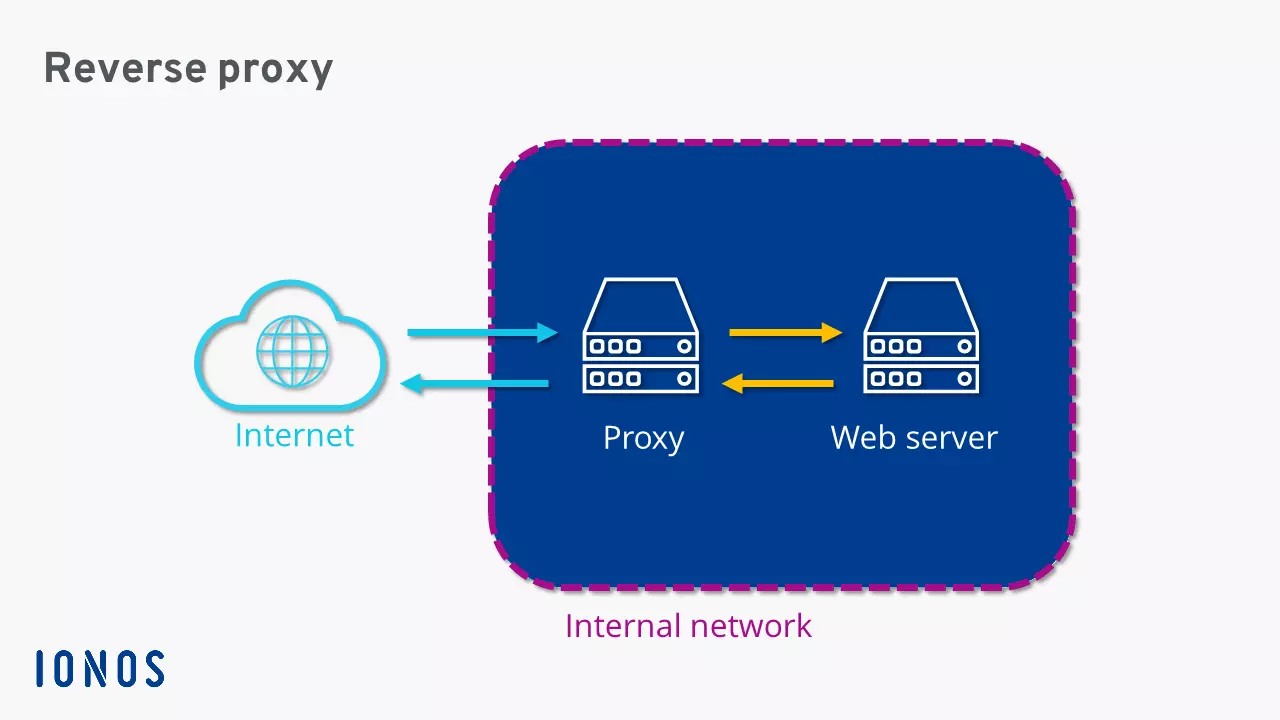
While a forward proxy protects client devices in a network from negative online influences, a reverse proxy operates in the opposite direction – hence the name. This proxy serves as an additional security component for one or more web servers, in order to accept requests from the internet as a proxy and forward them to a backend server in the background.
As the network’s communication interface a reverse proxy can take over various functions that provide security for the backend servers and optimise the data traffic.
Reverse proxy: function and application
Reverse proxies are usually secured by a firewall in a private network or a demilitarized zone (DMZ). The reverse proxy, similar to the forward proxy, is the only connection between the internet and the private network. All requests to the backend servers in the LAN therefore pass through the same communication interface before they are forwarded to the actual target system. By tying them together, this enables you to control incoming data traffic, provide multiple servers under the same URL, distribute requests evenly across different servers, and speed up data retrieval through caching. The reverse proxy servers are therefore used for the following fields of application:
- Anonymisation: as the only access to the internal network, a reverse proxy handles all requests to servers in the background and acts so that client programs think they are dealing with the actual target system. For this purpose, the proxy forwards the queries to the corresponding target systems in the LAN, accepts their responses, and forwards them to the requesting clients. The actual backend servers remain anonymous.
- Protection and encryption: an upstream reverse proxy offers the possibility to install control systems such as virus scanners or packet filters, which additionally protect the servers in the background. The proxy server, therefore, represents another link in the security chain between internet and private network. Reverse proxy servers can also be used for encryption. Outsourcing SSL certificates to the proxy relieves the web servers that act in the background.
- Load balancing: using an upstream reverse proxy, you can link a URL to various servers in the private network. This also means there’s the opportunity to distribute incoming requests to multiple servers. Load balancing prevents the overloading of individual systems and still works in case one server malfunctions. If a server is unreachable due to hardware or software errors, the proxy’s load balancing module distributes incoming requests to remaining servers. It can be ensured that a service is always available even when something goes awry.
- Caching: in order to speed up the service, the reverse proxy provides a feature that allows server responses to be cached. This caching enables the proxy server to respond to repetitive requests, either partially or completely. Static content such as images or frequently accessed dynamic websites is kept in the proxy’s cache. This means that no data or less data has to be retrieved from the backend server, which significantly speeds up the access rate to web services. However, since content changes quickly and it cannot be ensured that the proxy’s cache contains the current version, there is a risk that clients will get out-of-date information.
Setting up Apache as a reverse proxy
The Apache HTTP server can be used to set up a reverse proxy. The world’s most popular web server has various extension modules for proxy functions and can be configured with just a few code lines. The following step-by-step guide shows how to expand an Apache installation on the Ubuntu operating system by adding the required module and creating a configuration file for redirection. The open source Apache HTTP server is provided free of charge by the Apache Software Foundation. An introduction to the web server software can be found in our guide.
1. Install the Apache Proxy module
To use an Apache HTTP server as a reverse proxy, you need the mod_proxy module. This implements the core functionalities and can be extended by various additional modules:
- mod_proxy_http contains all proxy functions for HTTP and HTTPS requests. The add-on module supports the protocol versions HTTP/0.9, HTTP/1.0, and HTTP/1.1.
- mod_proxy_ftp is required in order to provide proxy features for FTP requests.
- mod_proxy_connect provides proxy functionality for SSL tunneling.
- mod_proxy_ajp implements the Apache JServ Protocol (AJP). This is used in the context of load balancing in order to forward requests to application servers in the background.
- mod_cache, mod_disk_cache, and mod_mem_cache implement caching functions that enable content to be cached on the Apache server.
- mod_proxy_html enables rewriting of HTML links.
- mod_headers enables HTTP header data to be manipulated.
- mod_deflate implements a compression function.
To install the module mod_proxy including all additional modules, the following command line is required:
sudo apt-get install libapache2-mod-proxy-htmlThis tutorial focuses on the basic features of the mod_proxy Apache module. A detailed description of the add-on modules including all required directives can be found in the official documents of the Apache project.
2. Activate the required modules
In order to activate individual modules of the Apache proxy function, the command a2enmod is used. Modules that are already activated can be deactivated by a2dismod. To create a simple reverse proxy for a downstream web server, simply load the mod_proxy and mod_proxy_http modules:
sudo a2enmod proxy
sudo a2enmod proxy_http
After the modules have been activated, the Apache HTTP server must be restarted:
sudo apache2 reload3. Create the configuration file
In order for the reverse proxy to accept queries from the internet and forward them to the correct server in the local network, you need to deactivate the configuration file 000-default.conf in the /etc/apache2/sites-enabled directory and to replace it with a virtual host file such as example.conf. It’s recommendable to create a separate virtual host file for each target server with its own IP:
<VirtualHost *:80>
 ServerName domain.tld
 ServerAlias www.domain.tld
 ProxyRequests Off
 ProxyPass / http://123.456.7.89/
 ProxyPassReverse / http://123.456.7.89/
</VirtualHost>
Instructions for the proxy function are defined within the <VirtualHost> directive. The start tag also contains the IP address including the port number at which Apache, configured as a reverse proxy, should listen for inquiries. If all IP addresses are to be included, the placeholder * is used like the example shows. Information within the VirtualHost tag is also displayed in directive form. Unlike the VirtualHost tag, these arguments specify how to process incoming requests and response packets. The directives ServerName, ProxyPass, and ProxyPassReverse are especially important.
- ServerName: the ServerName directive defines the primary name of a server on the internet. This must be resolvable either via DNS or via /etc/hosts. In the example, the Apache server is instructed to accept all requests to domain.tld.
- ProxyPass: the directive ProxyPass defines the target address for redirection. All requests that are directed to the public address are forwarded by the reverse proxy to the internal address specified in the ProxyPass directive. In the example, this would be the fictitious IP 123.456.7.89.
- ProxyPassReverse: a proxy server not only receives requests, it also forwards the answer packets from the backend server to the clients. To prevent these replies from being delivered with incorrect header information (namely those of the server in the background), the ProxyPassReverse directive rewrites the header of the server response so that it matches the proxy server. The backend server remains anonymous.
In addition, there are two other directives: ServerAlias and ProxyRequests. These do not provide basic functions for the proxy server and are therefore optional.
- ServerAlias: the ServerAlias directive enables you to define an alternate name for the target server in addition to the primary server name.
- ProxyRequests: the ProxyRequests directive with Argument Off prevents the Apache HTTP server from being used as a forward proxy to prevent possible misuse.
If the rules for the proxy function have been defined, the configuration must be activated via the terminal:
sudo a2ensite example.confThe Apache HTTP server now accepts all requests to domain.tld or www.domain.tld and redirects them to a backend server with the IP 123.456.7.89.


