How to set up your own Unturned server
For an optimal multiplayer experience, host your own Unturned server in a provider’s data centre. The requirements of the free survival game are manageable, but an external hosting option is recommended, especially for adventures involving several people. Installation and setup are completed in a just few steps.
System requirements for Unturned server hosting
Unturned’s dedicated server application does not place high demands on hardware, which is why you can basically run it on your own computer. That it is nevertheless advisable to run an Unturned server on rented resources has various reasons: For example, the internet connection in many households is rarely sufficient to ensure stable and smooth gameplay. Also, the home server only runs when you have your device turned on.
The system requirements for Unturned server hosting depend especially on how many players are active at the same time. The number of integrated modifications also has a strong influence on the required computing power. The following values serve as a rough guide:
- Computing power (CPU): min. 2.4 GHz (2 cores)
- RAM: 2-4 users: 2 gigabytes; 5-8 users: 3 gigabytes; 24 users: 5 gigabytes
- Hard disk space: min. 4 gigabytes
If you use a lot of mods, you have to plan for more memory and RAM. You should also not forget to reserve power for the operating system. Here you have the choice between Windows and the classic Linux distributions like Ubuntu or Debian.
Booking a Cloud server from IONOS is a great way of checking how many resources you need. You can start with a small hardware setup that you can upgrade at any time if necessary! Thanks to minute-by-minute billing, you only pay for the services you actually use.
Three options for hosting an Unturned server with IONOS
You can rent hosting hardware for a gaming server from various providers. Usually, the individual providers offer different server models and rates, which differ in terms of architecture, scope of services and costs.
A comparison of the IONOS server options
With IONOS, you can choose between the following three server types:
- Cloud Server: Virtualised server resources billed by the minute
- vServer: Virtualised server resources at a fixed monthly price
- Dedicated Server: Dedicated enterprise hardware; per-minute billing
You can book all three server models mentioned in different packages, whereby a high-class broadband connection with up to 400 Mbit/s is always guaranteed.
With both a cloud server and a vServer from IONOS, you rent resources that are fully virtualised and highly scalable. With a cloud server, the service used is billed to the minute, so you only pay for what you have actually used. For the vServer, on the other hand, a fixed monthly amount is charged, depending on the booked performance package.
If you are looking for dedicated hardware that is reserved exclusively for you, the dedicated servers from IONOS are the right choice. However, you will also pay more for this enterprise solution than for the other two server types.
A dedicated server from IONOS is the perfect choice if you want to use your server for other purposes as well. For example, you can host your own voice tool in parallel. Simply install your desired solution using our articles:
- How to set up a TeamSpeak server
- How to create a Discord server
- How to create a Mumble server
Possible cases for an Unturned dedicated server and matching IONOS packages
Finding the perfect server for your purposes is not that easy, even with the knowledge of the features of the three available models from IONOS. To simplify the question of which package suits you best, we have summarised three typical usage scenarios in the table below and assigned the matching server offers from IONOS.
| Unturned server scenario | Matching IONOS server packages |
| 2-12 persons; server permanently online | VPS L |
| 12-24 persons; server permanently online | VPS M RAM |
| 24 persons+; many mods or other use of the server planned | AR6-32 SSD |
Try out your VPS for 30 days. If you're not satisfied, we'll fully reimburse you.
Step by step guide: Create and set up an Unturned server
Once you have decided on a package for your Unturned server hosting, you can start with the setup and installation. Learn which steps you need to take and how you and your fellow players will connect to the server. As an example, we’ll describe the process from the perspective of IONOS customers (vServer, Cloud Server, Dedicated Server) using Windows Server.
Step 1: Establish remote desktop connection to the server
You can access the rented server hardware remotely from any device. If you haven’t set it up yet, this is consequently the first step on the way to your Unturned server. As a IONOS customer, you can perform a remote setup in the Cloud panel, the web-based customer area:
- Log in to the IONOS Cloud panel with your personal customer data.
- Go to the ‘Server & Cloud’ section.
- Select the server you want to host Unturned on.
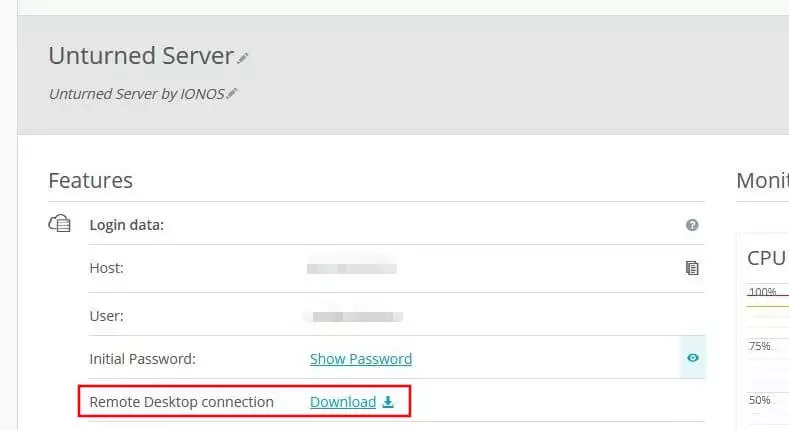
- Scroll down to the credentials and click on the download link in the ‘Remote Desktop Connection’ line.
- Double-click the downloaded .rdp file to execute it.
- In the dialog that pops up, click on ‘Connect’.
- Press ‘More options’ and ‘Use another account’.
- Enter the credentials for server and confirm them with ‘OK’.
The login data for your server can be found under the access data in the Cloud panel (‘User’ and ‘Initial password’). When establishing the connection for the first time, it will be necessary to confirm the server’s security certificate.
Step 2: Install SteamCMD
The easiest way to get Unturned’s dedicated server software is via SteamCMD. Using the game platform’s command line client, you can easily and conveniently connect to the public Steam servers and download and install the application using the appropriate App ID.
To install SteamCMD, download the installation package from the following SteamCMD-Download-Link and unzip it to any directory. Then run the SteamCMD.exe and the tool will be installed.
In our article ‘installing SteamCMD’ we go into detail about the installation process both on Windows and Linux.
Step 3: Obtain Unturned server software via SteamCMD
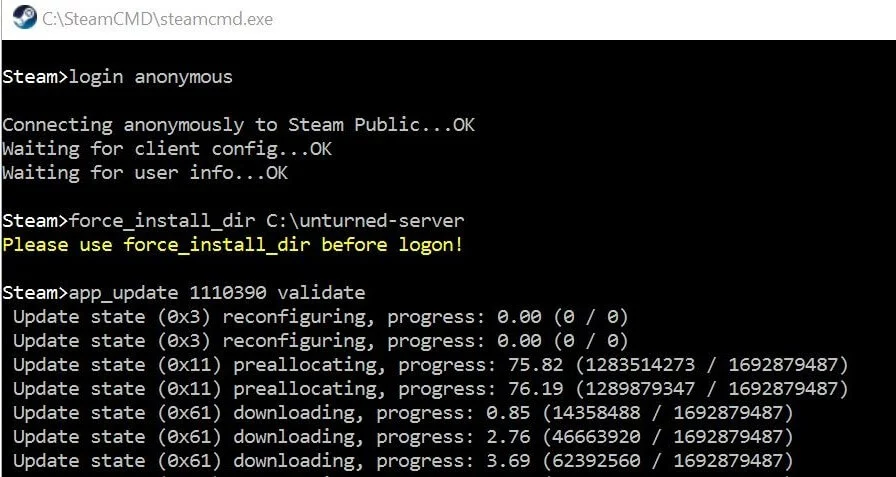
Installing the server via the Steam command-line client is done in three steps. First, log in anonymously to the public Steam servers by running the following command:
login anonymousThen create an installation directory for the server:
force_install_dir C:\unturned-serverFinally, obtain the Unturned server application using the ‘app_update’ command and the app ID ‘1110390’:
app_update 1110390 validateStep 4: Create Game Server Login Token (GSLT)
In version 3.21.31.0 and later, you must authenticate your Unturned server with a Game Server Login Token (GSLT) in order for it to be listed in the server overview. You can generate a token in the Steam game server account management.
To be able to generate a Game Server Login Token, you need a contact number listed in your Steam account
To do so, log in with your Steam account on the linked page and type Unturned’s Steam ID (304930) into the line ‘App ID of the base game’. In the memo field, enter a custom description that you can use later to identify the purpose of the token. Finally, press ‘Create’.
You can copy the token and save it in any document for later use. It can also be viewed in your account management at any time.
Step 5: Release server ports
In order for your server to be accessible to clients, TCP/UDP ports 27015 (Game Port), 27016 (Query Port) and 8766 (Steam Server Port) must be open. You can unlock both ports in the firewall settings in the IONOS Cloud panel by following these steps:
- Log in to the IONOS Cloud panel.
- Go to the ‘Server & Cloud’ section.
- Click the Unturned server.
- In the left side menu, select ‘Network’ and ‘Firewall Policies’ one by one.
- Under ‘Incoming’, set the rules for the three ports. Make sure that the value ‘TCP/UDP’ is set in the ‘Protocol’ field in each case.
Step 6: Set configuration for the Unturned server
After you have made all necessary preparations in the last steps, you can now configure your Unturned server. You make basic settings in the file Commands.dat, which, however, must first be created by a first test start of the server application. For this purpose, simply execute Unturned.exe in the server’s directory by double-clicking on it and close the opened window again as soon as the game world has been loaded.
Under the path C:\unturned-server\Servers\Default\Server you will then find the configuration file mentioned, which you open with the editor of your choice. Among the possible parameters you can define are server name, map and number of players.
In the Commands.dat you have to use a separate line for each parameter. An overview of all available entries is provided by the section ‘Setup Commands’ in the Unturned Wiki on Fandom.
A possible basic configuration with the map ‘PEI’ on the difficulty level ‘Normal’ looks like this:
name Unturned Server Name
map PEI
port 27015
password Server-Password
maxplayers 8
mode normal
perspective both
pve
cheats on
owner Steam-ID
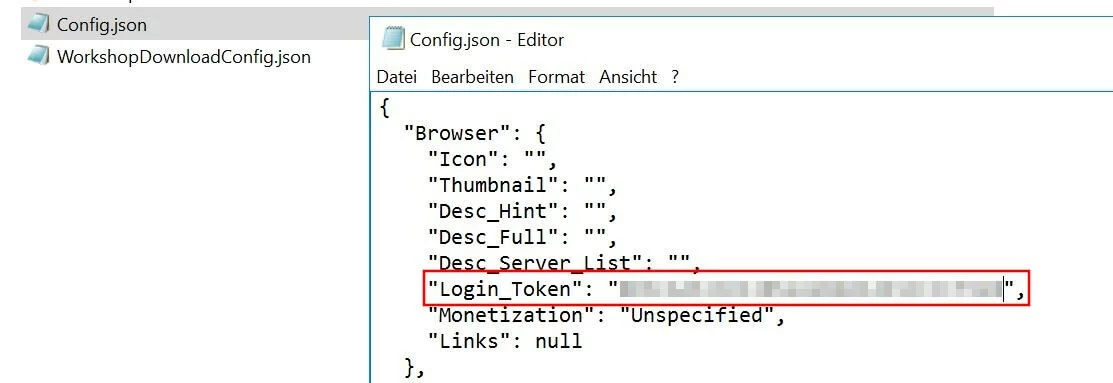
Save the file and change to the path C:\unturned-server\Servers\Default. There you will find the file Config.json, where you can make very specific settings for the game rules and also enter the created token. Copy the token between the quotation marks in the line ‘Login_Token’.
To learn more about the possibilities of Config.json, it’s worth taking a look at the article ‘Gameplay_Config’ in the Unturned fandom wiki.
Step 7: Start your Unturned server
Step 8: Join the Unturned server
You and your fellow players can now connect to the server at any time. To do this, start the game and proceed as follows:
- Click on ‘Play’.
- Select the ‘Servers’ menu item.
- Set the appropriate filters in the lower menu bar and enter the name of your server.
- press the ‘Internet’ button to find your Unturned server using the set parameters.
Make a statement with your own .gg domain and let the games begin. Register your own .gg domain now with IONOS.


