How to host and install a The Front server
Equipped with the appropriate hardware, you can set up your own The Front server in just a few steps. All you need to install the server application is a Windows operating system and the SteamCMD client. Once the appropriate ports have been opened, you and your fellow players can connect at any time.
What are the system requirements for a The Front server?
In principle, you can install The Front dedicated server software on any Windows device, so your private home PC is a possible option for hosting. However, if you decide to host the application in a provider’s data centre instead, you’ll benefit from various advantages such as a better internet connection and specific server hardware. In this case, you can also run your The Front server around the clock without any problems if required.
The specific system requirements result from the number of players who are connected to the game world at the same time. In particular, the amount of RAM required increases with the number of players. The following values can be stated as minimum requirements:
- CPU (processor): 3.2 GHz (3-4 vCores)
- RAM (working memory): 6 GB
- Hard disk storage: 10 GB
The performance requirements of the underlying operating system must also be taken into account. The server application ‘The Front dedicated server’ is currently designed for use on Windows, which is why a Microsoft system is the recommended choice. With the Windows Server 2022, for example, an additional 1.4 GHz processor performance, 2 GB RAM and 36 gigabytes of hard disk space (512 MB and 32 GB without graphical user interface) would be required.
You can use rented server hardware for a wide variety of purposes. Instead of a The Front server, for example, you can host another game with dedicated server, operate a simple web server or set up an FTP server at any time.
How to host a The Front server with IONOS
Server hosting providers usually offer you not only different performance packages, but also different types of servers. This can be confusing, especially in the beginning, which is why the offer from IONOS is limited to the following three options (each with different packages):
- Dedicated Server: If you’re looking for a long-term solution for ambitious hosting, you’ll find it in a dedicated server from IONOS. You get access to dedicated enterprise hardware that’s reserved just for you, can be scaled at any time and is billed by the minute.
- Cloud Server: With a cloud server from IONOS, you rent scalable server performance based on virtualisation (various host systems). This model also gives you the option of scaling the billed-by-the-minute computing power at any time.
- VPS (vServer): The vServers or VPS from IONOS utilise the virtualised computing power of a dedicated host system. You reserve a specific hardware configuration, which comes with a set monthly cost.
Try out your VPS for 30 days. If you're not satisfied, we'll fully reimburse you.
3 The Front server scenarios and the right IONOS package
As we’ve already said, the actual system requirements of The Front dedicated server software are primarily the result of your individual usage (number of players, online times, etc.). For this reason, we’ve compiled five possible multiplayer scenarios below and assigned the most suitable IONOS server package to each.
| The Front server scenario | Suitable IONOS server with Windows |
|---|---|
| 2-4 people; server permanently online | VPS Windows L |
| 5-12 people; server permanently online | VPS Windows XL |
| 12+ people; one or more servers permanently online | Dedicated Server AR6-32 SSD |
Try out your VPS for 30 days. If you're not satisfied, we'll fully reimburse you.
How to create a The Front server for Windows step by step
Once you have decided on a hosting option, you can start setting up your own gaming server. In the following step-by-step guide, we’ve summarised how to proceed in the case of a The Front dedicated server. The hardware used is a server from IONOS (vServer, Cloud Server, Dedicated Server) and the operating system used is Windows Server 2022.
Step 1: Connect with the hosting server
To access the rented resources, you need an active remote connection to the server. You establish this remote access in Windows using the ‘Remote Desktop Connection’ tool installed as standard. All you need is the IP address and login details of the server, which you can find in your customer account. As an IONOS customer, proceed as follows to set up the remote connection:
- Go to your IONOS customer account login page and log in.
- Click on Server & Cloud and select the package you’ve rented to host your The Front server.
- Under Access data you’ll find the IP address of your server (‘Host’), as well as the required login data (‘User’ and ‘Initial Password’).
- Start the application Remote Desktop Connection on your device.
- Log in to the server using the access data. Confirm the certificate if this is the first time connecting.

In the IONOS Help Centre, you’ll find a separate article on connecting to a Windows server via remote desktop.
Step 2: Install SteamCMD
Once you’re connected to the server, you can install applications such as SteamCMD. The command line client is the easiest option to access steam game server applications. The following three steps are necessary to make the tool ready for use:
- Click on the following download link for SteamCMD to download the installation package for Windows.
- Unpack it in any directory such as
C:\SteamCMD. - Execute the file
steamcmd.exeto install the client.
Step 3: Install the Steam app ‘The Front Dedicated Server’
SteamCMD runs automatically after the installation is complete in the Command Prompt window that was started (recognisable by the Steam> input line). If you have closed the window, simply click on steamcmd.exe again to restart the client.
To download and install the server app for The Front, the first step is to connect to the public Steam servers by executing the following command:
login anonymousAfter logging in, specify an installation directory. For the C:\the-front-server directory, for example, send the following command:
force_install_dir C:\the-front-serverFinally, download and install the Steam app ‘2612550’ (The Front Dedicated Server) using the command app_update:
app_update 2612550 validate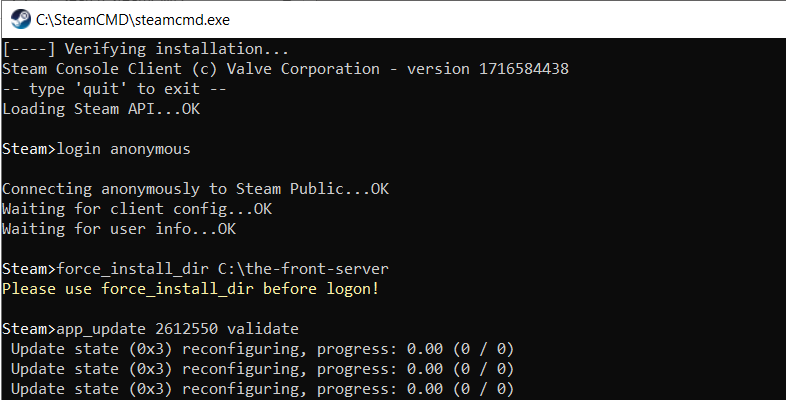
After successful installation, close SteamCMD with the command quit.
With the command app_update 2612550 validate, you can update your The Front server at any time, provided that the development team has released a new version.
Step 4: Open the ports
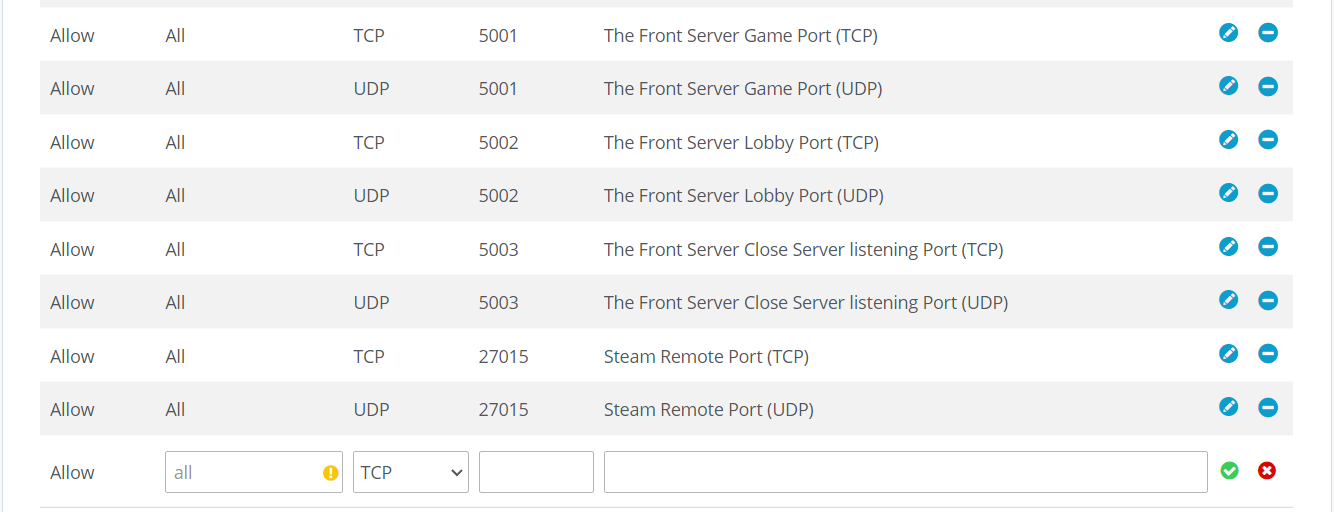
To make your server available online, you must enable the appropriate ports in the firewall. In the case of The Front, these are the following TCP/UDP ports:
- 5001: Game Port
- 5002: Lobby Port
- 5003: Close Server Listening Port
- 27015: Steam Remote Port
You can manage this directly in the IONOS customer account as follows:
- Log in to your IONOS customer account via the login page.
- Click on Server & Cloud and select the package on which you have installed The Front dedicated server.
- In the menu on the left, select the entries Network and Firewall policies one after the other.
- Create new rules for the TCP/UDP ports 5001, 5002, 5003 and 27015 under ‘Incoming’.
Step 5: Configure The Front server
The settings of a The Front dedicated server can be customised via the ServerConfig_.ini file. However, this file does not yet exist in the directory on your rented server after installing the dedicated app. The easiest way to solve this problem is via the normal The Front installation on your PC. Here you can create a new server configuration via the client and then transfer the generated files to the rented server at IONOS. The individual steps are as follows:
- Start The Front via the Steam client.
- Click on Create dedicated server in the main menu to start the tool named ‘The Front Manager’.
- Create the desired settings for your The Front server, such as the server name, ports or player limit.
- If you want to make more detailed adjustments to the gameplay, simply switch to the respective tabs such as ‘Adv. server settings’, ‘Survival’, ‘NPCs’ or ‘Combat’.
- As soon as you have created all the desired settings, click on Start server.
- In the The Front manager folder that then opens, copy all files with the exception of the ‘data’ and ‘plugins’ folders using
Ctrl+c. - Switch back to the rented server and paste the copied files into the directory of the created The Front server using
Ctrl+v.
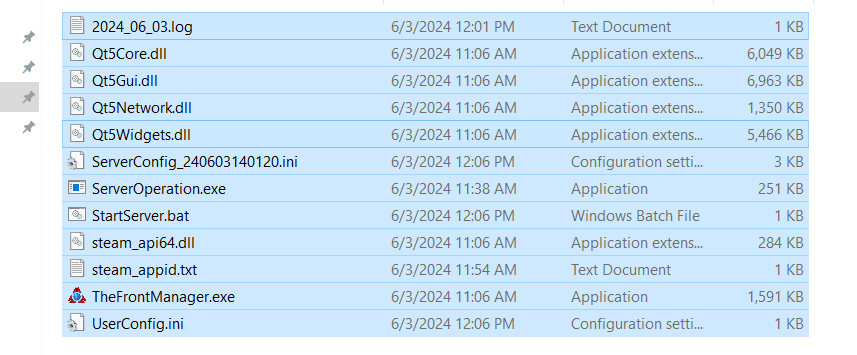
Among other things, the file StartServer.bat should now be located in the directory on the server. In this script for starting The Front server, the following three final adjustments are required to complete the configuration:
- Path of the start file: The second entry in even quotation marks
"..\WindowsServer\ProjectWar\Binaries\Win64\TheFrontServer.exe"currently still refers to the start file in the folder on your PC. Replace the correct path on your server (it should be".\ProjectWar\Binaries\Win64\TheFrontServer.exe"). - IP address: Search for the item
-OutIPAddress=and enter the IP address of the rented server here (to be found in the customer account). - User directory: The following entry
-UserDir=must also be adapted. Here you enter the storage directory, although you must first create this individually on your server.
Don’t forget to save the changes to the file before you close StartServer.bat.
Step 6: Start your own server for The Front
You can now start your own The Front dedicated server at any time using the start script. To do this, simply double click on StartServer.bat and confirm the server settings presented in the command prompt window. The loading process will then start, which may take a few minutes depending on performance.
Step 7: Connect with The Front server
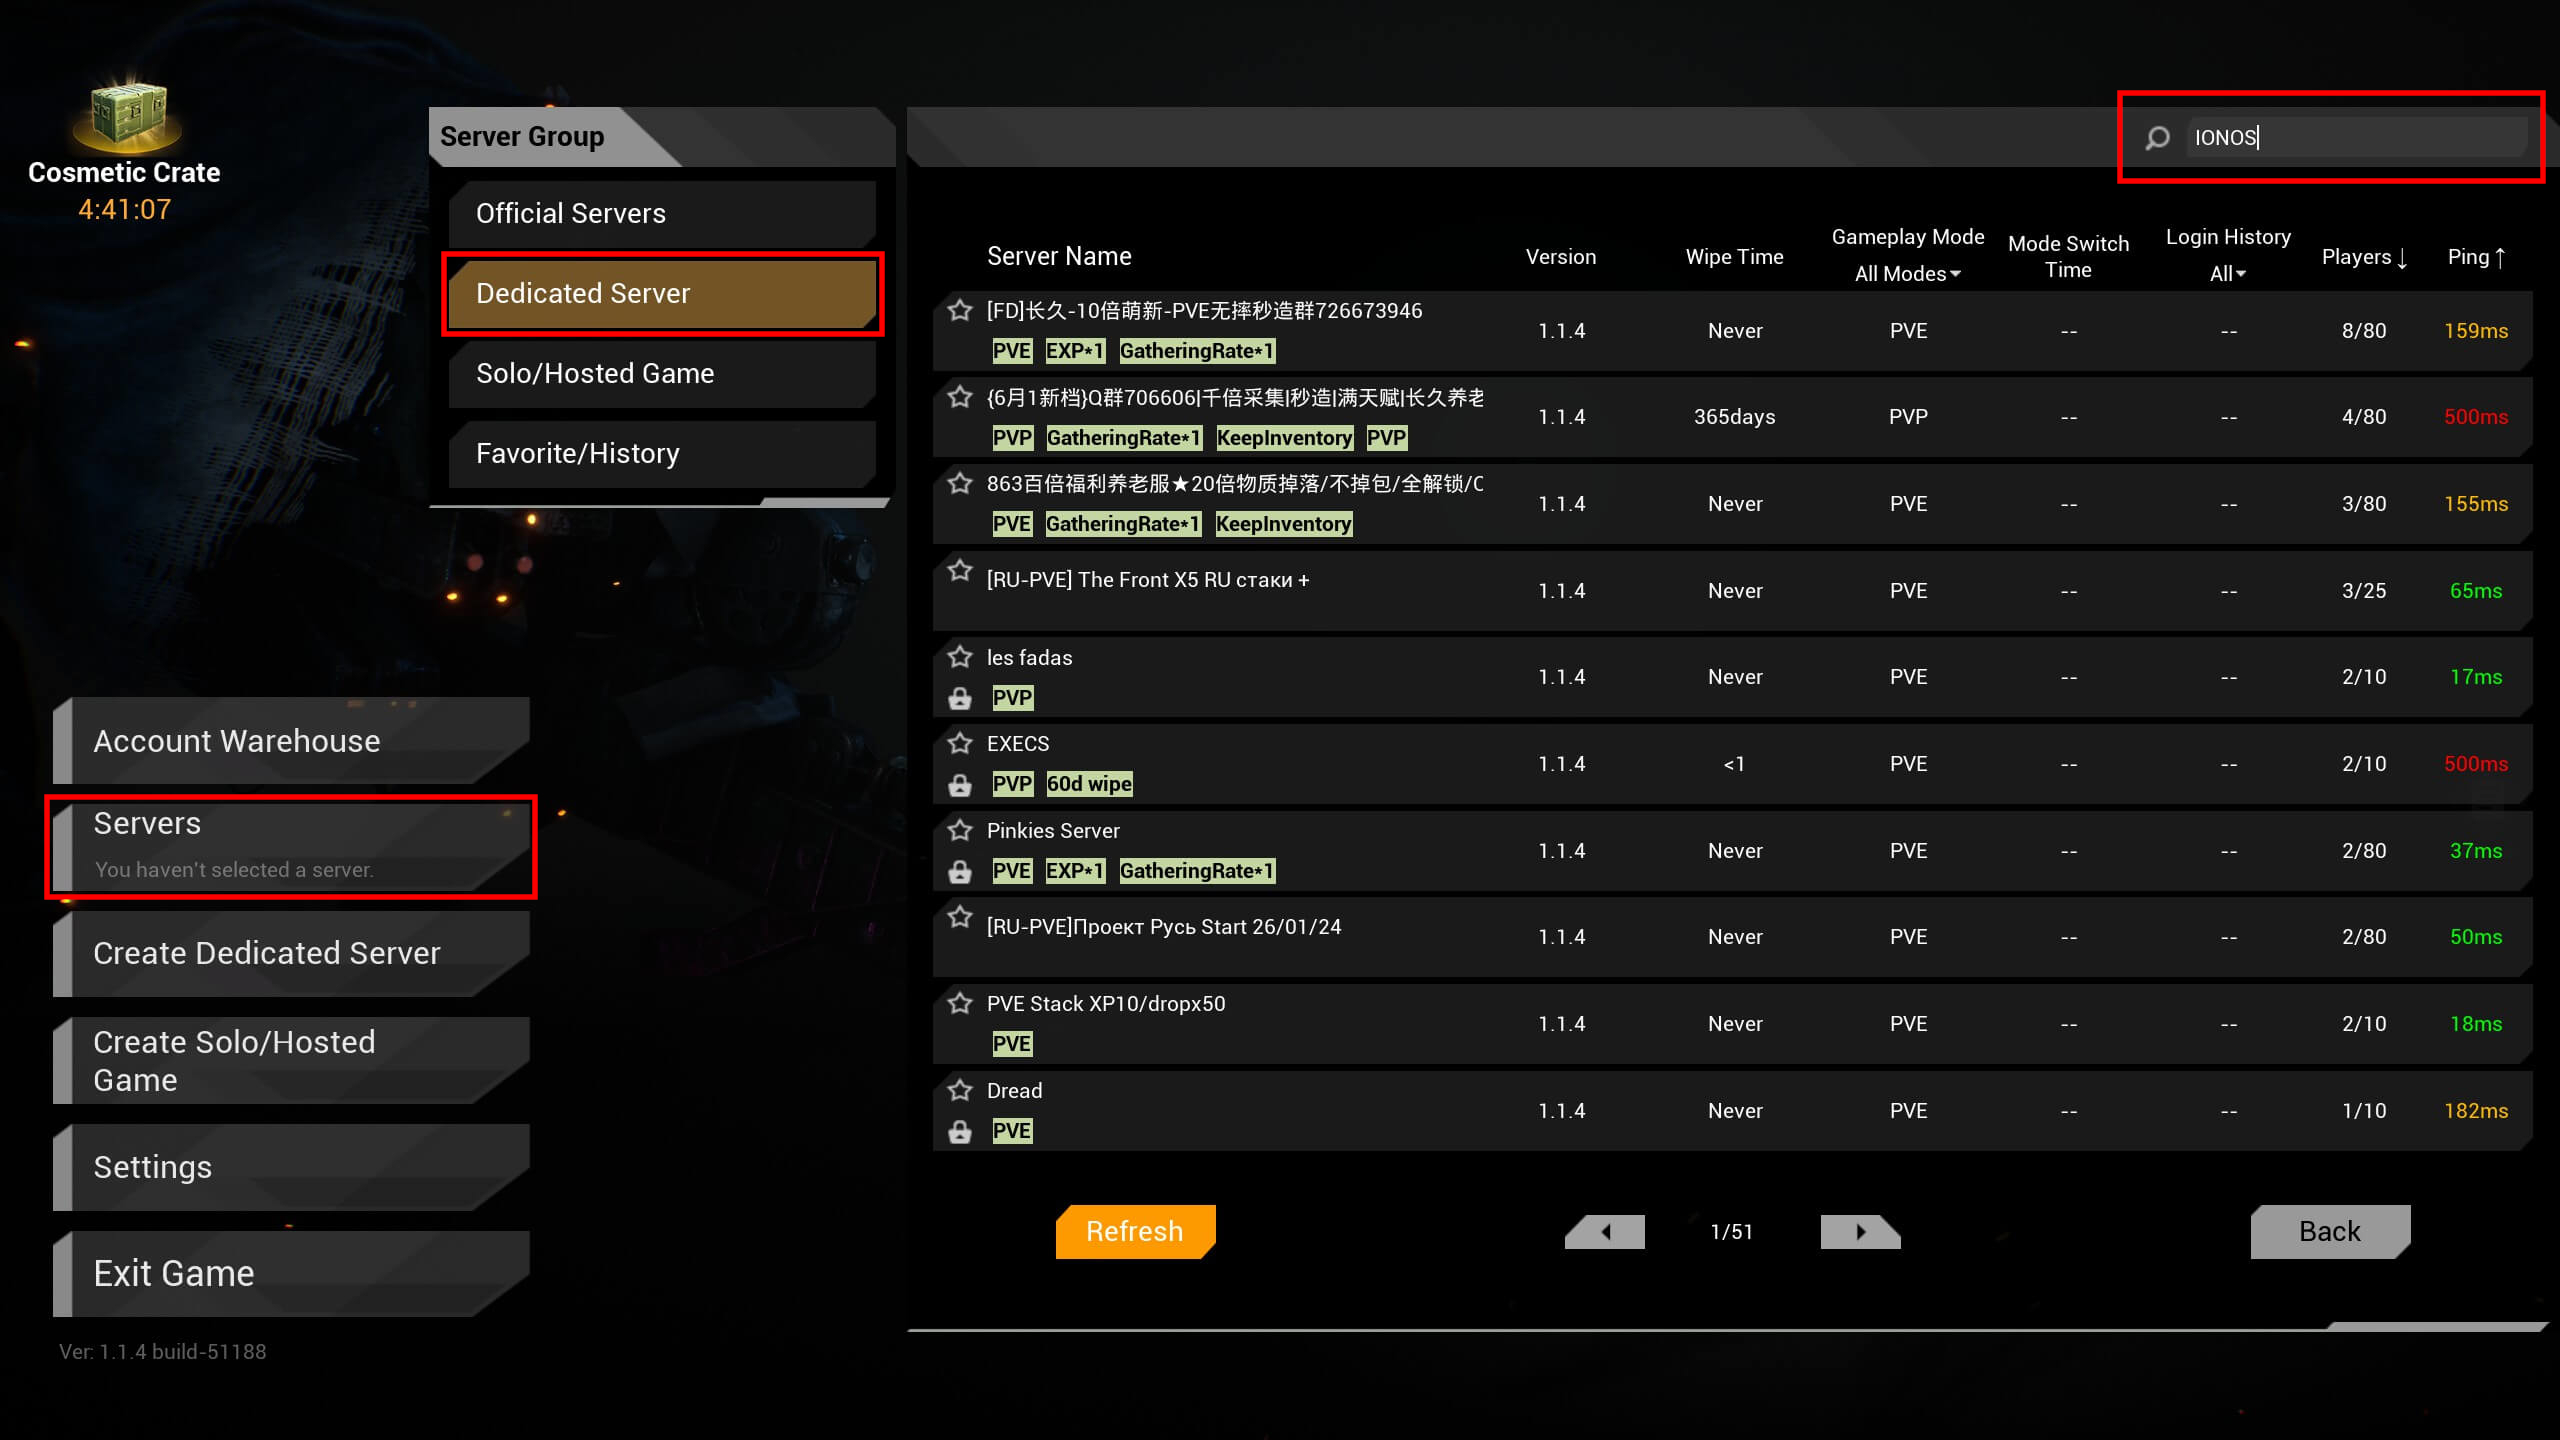
You now have the option of connecting to your created server at any time. To do this, simply start the game and carry out the following steps:
- Click on Servers.
- Under Server Group, select the option Dedicated Server.
- Click on Refresh to update the list of available The Front dedicated servers.
- Use the filter function to search for your server and click on the appropriate entry to establish the connection to the The Front server.
Now, nothing can stop you from embarking on your personal adventure in the world of The Front!
Do you want to give your rented server an individual touch? Simply register your own web address, for example under the .gg domain. This way you can replace the cryptic IP address with an easy-to-read, meaningful name!

