How to host your own Space Engineers Server
At the latest since the release of the final version on February 28, 2019, the sandbox computer game Space Engineers has thrilled space fans worldwide. Whether an asteroid field or an alien planet - the diverse game worlds offer hobby space engineers plenty of adventures and surprises. If you want to explore the game together with friends and acquaintances and enjoy maximum freedom, you should play Space Engineers on a dedicated server.
What are the requirements of the server software, and how can you host your own dedicated Space Engineers server?
Thanks to free starting credit, you can test the IONOS cloud server for 1 month free of charge (or until the credit is used up) and experience the perfect combination of performance and security!
Space Engineers: Host a server on your own PC or rent it?
If you want to play Space Engineers together in multiplayer mode online, you have three options:
- Join a community or public dedicated Space Engineers server.
- Host a server on your own PC
- Host a server on external server hardware
The simplest solution for a shared Space Engineers adventure is undoubtedly the first option: You choose a suitable, freely accessible server and join it together, without having to worry about hosting. However, in this case you won’t have any decision-making power about the game world’s texture or the use of mods. Besides, you won’t have control over whether and when the server is online.
The latter problem also exists in option number two: If you host the game on your own PC, the Space Engineers server will only be available when your device is turned on. Besides, since the technical requirements are very specific, due to many moving and interacting objects with real-time physics, it requires a very powerful PC, even if you plan to only have two to four players.
To achieve an optimal gaming experience when hosting a Space Engineers server, it is therefore recommended to use external hardware resources, which you can rent from various hosting providers for a monthly fee.
If you host your Space Engineers server with a provider, you also have the option of linking your server to an individual Internet address. If you are interested, you can register your desired register domain today at IONOS to make your server even easier to find later on using the search and filter function!
The system requirements of a Space Engineers dedicated server at a glance
A dedicated server is the best possible solution for long-term multiplayer adventures. The server is independent of individual players and also has the advantage of running without rendering and video and sound effects. This favours excellent connection and top performance with low server lag.
Unlike, for instance, a LS-22 server, you don’t have to purchase an additional license to host a Space Engineers dedicated server.
Nevertheless, due to the complexity of the game, which results from the high rate of movement and interaction of objects, among other things, the hardware requirements should not be underestimated. The developer Keen House Software recommends the following minimum setup on the official website:
- Processor: 3.2 GHz (3 logical cores)
- RAM: 6 gigabytes of RAM
- Bandwidth: 5 Mbps
If you want to run a Space Engineers server with the maximum limit of players recommended by Keen House Software (16 players), you should take the hardware setup a step further:
- Processor: 4.5 GHz (3 logical cores)
- RAM: 10 gigabytes of RAM
Windows is preferable as operating system, because the Space Engineers dedicated server
requires that the Microsoft tool collection .NET Framework (4.6.1 or later) and the 2013 and 2017 packages of the compilers Visual C++ are installed.
If you want to create your dedicated Space Engineers server on Linux, you can do so despite the Microsoft tools mentioned. But you need a Windows compatible runtime environment like Wine for this.
Space Engineers server hardware at IONOS: These are the options
Finding the appropriate environment for hosting your own Space Engineers server is not that easy. Although various providers offer corresponding hosting services - it is not so easy to keep track of the large range of server and cost models. At IONOS you can choose from the following three server models, for each of which there are also different packages:
- vServer (Virtual Private Server, VPS)
- Cloud Server
- Dedicated Server
The server hardware from IONOS is not only best suited for hosting Space Engineers! Also other gaming servers like a dedicated ARK server or a Valheim server can be created and operated on the basis of the certified, fail-safe computing resources.
How do the three IONOS server solutions differ?
The three IONOS server models mentioned above differ on the one hand in terms of pricing structure, and on the other hand in the way the resources are made available to customers. Regardless of the chosen model, an external broadband connection of the server with up to 400 Mbit/s is guaranteed. In concrete terms, the three variants differ in the following points:
When renting a vServer you get access to virtualised resources - so you share the underlying hardware with other customers, whereby this does not mean any loss in terms of performance. The booked computing power is billed monthly at a fixed price.
The Cloud Server model also gives you access to a virtualised server environment. Since this model is billed by the minute, you only pay for the service that you have actually used.
Profit from powerful, maximally scalable hardware resources and professional 24/7 support today by renting your individual Cloud Server package from IONOS!
If your choice falls on a Dedicated Server, you rent hardware that is entirely yours to use. The biggest advantage about this model, however, is the strong single-core computing power (up to 3.8 GHz), which plays an important role in the performance of a Space Engineers server - unlike, for example, a Minecraft server. However, the performance level is also noticeably reflected in the price.
Space Engineers Server: Three scenarios and matching IONOS packages
As mentioned above, each of the three server models is available from IONOS in different packages, which differ in terms of performance capacity and price. For an optimal start, we have compiled three possible examples for a Space Engineers dedicated server in the following table and assigned matching packages for vServers, dedicated servers, and cloud servers from IONOS.
| Minimum requirements (incl. operating system) | Recommended vServer | Recommended Dedicated Server | ||
| Space Engineers server for 2 players | 3.2 GHz (min. 4 cores), 8 GB RAM, 50 GB disk space | IONOS Virtual Server Cloud XL (VPS XL) | IONOS Dedicated Server AR6-32 HDD | |
| Space Engineers server for 3-6 players | 4.1 GHz (min. 4 cores), 12 GB RAM, 70 GB disk space | IONOS Virtual Server Cloud RAM L (VPS L RAM) | IONOS Dedicated Server AR6-32 HDD | |
| Space Engineers server for up to 16 players | 4.5 GHz (min. 4 cores), 16 GB RAM, 100 GB disk space | IONOS Virtual Server Cloud RAM XL (VPS XL RAM) | IONOS Dedicated Server AR8-64 HDD |
In the minimum scenario requirements, Windows Server 2019 was calculated as the operating system. The Microsoft system requires a 1.4 GHz processor (64-bit), 512 MB or 2 GB of memory, and 32 or 36 GB of hard disk space (without or with graphical interface, respectively).
Create a dedicated Space Engineers server: Step-by-Step Tutorial
Once you have decided on a hardware setup and received the access data, you can finally venture into the creation of your own Space Engineers server. In the following tutorial we show the steps required for this as an example for IONOS customers (vServer, Cloud Server, Dedicated Server).
Rent your Dedicated Server from IONOS today to experience adventures together in Space Engineers!
Step 1: Connect to the rented server
To access the hardware of your future Space Engineers server, the first step is to set up and establish a remote connection. IONOS customers can do the configuration comfortably via the Cloud Panel. To use the browser-based customer portal, simply access the Login page and log in with your individual customer data.
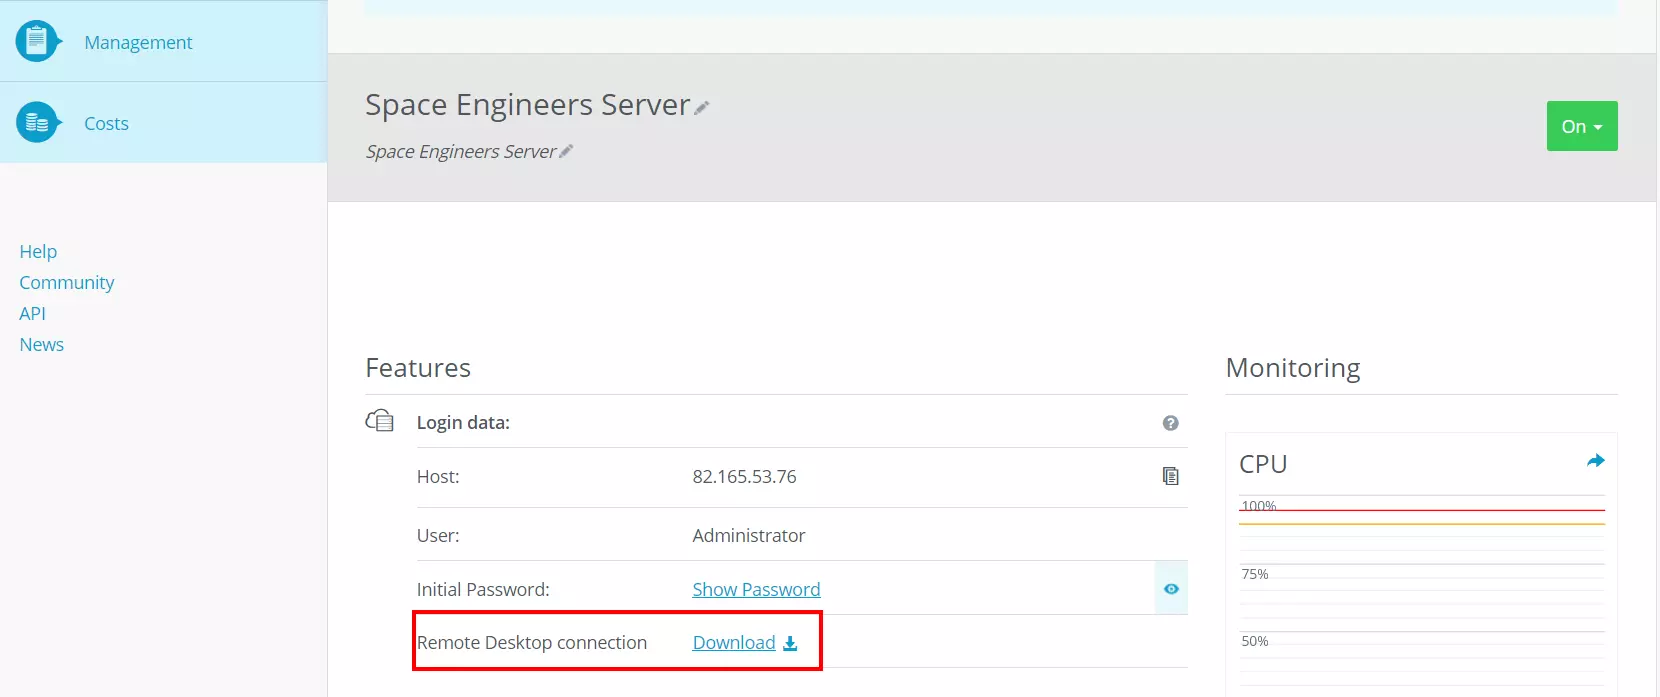
On the start page of the Cloud Panel, access the ‘Server & Cloud’ section. After that, you can select the hardware setup you have rented for hosting the Space Engineers dedicated server. The following page presents you with the most important key data about the server. Under ‘Access data’ you will find, among other things, the entry ‘Remote desktop connection’ including a download button.
Click the link and keep the ‘Open with’ option. If you are just setting up and establishing the remote connection, a security note will be displayed. Continue the configuration process by clicking on ‘Connect’.
Finally, enter the credentials for your Space Engineers server. Click on ‘More options’ and ‘Use another account’ and enter the individual credentials there. If you have not yet customised the credentials of your IONOS server, you will also find the automatically generated startup data on the overview page of the server data in the Cloud Panel - under ‘Users’ and ‘Initial Password’.
When establishing the connection for the first time, you must first classify the server’s certificate as trustworthy. To do this, press the ‘OK’ button on the security warning that appears. Also, tick the ‘Do not ask for connections with this computer again’ box so that the message will not be displayed on subsequent connection attempts.
Step 2: Install Space Engineers server via Steam client.
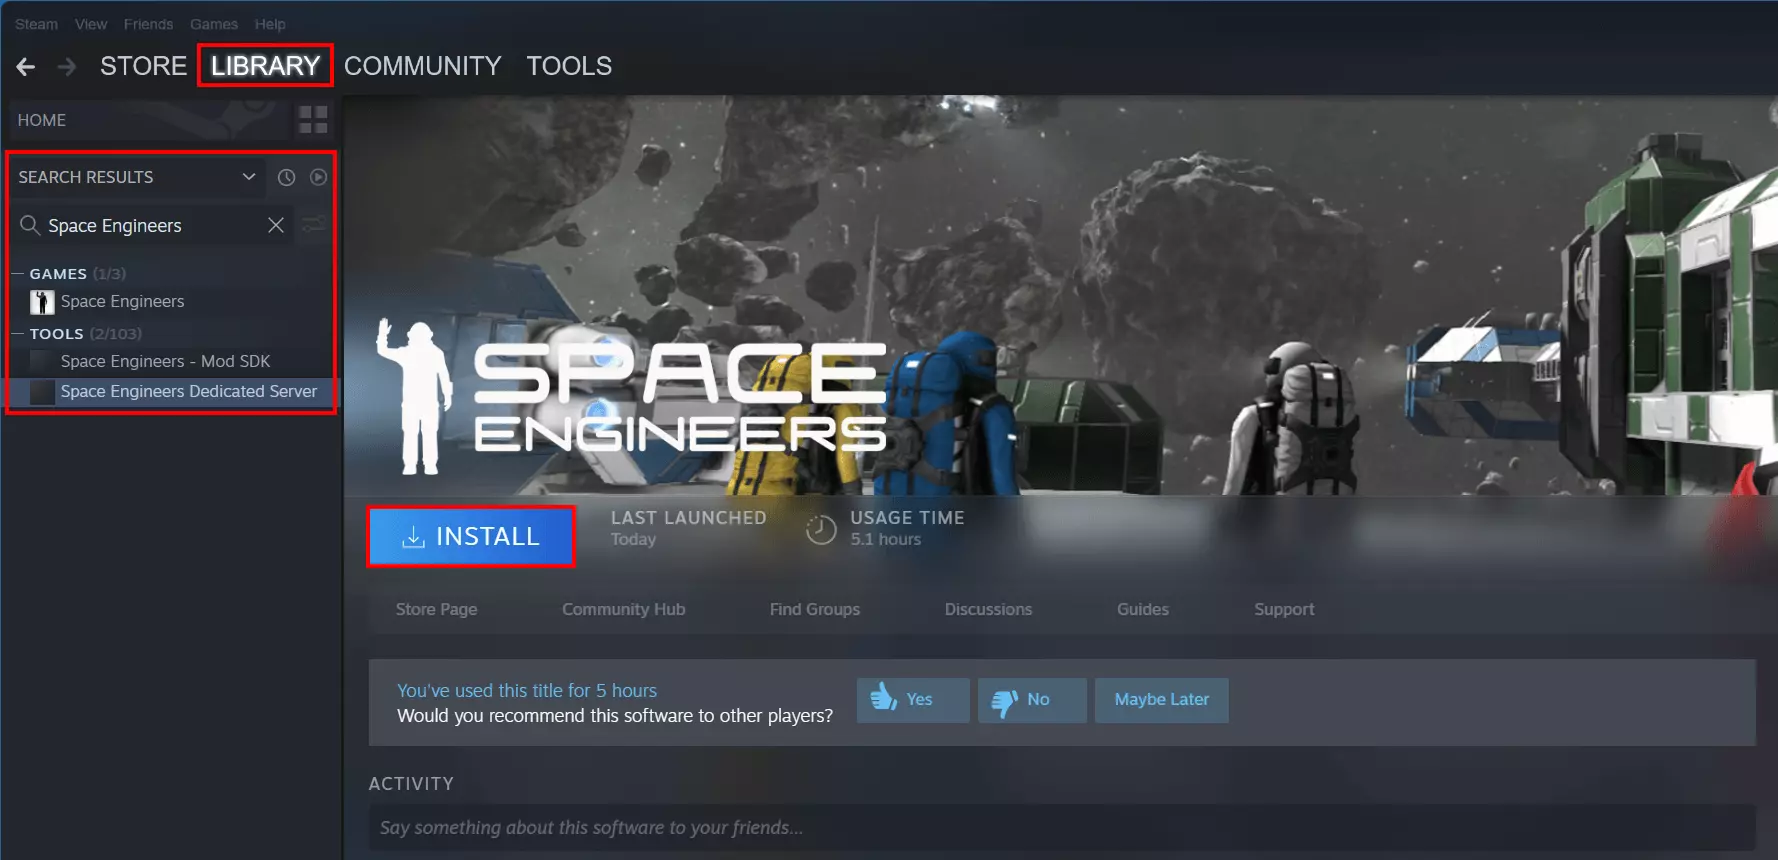
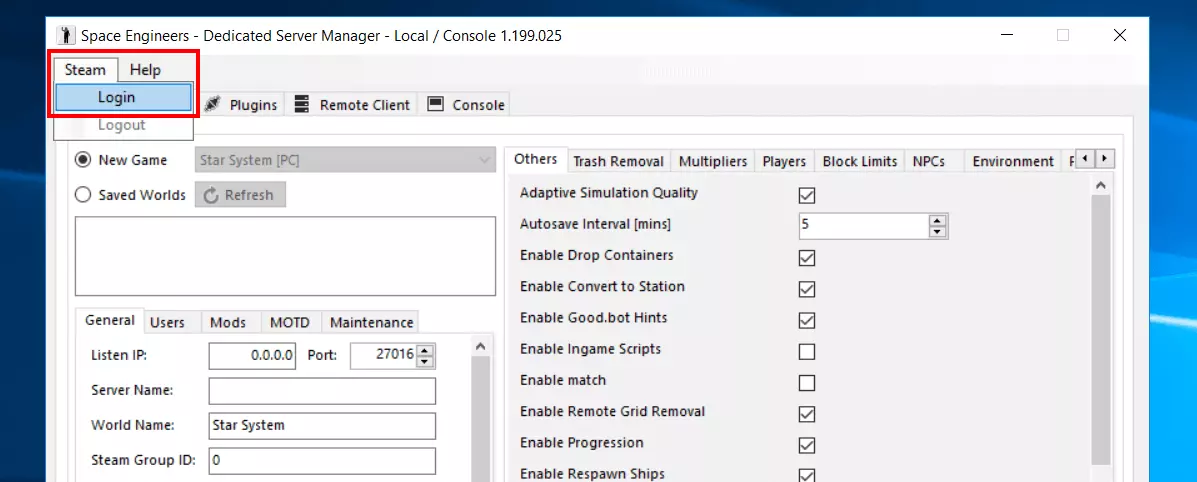
Once the connection to the server is established, you can install the dedicated server software. For owners of a valid license of Space Engineers, the easiest way to do this is via the Steam Client. So install the application on the server as well, and then log in with the Steam account you purchased Space Engineers on. After that, proceed as follows:
- Go to the ‘Library’.
- Open the drop-down menu at the ‘Games’ entry.
- Put a tick next to ‘Tools’.
- Search for ‘Space Engineers Dedicated Server’.
- Left-click on the appropriate match.
- Install the Space Engineers server application using the ‘Install’ button.
Step 3: Start Space Engineers server
At the same point in the Steam client, you can run the Space Engineers dedicated server software following the installation by pressing the ‘Start’ button that is now available. The client will subsequently automatically ensure that any additional software required to host the server is downloaded and installed (such as .NET framework).
When you start your Space Engineers server via the Steam client, it will also automatically check if there are any new updates for the application.
Step 4: Create or select server instance
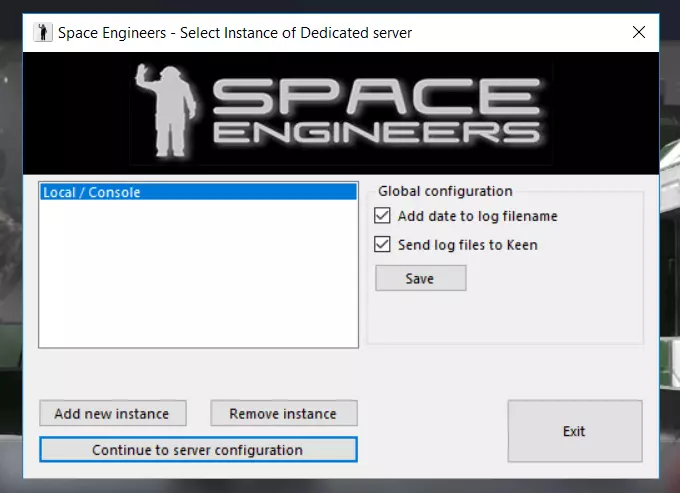
Before you get into the deeper configuration, you can specify in the ‘Global configuration’ section whether the server’s log files should be timestamped and sent to the developer Keen House Software.
With ‘Local/Console’ there is a predefined instance available, which is always executed in the foreground and is perfectly suited for your first own Space Engineers adventure. Alternatively, the ‘Add new instance’ button allows you to create additional server instances, but each will run as Windows services in the background.
New instances also appear in the small overview window after creation. Select the preferred solution by left-clicking and press ‘Continue to server configuration’ to create the configuration for your dedicated Space Engineers server.
Step 5: Define settings for game world, plugins, and mods
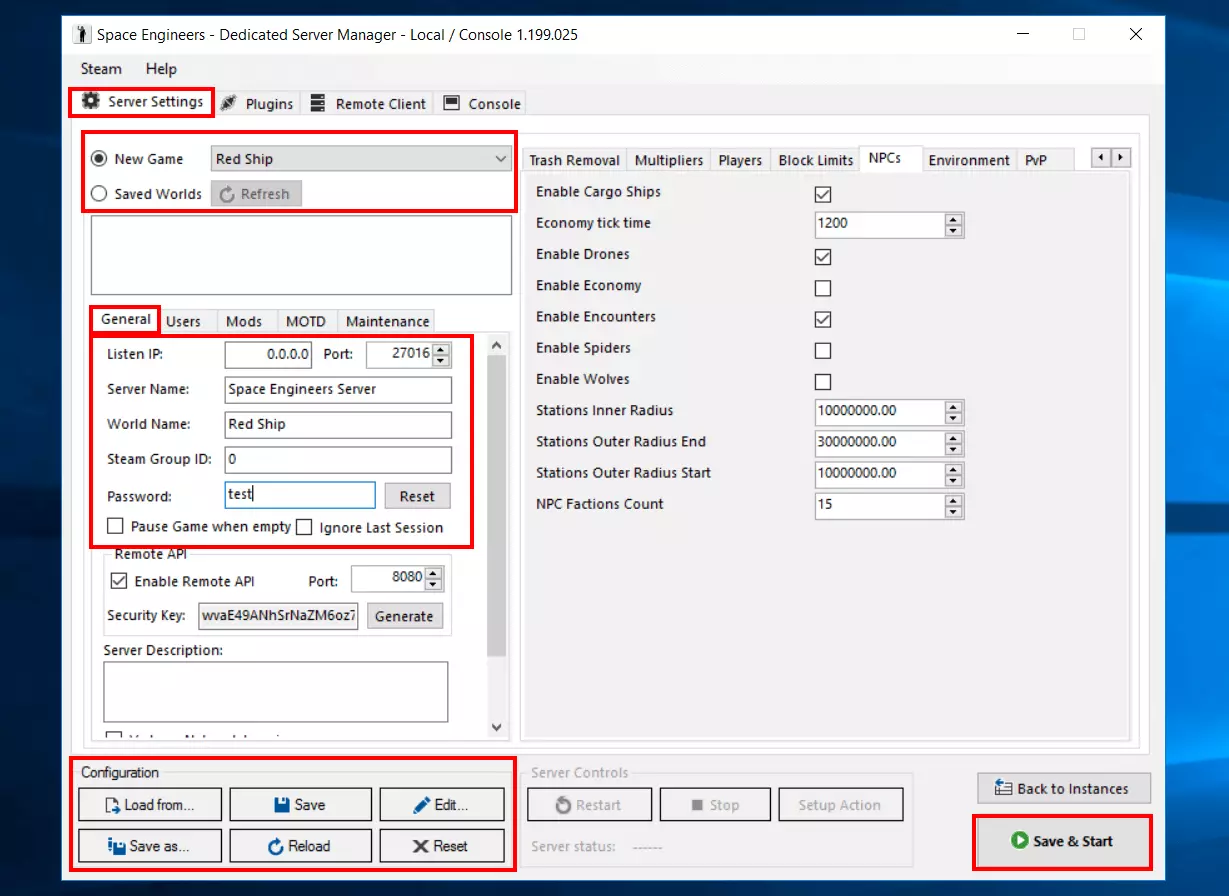
The four main features of the server manager are as follows:
- Server Settings: In the Server Settings you make all the important decisions for the nature of your Space Engineers server. On the one hand this concerns technical settings like the port, update intervals or automatic server restarts. On the other hand, you define all relevant game settings here.
- Plugins: The plugin menu allows you to install and manage extensions server-side.
- Remote Client: The Remote Client allows you to manage your server without having to connect to it directly for this purpose. At a glance, you can get information about the status of the server as well as an insight into the chat, active players, objects, and much more.
- Console: In the ‘Console’ tab you can view the output of the console of the running server.
The important parameters for the first start can be found in the Server Settings. First, select whether you are creating an entirely new dedicated Space Engineers server (‘New Game’) or using an existing save state (‘Saved Worlds’). With the former option, you also have the choice between the different available worlds - whether scenario, star system, alien planet, or empty world. In the ‘General’ tab, you can also assign a name and password for your server and choose whether or not the game should be paused in case there are no active players.
In the right window you can go wild and define individual values for PvE, PvP, game world, etc. As soon as you have defined the desired server configuration, you can save the setting via the ‘Save’ button. You can also import complete configurations at the same point. As soon as you have configured all settings, start the configured server via ‘Save & Start’.
After starting the server, you can shut it down at any time by clicking the ‘Stop’ button (found under ‘Server Controls’). To the left of this button you will find the ‘Restart’ button if you just want to reboot.
Step 6: Release UDP port 27016
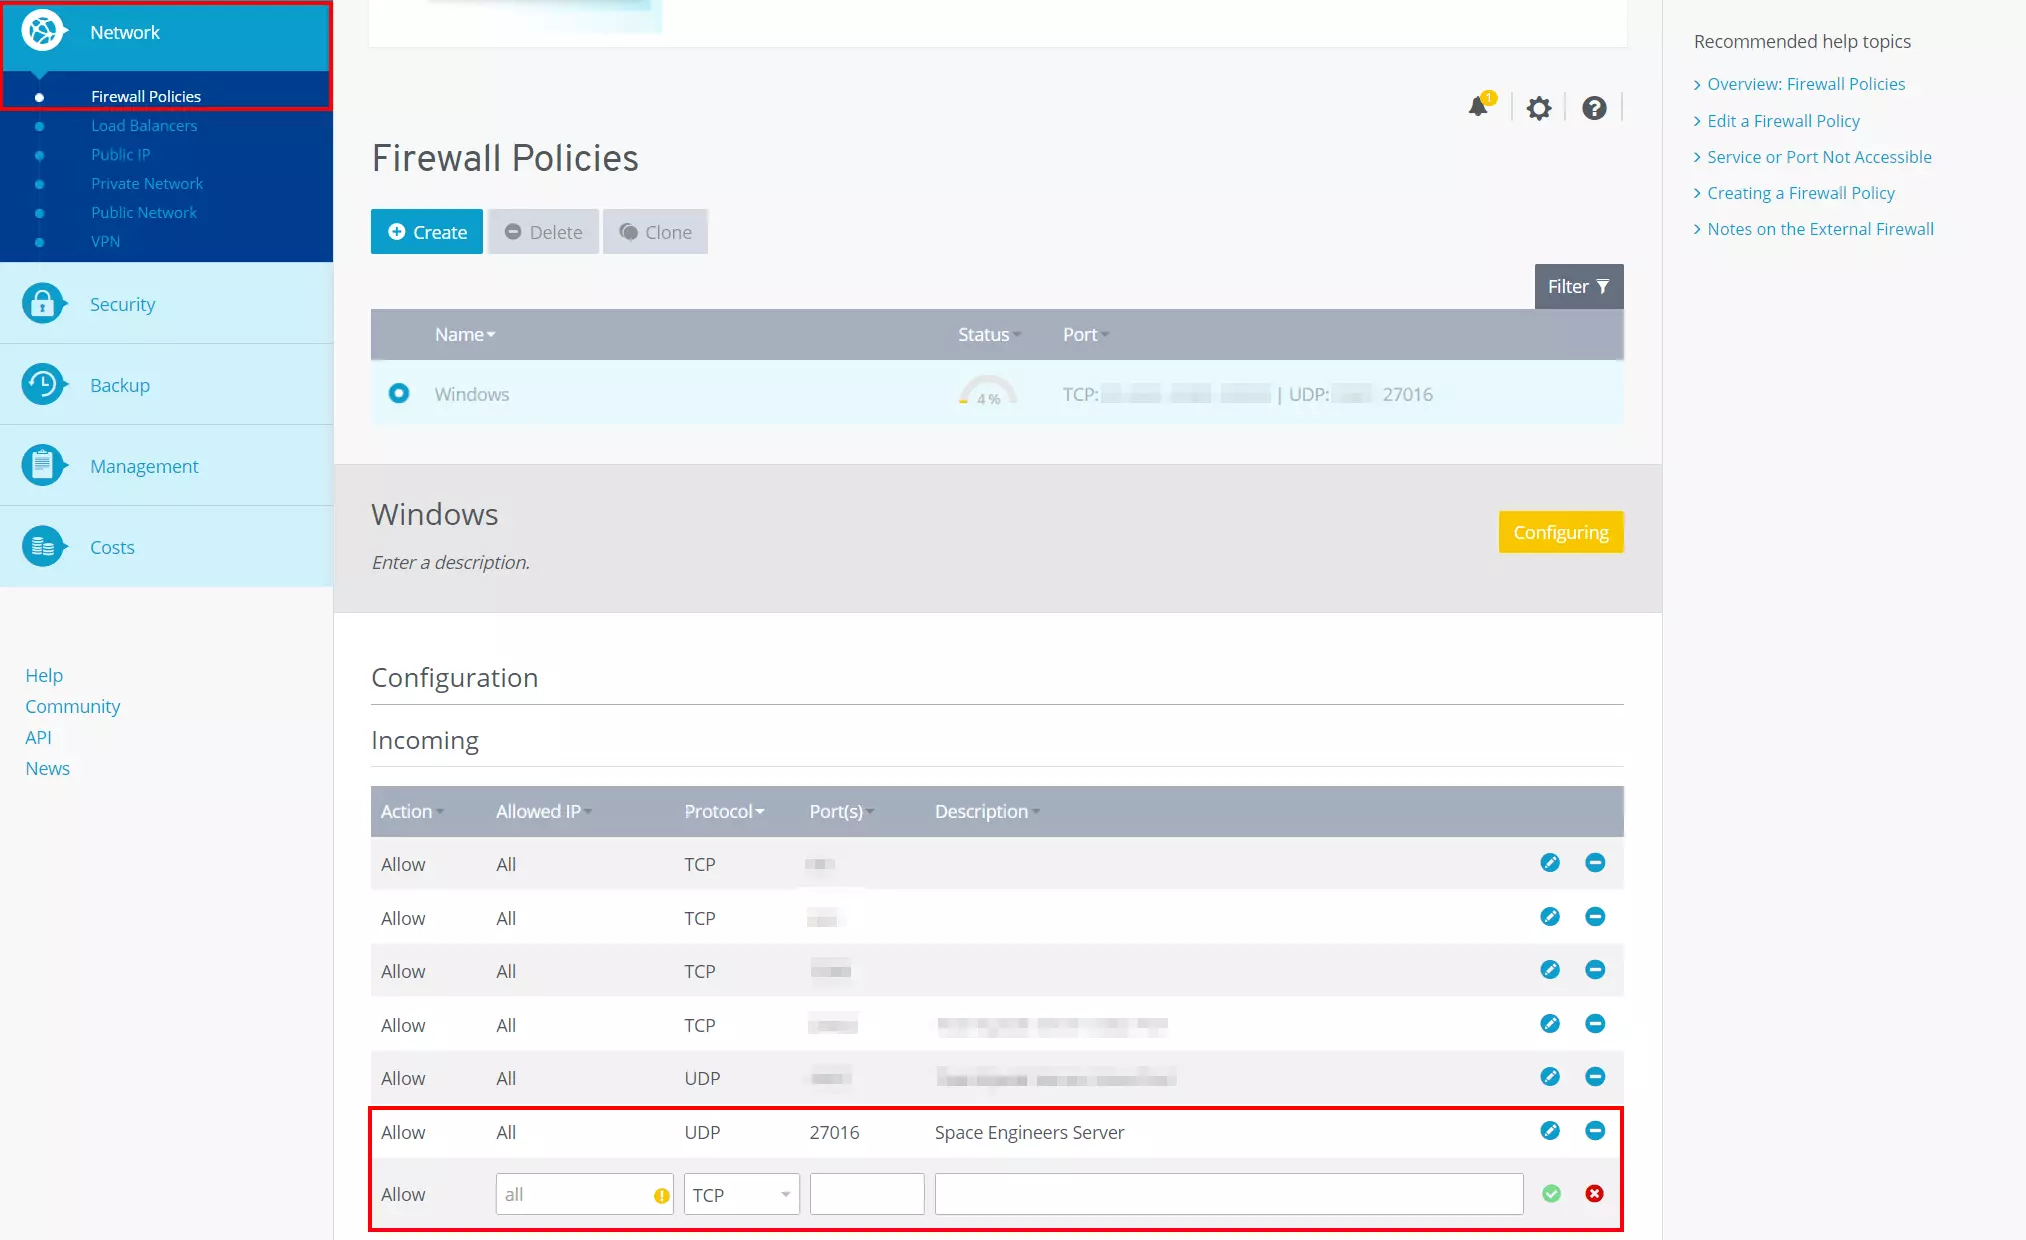
Once the game world has been generated with the desired settings, it is time to make the server available or accessible to other users on the Internet. In the case of the created Space Engineers server, this requires opening the incoming data traffic via UDP port 27016. If you have assigned another port during the configuration in the Server Settings (‘General’ -> ‘Port’), enable the corresponding port number in this step.
To enable a port, set up a suitable rule for the server’s firewall - IONOS customers can do this conveniently via the Cloud Panel:
To do this, log in with your data and access the ‘Server & Cloud’ section already familiar from the first step. After selecting the server environment, go to the items ‘Network’ and ‘Firewall Policies’ in the left side menu one after the other. Select the Space Engineers server and add the rule for UDP port 27016 under ‘Inbound’.
The port release may take a few minutes to complete. IONOS customers can see the progress of the configuration under ‘Status’ in the Cloud Panel.
Step 7: Establish connection to the server
Once the Space Engineers server is created and started and the port is enabled (may require a reboot), you and other users can connect to the server. To do this, start the game on your device and select ‘Join Game’ from the main menu.
As mentioned, you do not need an additional license to host the Space Engineers dedicated server via Steam. However, to log in on your device, you will need to disconnect the server-side login in the Steam client. This is basically no problem - but note that the server manager remains open as well!
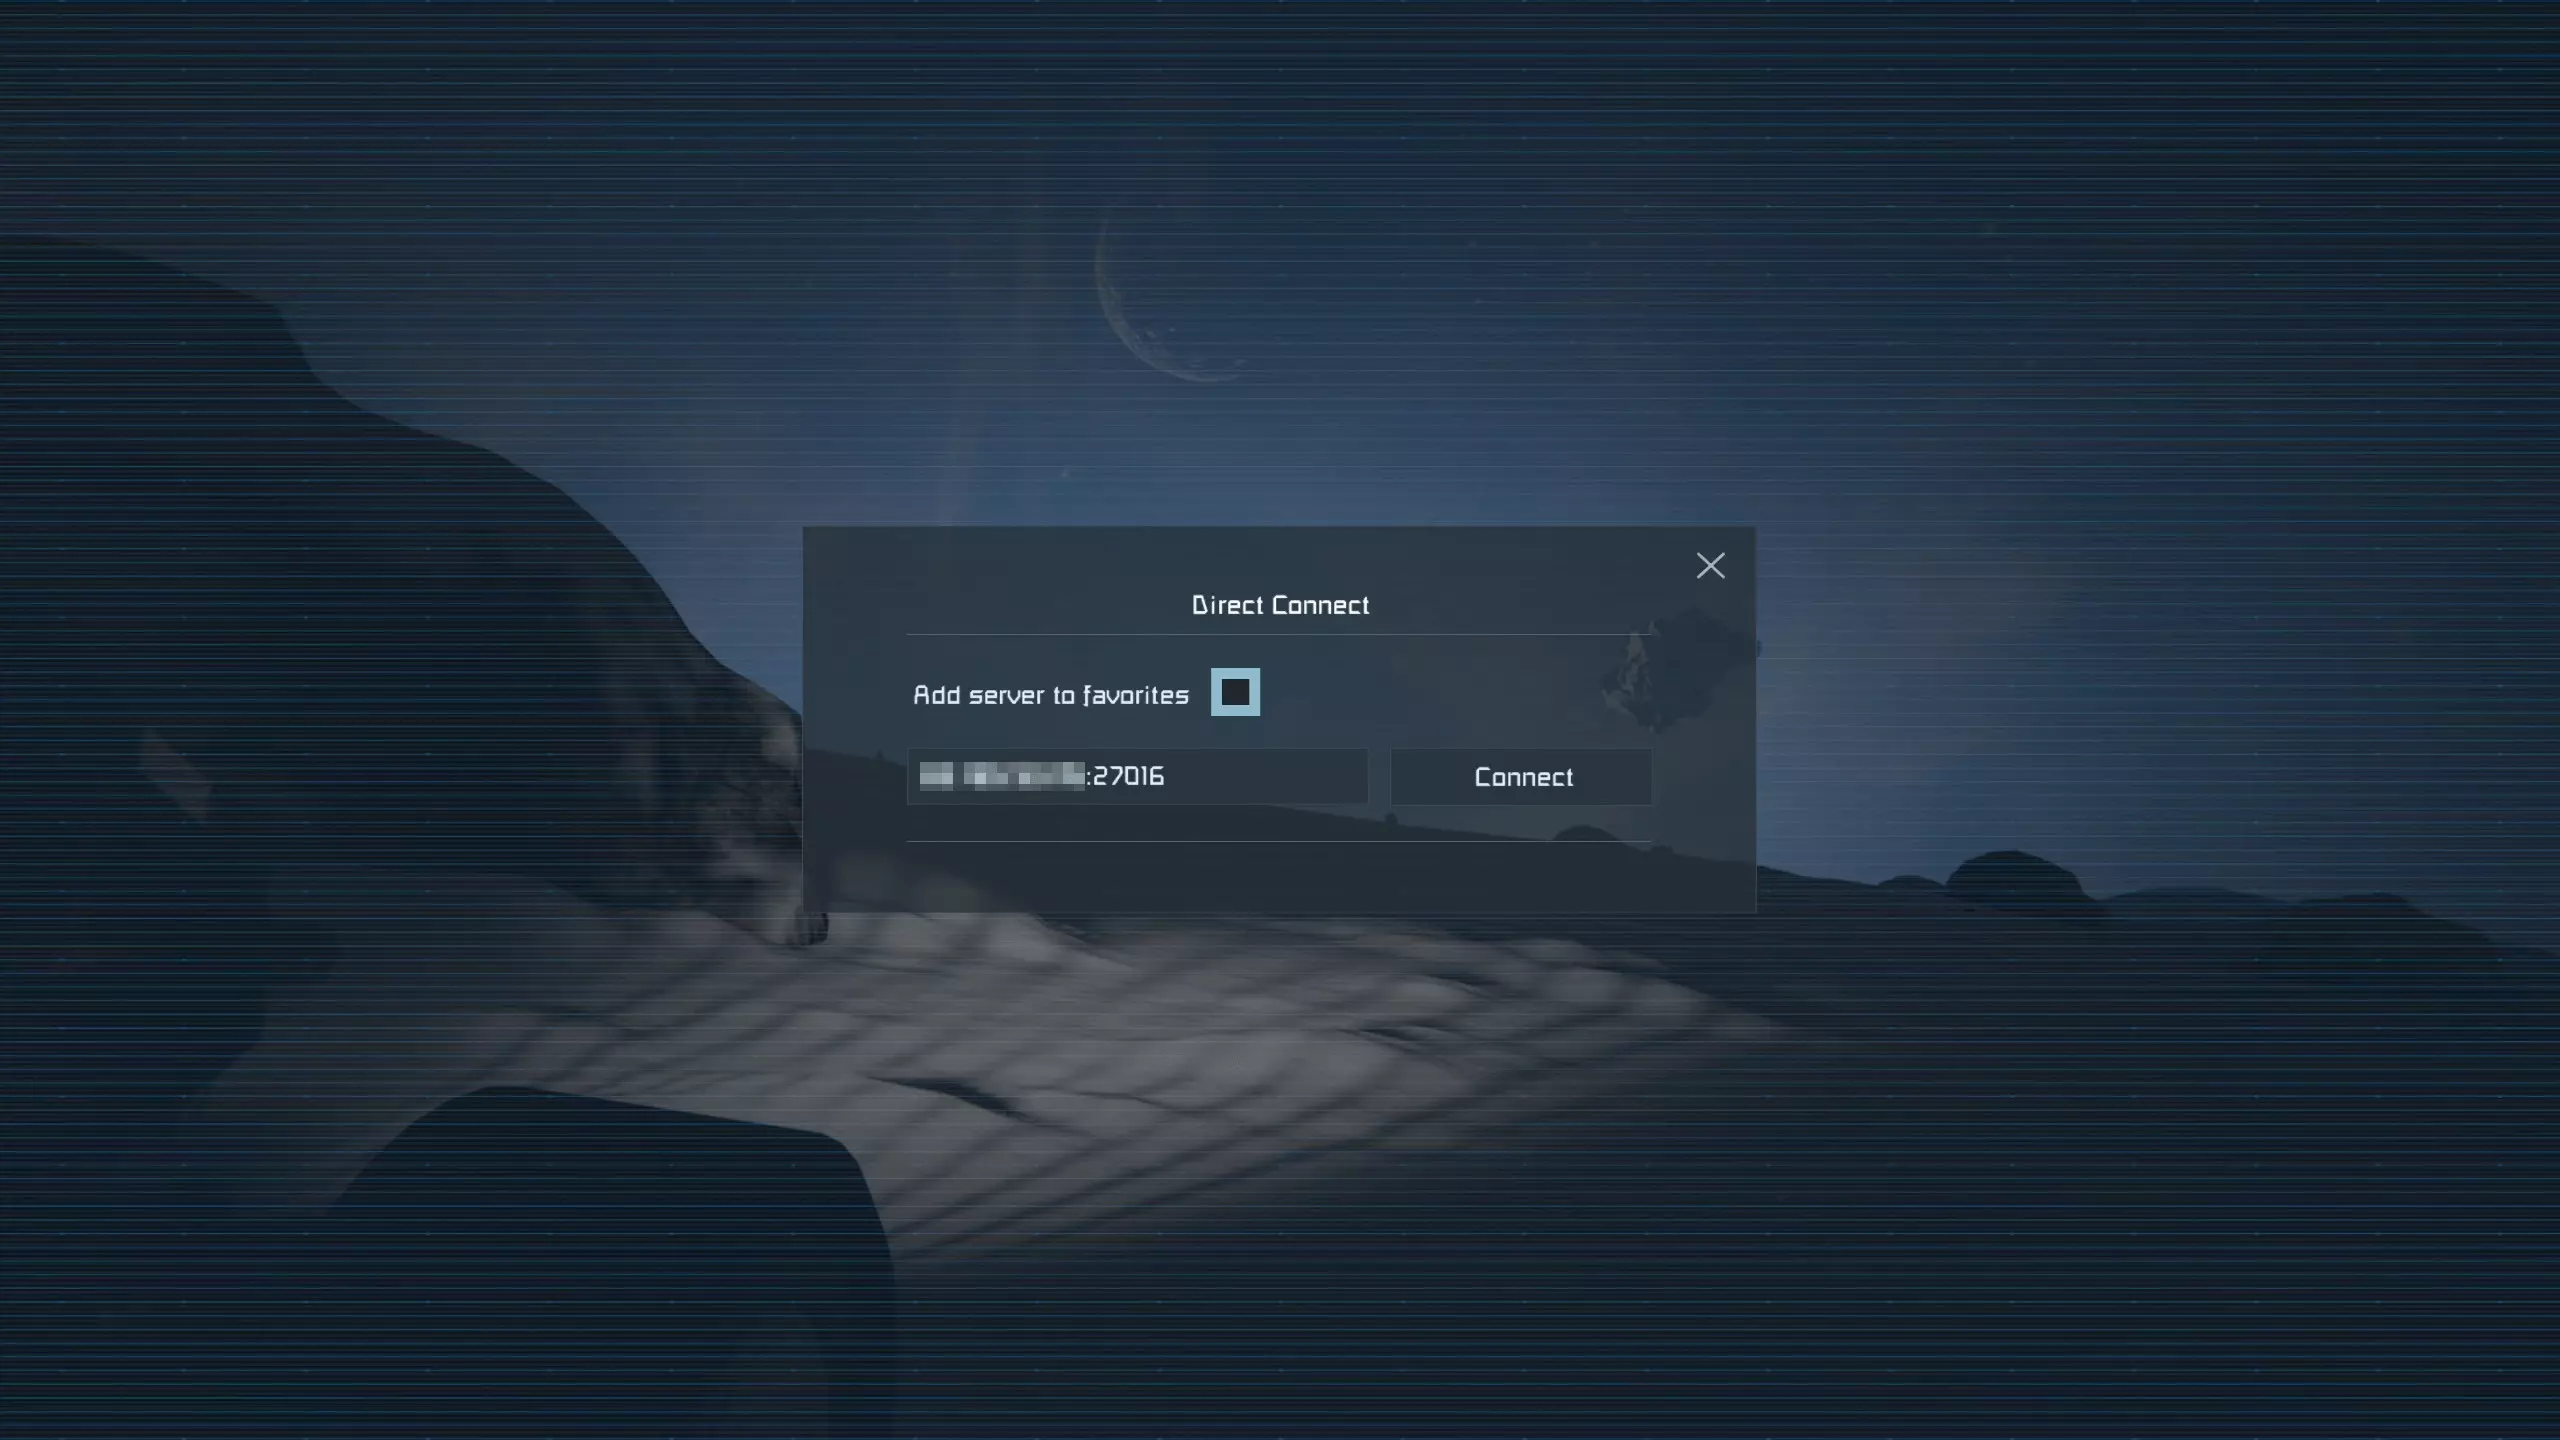
Next, look for your server in the listing (‘Servers’ tab) or press the ‘Direct Connection’ button. With the latter option, you only need the IP address of the server to establish the connection. Note that the previously released port must be appended to the address, preceded by a colon.
Tick ‘Add server to favorites’ to save the address and retrieve it from favourites when you try to connect later.
Make a statement with your own .gg domain and let the games begin. Register your own .gg domain now with IONOS.


