How to create a Skyrim Together server
The Skyrim Together Reborn mod lets you enjoy the open-world fantasy game in a multiplayer setting. If you prefer not to utilise publicly available servers, hosting your own Skyrim Together server is an option, assuming you have the appropriate hardware setup.
Should you host a Skyrim Together server on your PC or in a data centre?
With a self-hosted Skyrim Together server, you gain complete control over the game configuration, including aspects like the number of players, difficulty level, and the allowance of PvP. To run the dedicated server application for the required modification, Skyrim Together Reborn, you can use your personal device. However, it’s advisable to have a high-end PC and a robust internet connection for optimal performance. Smooth gameplay on the Skyrim Together server may not be possible otherwise. Additionally, hosting the server on your home computer means it’ll be offline as soon as you shut down the device.
To ensure a comprehensive multiplayer experience in the world of Skyrim, it’s highly recommended to host the server application with a professional provider. By doing so, you can enjoy the advantages of a dedicated Skyrim server that remains online 24/7 and offers optimal performance capabilities.
Looking for a suitable communication tool for your online gaming activities? Learn how to create a Discord server to share information and chat with other players in our dedicated guide.
What are the requirements for a Skyrim Together server?
To host your Skyrim Together server, you must have the Skyrim Special Edition installed on Steam (version 1.6 or higher) along with the Skyrim Together Reborn modification. As a result, it’s essential to allocate sufficient memory for this purpose. The required CPU and memory specifications for your server primarily depend on the number of users participating in the shared online adventure and their level of interaction with the game world.
According to the official documentation provided by the developers of the Reborn mod, the modification is essentially compatible with the Skyrim Anniversary Edition. However, it is worth noting that the Special Edition is still considered preferable.
The minimum requirements for hosting a Skyrim server are the following:
- Processor (CPU): Dual-Core 2.4 GHz or higher
- Memory (RAM): 3-4 GB RAM
- Hard disk space: 20 GB
In addition to the resources mentioned, it’s important to allocate computing capacities for the underlying operating system. The preferred choice for hosting a Skyrim Together server is Microsoft server operating systems, as they provide ease of installation for Steam, Skyrim, and the modification. For instance, if using Windows Server 2022, the following additional resources should be considered:
- 1.4 GHz processor (64-bit)
- 512 MB or 2 GB memory (without or with graphical user interface)
- 32 or 36 GB hard disk space (without or with graphical user interface)
To host a Skyrim Together server on a Linux distribution like Debian or Ubuntu, Docker is the recommended approach. Using Docker allows for easy installation and management of the server application. For detailed instructions on how to install and set up the server using Docker, you can refer to the Docker setup entry on the Tilted Online Wiki.
What options does IONOS offer for a Skyrim Together server?
If you decide to host a multiplayer server for Skyrim on rented hardware, you can choose from a large number of providers and packages. Finding out which offer best suits your needs isn’t straightforward.
For example, when hosting a Skyrim Together server with IONOS you can choose from the following three models:
- vServer (VPS): IONOS’ vServers provide virtualised hardware based on a single host system. The service package you choose is fixed, and you pay a monthly fixed price.
- Cloud Server: IONOS’ cloud servers are built on virtualised resources sourced from multiple host systems. This setup allows for greater flexibility as you can easily scale the CPU, RAM, and disk space up or down according to your needs and only pay for the actual power used.
- Dedicated Server: With IONOS’ dedicated server option, you have the opportunity to rent dedicated hardware without virtualisation. You can select from pre-built setups or customise the power according to your specific requirements using the ‘Configurable Hardware’ option.
If you choose a dedicated server from IONOS, you’ll get access to the right hardware for hosting a Skyrim Together server. The powerful enterprise components provide the perfect basis for parallel operation of multiple gaming servers and other server applications.
Step by step to running your Skyrim Together server
Once you’ve chosen an appropriate hosting solution, you can proceed with installing and configuring the Skyrim Together server. In the following tutorial, we’ll guide you through the process using IONOS customers (vServer, Cloud Server, or Dedicated Server) as an example. For illustrative purposes, we’ll assume that the operating system of the server being used is Windows Server 2022.
Step 1: Establish remote connection to the server
To install and set up an application such as a Skyrim Together server on rented server hardware, you need a remote connection to the hardware. To connect to Windows Server 2022, you can use the Remote Desktop Protocol, enabled by default. As a IONOS customer, you can set up the connection using the below protocol from the Cloud Panel:
- Access the IONOS Customer Center Login Page.
- Log in using your customer credentials.
- Call up the Server & Cloud product category.
- Select the server plan you’ve booked and navigate to the Access data menu.
- Click the download link next to the Remote Desktop Connection entry.
- Execute the downloaded .rdp file and press Connect.
- Enter the server credentials (‘user’ and ‘initial password’ in the cloud panel) and confirm the security certificate to establish the remote connection.

Step 2: Install Steam client and Skyrim on the server
To begin, ensure that you have the current Steam edition of Skyrim installed on your server. Download the Steam client from the Steam client download page and install it on your server. Once the installation is complete, launch the Steam client and log in with the account that owns the Special Edition or Anniversary Edition of the game. From the Steam library, install the game.
Step 3: Install Mod Manager and create Skyrim instance
To be able to set up a Skyrim Together server, you’ll need the aforementioned Skyrim Together Reborn modification. You can get this using a manager such as Mod Organizer 2 (MO2), which you install as follows:
- Navigate to the Nexus Mods registration page and create an account. A premium package isn’t required for this.
- Open the Mod Organizer 2 page and log in with your ‘Nexus Mods’ account.
- Click on ‘Manual’ to download the manager.
- Double-click the downloaded file to start installing Mod Organizer 2 and initiate installation using the corresponding wizard.

All modifications, configurations and profiles for a game are managed in Mod Organizer 2 with the help of a so-called instance. So start the mod manager and create an instance for Skyrim by following the instructions below:
- Press Next.
- Select the option Create a portable instance.
- Press ‘Browse’ and enter the directory of the installed Skyrim Special Edition.
- Keep the directory of MO2 and continue with the setup by clicking ‘Next’.
- Click on Connect to Nexus and then on Authorize. If no window opens, you’ll need to log in to your previously created ‘Nexus Mods’ account first.
- After successful linking, press ‘Next’ one more time and finally ‘Finish’.
- Skip the tutorial and confirm the handling of nxm links via Yes to complete the initial setup of MO2.
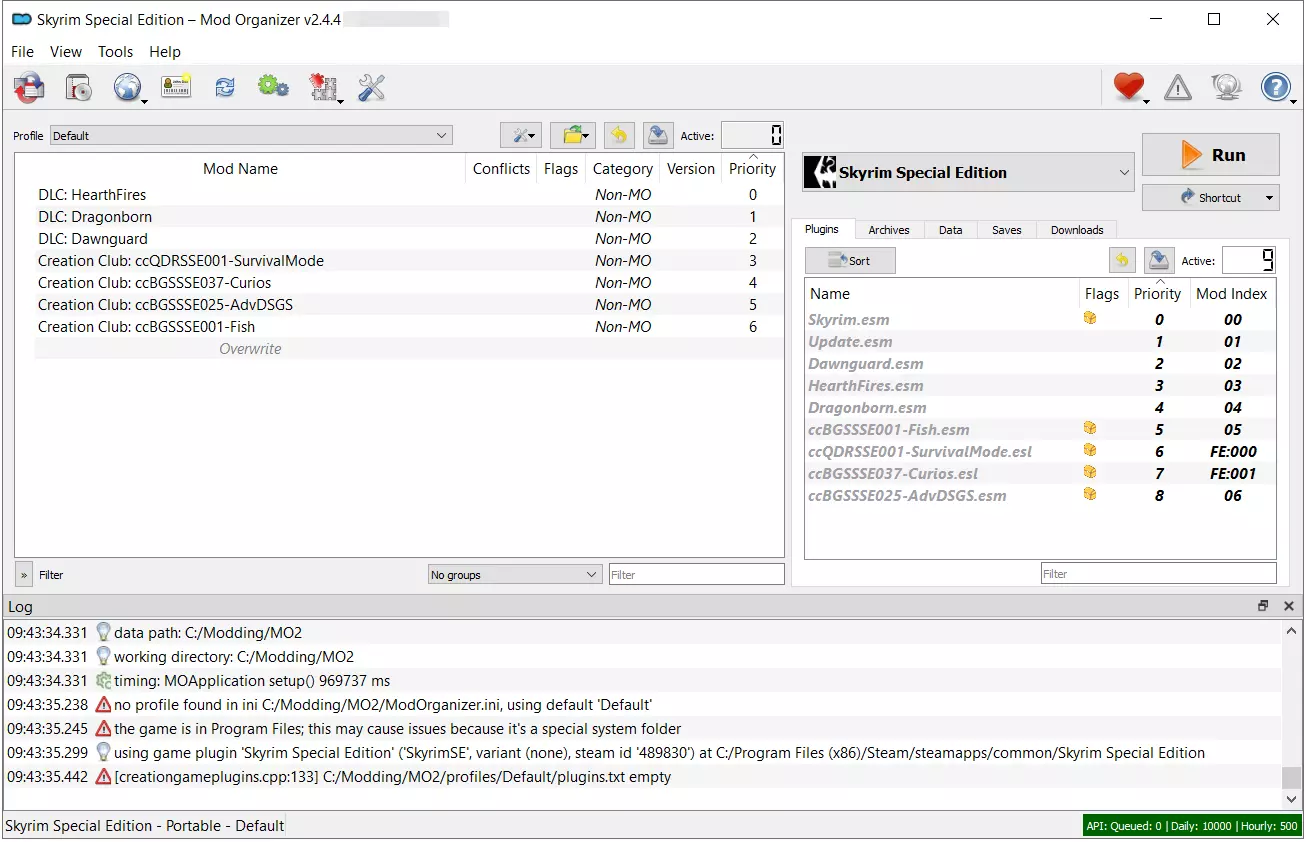
Step 4: Create MO2 profile and separator
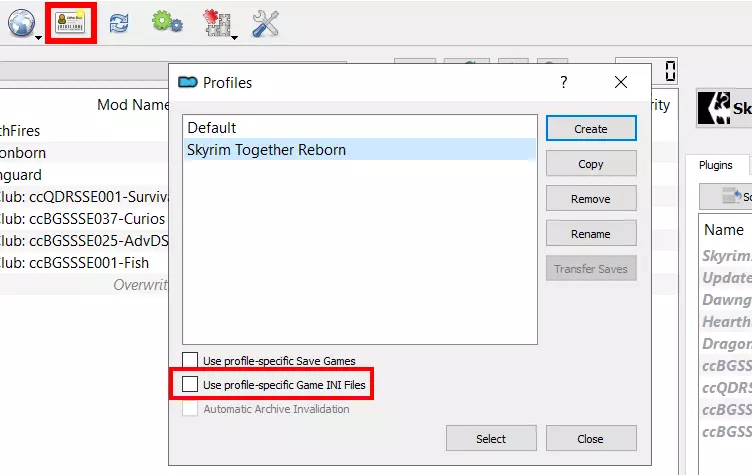
The next step is to create an individual profile in the Mod Manager. To do this, click on the Configure profiles button (business card icon) and then on New. Enter a name for the profile (e.g. ‘Skyrim Together Reborn’) and click ‘OK’ to create this profile. Remove the tick in the line ‘Use profile-specific Game INI Files’, click ‘No’ in the dialogue that pops up and enter the profile as the default profile via ‘Select’.
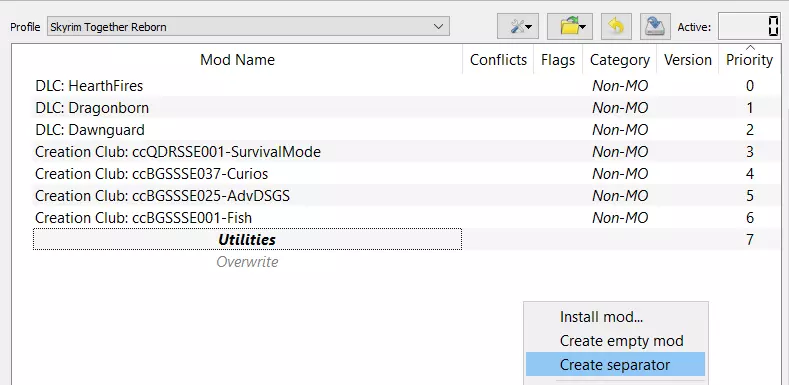
You use separators in MO2 to organise the mods you have installed. For the purposes of this tutorial, we will only create one separator for the ‘Reborn’ mod, as it’s essentially the only mod required to set up your own Skyrim Together server.
To create a separator, right-click in the empty area of the main window in the manager. From the menu that appears, select the option Create separator. Name the separator ‘Utilities’ and confirm by clicking ‘OK’.
Step 5: Delete ‘Creation Club’ files
Following the release of the Anniversary Edition, Skyrim, including the Special Edition, was updated to version 1.6. As part of this update, four ‘Creation Club’ contents were introduced: ‘SurvivalMode’, ‘Curios’, ‘AdvDSGS’, and ‘Fish’. However, these files have been known to cause crashes on Skyrim Together servers. Therefore, it’s advisable to delete the corresponding files from the game directory to ensure smooth operation.
To delete the files, close the mod manager temporarily. Then perform the following steps:
- Launch the *.\Program Files (x86)\Steam\apps\common\Skyrim Special Edition\Data directory.
- Select the following eight files: ccBGSSSE001-Fish.bsa, ccBGSSSE001-Fish.esm, ccBGSSSE025-AdvDSGS.bsa, ccBGSSSE025-AdvDSGS.esm, ccBGSSSE037-Curios.bsa, ccBGSSSE037-Curios.esl, ccQDRSSE001-SurvivalMode.bsa, ccQDRSSE001-SurvivalMode.esl.
- Press the right mouse button and select ‘Delete’.

Step 6: Install Address Library for SKSE plugins
One final preparatory step is to install the Address Library for SKSE plugins. After setting up this library in the Mod Manager, you can proceed to download and install the multiplayer modification, enabling you to set up your own Skyrim Together server using it.
Set up the SKSE address library with Mod Organizer 2 as follows:
- Launch the Address Library for SKSE Plugins mod page.
- Scroll to the ‘All in one (Anniversary Edition)’ entry and press ‘MOD MANAGER DOWNLOAD’.
- Start the free download or the fast premium download by clicking on the corresponding button.
- Confirm the launch of NXM-Link proxy.
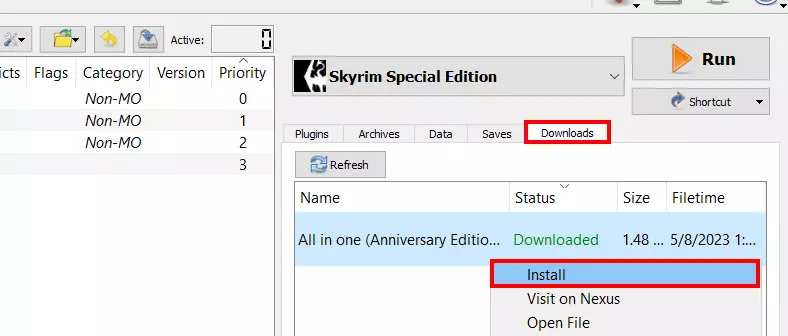
- Mod organizer 2 will now start automatically to download the library. You can find the downloaded file afterwards under the Downloads tab to the right of the MO2 user interface.
- Right-click the download file and select the ‘Install’ menu item.
- Retain the default installation name by pressing ‘OK’.
- Finally, in the left menu window, place a tick next to Address Library to activate it.
Step 7: Install Skyrim Together Reborn
Now download the multiplayer mod by heading to the [Skyrim Together Reborn page on nexusmods.com](https://www.nexusmods.com/skyrimspecialedition/mods/69993?tab=files “nexusmods.com: Skyrim Together Reborn”). Download the modification via MOD MANAGER DOWNLOAD (like the library in step 6 before).

You’ll find the multiplayer modification in the download tab of Mod Organizer 2. To initiate the installation process, right-click on it and select ‘Install’. Confirm the installation name and ensure you’ve selected ‘Skyrim Together Reborn’ in the left menu window by placing a tick next to it.
If setting up the multiplayer mod was successful, you should find Skyrim Together Reborn in the .\Modding\MO2\mods\Skyrim Together Reborn\SkyrimTogetherReborn directory.
Step 8: Configure Skyrim Together server
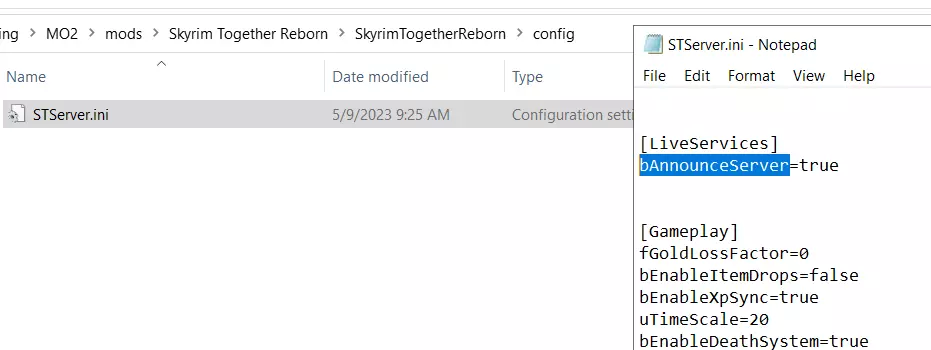
In the directory of the Skyrim multiplayer mod, you will come across the file STServer.ini among other files. This particular file serves as the central configuration file for your Skyrim Together server, allowing you to define basic gameplay settings and even set the server name. You can locate the file in the following subdirectory: .\Modding\MO2\mods\Skyrim Together Reborn\SkyrimTogetherReborn\config..
By default, you can retain the configuration settings as they are. However, if you wish for your server to be visible in the public server listing, it’s crucial to change the ‘bAnnounceServer’ entry to ‘true’. You can find a comprehensive overview of all available options in the STServer.ini entry in the Tilted Online Wiki.
Step 9: Share server ports
Communication with the hosted Skyrim Together server occurs through TCP and UDP port 10578 by default. To make the server accessible via the internet, it’s necessary to enable these two ports in the firewall settings of your rented server. IONOS customers can do this by utilising the familiar Cloud Panel:
- Log in to the IONOS Customer Center Login Page.
- Select Servers & Cloud and click on the IONOS solution where you’ve installed the Skyrim Together server.
- Click Network and Firewall Policies in the left side menu in order.
- Under ‘Incoming’ you can now create a rule for port 10578. Make sure that TCP/UPD is selected as protocol.

Step 10: Launch Skyrim server
Now you’re ready to launch your Skyrim Together server. Access the directory of the modification (.\Modding\MO2\mods\Skyrim Together Reborn\SkyrimTogetherReborn) and run SkyrimTogetherServer.exe. This will open a Command Prompt window automatically. Check the first line of the window to confirm if the server started successfully. When you wish to shut down the server later, simply close the window.
Step 11: Connect to the server
With the Skyrim Together server up and running, you and your fellow players can now connect to it from your respective PCs. To join the server, ensure that you have followed steps 2 to 7 of this tutorial, which involve installing the Skyrim Special Edition and the Skyrim Together Reborn modification on your devices. Before starting the game with the mod, it is recommended to create a new game state without any modifications and perform the introductory sequence, including character creation. This helps prevent issues that may arise during the scripted opening sequence of the game. Once you have your character ready to start the multiplayer session, launch Skyrim Together Reborn and then follow these steps to connect to your Skyrim Together server:
- Start your previously created game status, where you’ve completed the intro and created a character.
- Press the [F2]-key in the launched game.
- Select ‘Connect’.
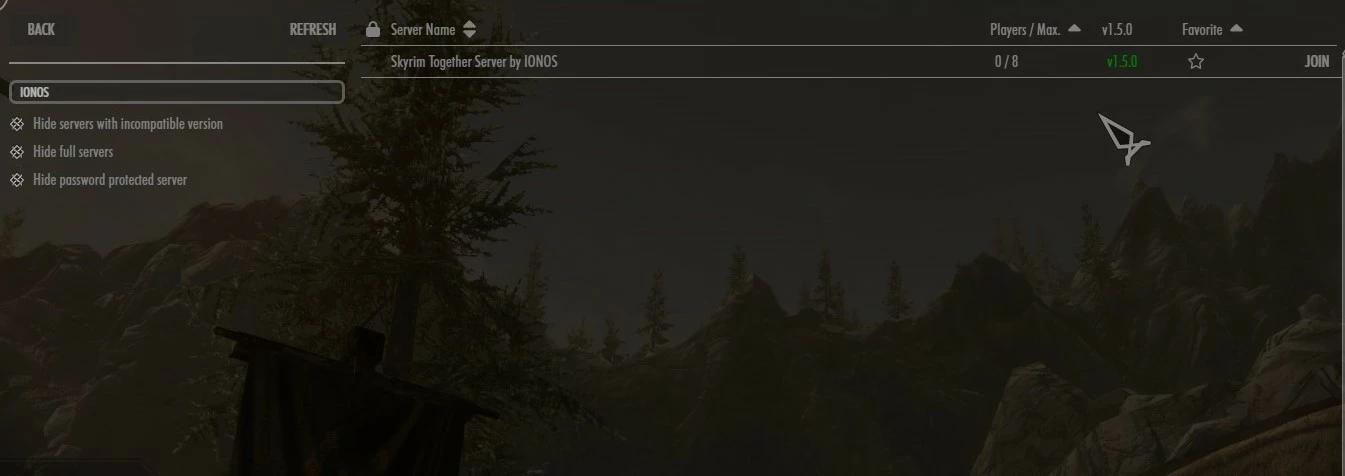
- If you’ve made your server publicly available, you can now select Public Servers and search for your ‘Skyrim Together’ server using the search function.
- If your server is only available privately, enter the IP address with port appended (:10578) and the password you chose to connect to the server.
Once other players have joined the server, press [F2] again and create a group through the Player Manager to explore the world of Skyrim together.
