Remote desktop: Application, troubleshooting, and alternatives
Using a remote desktop connection is a now common practice for many professionals. The possibility to access a server from the “outside” is an essential part of terminal services and help desk work. Home users also benefit from remote desktop control, using it to connect easily with their external work computer. But establishing the connection isn’t all that simple. Luckily there are now quite a number of remote desktop tools to make the task easier. What exactly is a remote desktop connection? What should you look out for? And which practical alternatives are available?
Try out your VPS for 30 days. If you're not satisfied, we'll fully reimburse you.
What does remote desktop mean?
The term remote desktop refers to a connection between your own computer (client) and another computer (server). Provided the technical requirements are met, the user can initiate a remote desktop session from practically anywhere. They’ll then receive — depending on the clearance — full access to the remote computer. Picture it like this: From your home computer, you can access all of the programmes, files, and network resources of your work computer, just as if you were sitting at your desk.
Requirements for the initiation of a remote desktop connection
In order to set up a remote desktop connection at all, you first have to observe some technical requirements. The control of a remote computer only works successfully if it’s connected to the same network or via the internet. You also need to make sure that the server is turned on at the desired time and is available over a functioning network connection. Make sure as well that the remote desktop setting is enabled on the server. Lastly, ensure that you can access the respective network from the outside and have permission to create a remote desktop connection. You can obtain permission by entering a remote desktop user on the user list and having the password for the connection setup.
You can’t connect to a computer that’s in power-saving mode or sleep mode. Make sure that these settings are disabled.
How to: Set up a Windows remote desktop
Microsoft offers remote desktop users an in-house network protocol: The Remote Desktop Protocol (RDP). The RDP is, in a way, the control tool of the terminal services (Remote Desktop Services) and ensures the execution of remote desktop commands. It controls the terminal server as well as the terminal client. It also regulates the transmission of screen content, keyboard input, and mouse movements over the network. A server version of Windows is not necessary.
1. Option: Windows remote support
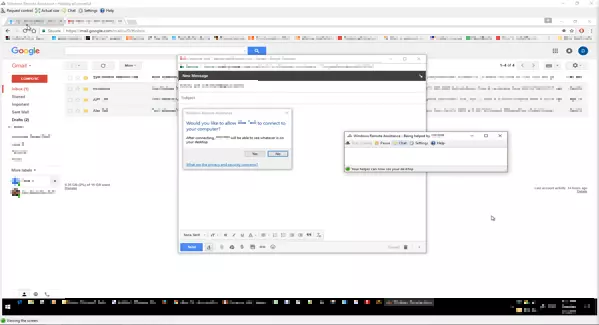
Windows remote support is an option for the implementation of remote desktop access. It offers users the chance to invite an outsider into their system. This is especially useful for remote maintenance sessions, where technicians can link with a local system and perform software repairs or edit the system settings.
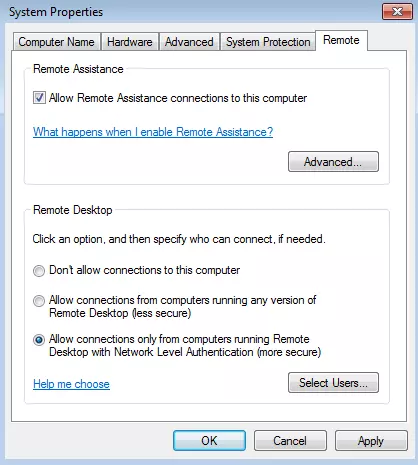
First step: Make sure that remote support is activated. You’ll find this setting under Control Panel > System and Security > System > System Properties > Remote. To authorise remote support, you need to check the corresponding box under “Remote Assistance”.
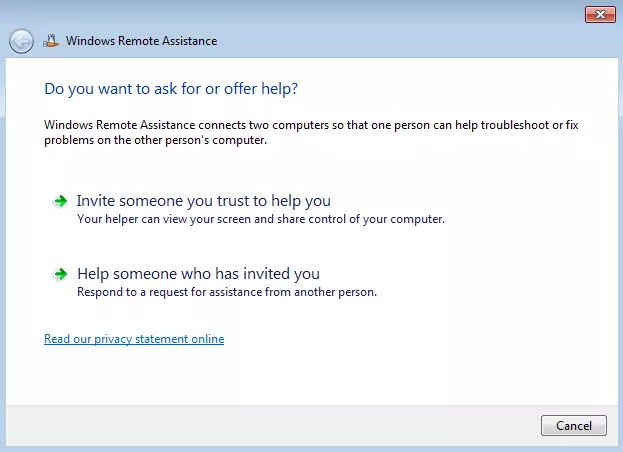
Second step: To invite an external user, start the assistant and enter “msra” into the search box or follow the usual path Start > All programmes > Maintenance > Windows remote assistance. In the query window that appears, you can now select whether you are “Helper” or “Seeking help”. For “seeking help," click on the button “Invite someone you trust to help you”.
 Virrage Imagesshutterstock
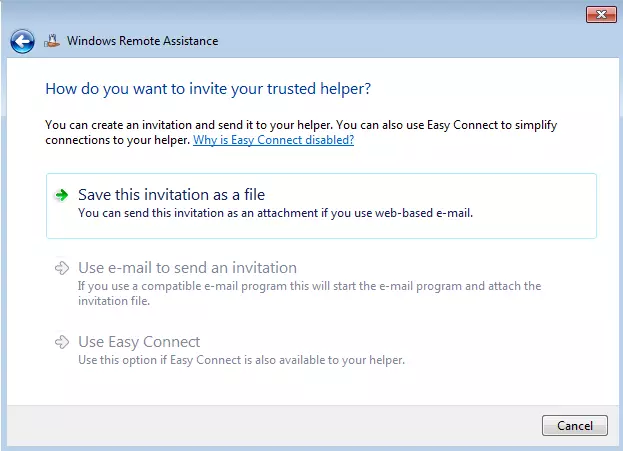
Third step: Now you can send an external user invitation (ticket) to connect. For this, Windows offers three different courses of action: a) Save the invite file on your computer and upload it as an email attachment, b) Your email programme will open automatically and send the file directly to the recipient, or c) Use the Easy Connect option and bypass the email traffic. With the invitation, the external user also receives a password which can be used to authorise remote desktop access later.
With a connection over Easy Connect, the external user receives the password directly. A separate invitation isn’t necessary.
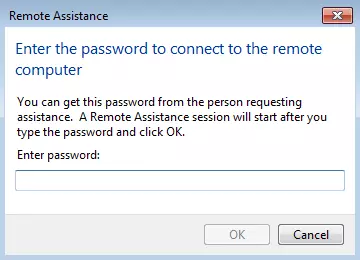
Fourth step: With the transmitted password, the external user can now connect to the remote computer. But access can still be denied when connecting via the internet since the local IP is stored in the file. The external helper needs either your external IP or your DNS name. You can access the latter via free DynDNS services.
Fifth step: The external user now enters the aforementioned password into the query window.
2. Option: Windows remote desktop connection
With a remote desktop connection, you can log into the desired host system without needing to actively “connect” to another user — unlike with remote support. The local system acts as the server, in this case, allowing users to log in as “local” users. For a successful application, you need to be entered into the user list of the local system and have the password. This option makes the most sense for the home office, when you want to access your work computer from home.
First step: It’s also a prerequisite here that the remote connection is activated. You’ll find the corresponding setting, as before, under System settings -> System and Security -> System -> Remote settings. Check the box to “Allow remote connection with this computer”.
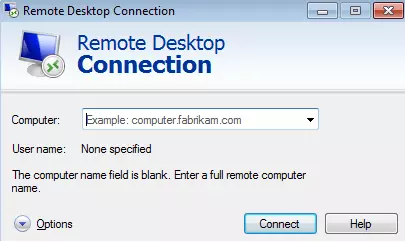
Second step: Start the RDP client. You can find this in the start menu under “Devices” or by directly entering “mstsc” into the search bar. This calls up the query window “Remote desktop connection”.
Third step: In the query window, enter the computer name. If you want to establish the connection over the internet, you also need the external IP of the host system. Alternatively, you can also enter a host name if you are using Dynamic-DNS services (“Dynamic Domain Name System”). With the help of DynDNS technology, dynamic IP addresses can be linked to stable domains that allow you to connect to the target system. Then you enter your username into the corresponding field.
DynDNS services are available to users for free; for example, from DNSdynamic or GoIP.
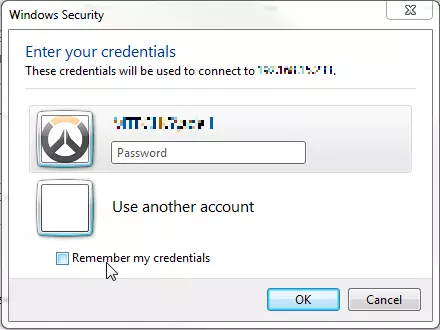
Fourth step: Your username as well as the associated password need to already be included in the user list. A remote desktop connection can only be established with your access data. After successfully logging in, you can see the desktop view of the remote computer.
Dangers of Windows: Firewall and WLAN router
Windows comes as standard with an active firewall that protects your computer from unauthorised access. But this can get in the way of remote support or a remote desktop connection. Since the RDP has its own port (3389) for communicating with other computers, the protection of the firewall is used for communications outside of the network, i.e., over the internet. This means that a connection won’t be able to be established. In order to use a Windows remote desktop, you need to add an exception rule in the firewall settings:
- Click on “Start” and select “Control Panel”.
- Click “System and Security”.
- Under “Windows Firewall” select “Allow a program through Windows Firewall”.
- Click on “Change settings” and click the box next to “Remote desktop”.
- Click on “OK” to apply changes.
The WLAN router can also become a stumbling block and hinder the establishment of a remote connection. Unfortunately, no settings for activating RDP services can be found on the router itself. For that, you have to set up port forwarding in your wireless router. The Windows Remote Desktop Protocol uses TCP-Port 3389. To forward to a router, like one from LinkSys, do the following:
- Select Settings -> Internet -> Port forwarding -> New port in the configuration menu.
- Under “Port forwarding active for” select the “Other applications” option.
- Under “Label” enter “Remote desktop”.
- Under “Protocol” select the setting “TCP”.
- In the “From port” and “On port” fields, enter “3389”.
- Under “On IP address” enter the IP address of the target computer.
- Click on “Apply” to confirm the changes.
- Under Settings -> Advanced settings -> Internet -> Dynamic DNS check the box next to “Use Dynamic DNS”.
- Either activate your LinkSys router or your chosen DynDNS.
- Save the entire configuration under Settings -> Advanced settings -> System -> Save settings.
Home editions of Windows have further restrictions: Here, remote desktop sessions are exclusively established by explicit “invitation," which means an increased effort for the user.
Alternative to Microsoft: TeamViewer
Microsoft’s remote desktop is rather complicated in its application and requires a certain degree of know-how. But there are a number of free alternatives, which are easier to use and popular with beginners. Third-party connections are also oftentimes easier than Microsoft services, as they don’t require firewall or router adjustments. Remote desktop connections can be established in less than a minute.
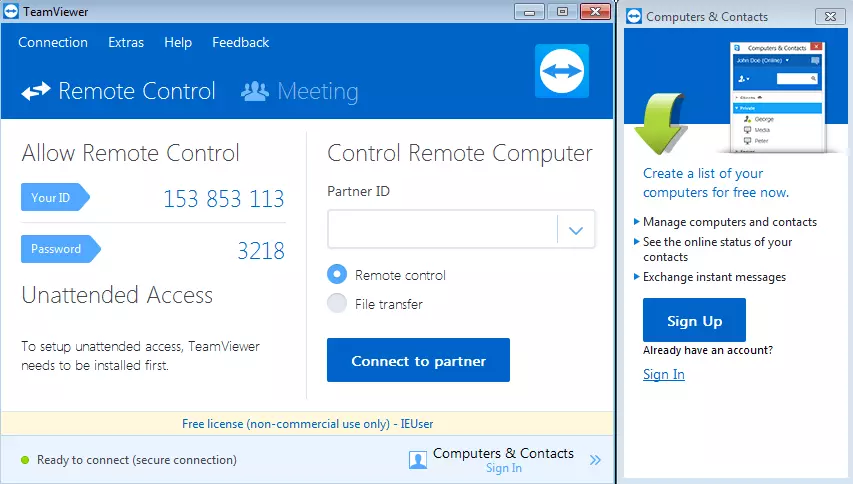
TeamViewer is one of the most popular remote desktop tools and is used by millions worldwide. With just a few clicks, you can conduct quick and uncomplicated remote maintenance or do remote presentations. As referred to above, since the data traffic runs via the normal internet connection (Port 80), you don’t have to alter any firewall or router settings.
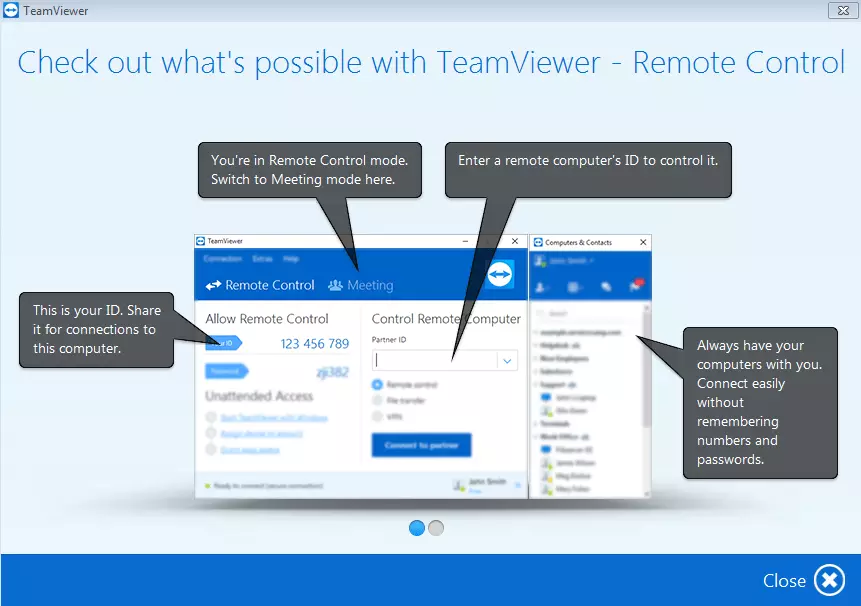
After the download has finished, you can get started using TeamViewer right away. As you begin, a unique ID and password are automatically generated for you. You can view them at any time in the display window (on the left side) and send them to your contacts. To establish a remote desktop connection, enter your partner’s ID in the field on the right under “Partner ID” and type the password that accompanies it. It’s just as simple in the other direction: If you need a “helper," you just have to provide your ID-number and password. Features like the creation of a contact list, data transfers, internet telephone, as well as chat and video functions complete the all-round package.
TeamViewer is convincing in terms of both performance and range of functions. Especially in a professional context, the free tool is a popular solution. But there are drawbacks: Particularly in terms of security and image quality, not all users are 100% satisfied. Besides TeamViewer, other free alternatives also exist that you should definitely take a look at.
Remote desktop connections with other operating systems: Linux and macOS
The remote desktop access between Windows computers is extremely easy with the help of user-friendly tools like TeamViewer. But wouldn’t it be useful if Windows users could just as easily access Linux or macOS systems? Microsoft offers useful implementations for various operating systems with the in-house RDP client. But other manufacturers, like Virtual Network Computing (VNC), are also upgrading. We’ll show you how easy the installation for various operating systems can be and how you can establish a remote connection between them.
Install VNC client on the Ubuntu 16.04 Server
With a VNC client, you can quite easily access a Windows computer on your Ubuntu 16.04 server. For the installation, you just have to follow a few steps. Open Ubuntu and enter the following commands one-by-one into the terminal window:
First step: Update system
apt-get updateSecond step: Install VNC client
apt-get install lxde tightvncserverThird step: Configure VNC client
Start the VNC client with the command:
tightvncserver :1After starting, the configuration file will be created. This needs to be adjusted now. The VNC client is stopped and the configuration file is edited:
tightvncserver -kill :1
nano ~/.vnc/xstartup
At the end of the file, enter the following lines:
lxterminal &
/usr/bin/lxsession -s LXDE &
The installation of LXDE enables a fast and energy-saving desktop environment.
The configuration file should be built as follows:
#!/bin/sh
xrdb $HOME/.Xresources
xsetroot -solid grey
export XKL_XMODMAP_DISABLE=1
/etc/X11/Xsession
lxterminal &
/usr/bin/lxsession -s LXDE &
Fourth step: Restart VNC client
tightvncserver :1With the installed VNC client, you can now establish a remote desktop connection with Windows.
Another option for configuring the VNC client on Ubuntu 16.04 can be seen in this video tutorial:
Install RDP client on macOS
Apple Remote Desktop offers an excellent option for managing your Mac remotely. The installation of an RDP client on macOS is far less complicated than on a Linux operating system. Here, you simply have to install the RDP client — either from Apple or from a third-party — onto your Mac. Apple Remote Desktop informs you about any updates and performs them by remote control.
How exactly the installation works can be seen in this video tutorial:


