How to install and host a No One Survived server
Developer Cat Play Studio released dedicated server software for the early access game No One Survived early on to enable individual multiplayer adventures. Equipped with the appropriate hosting setup, installation and setup via SteamCMD is quickly done.
Requirements for a No One Survived server
Similar to a Dayz server or a Sons of the Forest server, you can basically host a No One Survived server on your own PC. However, hosting with a professional provider is still recommended for several reasons. For one, the self-hosted server will only run when your device is turned on. With a hosting provider, you can make the game world available around the clock. Secondly, data centres have high-performance broadband connections that are clearly superior to ordinary household connections.
The specific requirements of the No One Survived server depend on the specific usage scenario. The number of players who are active on the server at the same time is particularly crucial. The following are the minimum requirements for a simple server with up to four users:
- Computing power (CPU): min 3 GHz
- Memory (RAM): min 4 GB
- Hard drive space: min 10 GB
The requirements of the underlying server operating system also need to be considered. The No One Survived server software is currently designed for Windows Server. If you’re using Windows Server 2022, for example, the following requirements are:
| Windows Server 2022 without GUI | Windows Server 2022 with GUI | |
|---|---|---|
| Processor | 1.4 GHz processor (64 bit) | 1.4 GHz processor (64 bit) |
| Memory | 512 MB RAM | 2 GB RAM |
| Hard drive space | 32 GB | 36 GB |
Get started today with a cloud server from IONOS and set up your own No One Survived server on powerful hardware. The infrastructure is ideally suited for a variety of uses. For example, you can supplement the gaming server with a specially hosted TeamSpeak server to have the right voice solution at hand for your multiplayer adventures.
Host a No One Survived server with IONOS
IONOS is all that you need in a reliable hosting partner. When looking for a suitable hardware option for your No One Survived server, you can choose from three different models including different packages:
- Cloud server: A cloud server from IONOS is the perfect way to get into hosting gaming servers. You rent virtualised hardware resources that can be scaled flexibly and billed by the minute.
- VPS (vServer): IONOS vServers are also based on virtualised hardware (based on shared host systems). The leased service is available at a fixed monthly price.
- Dedicated server: Dedicated enterprise hardware with state-of-the-art processors and per-minute billing is what you get when you rent a dedicated server from IONOS. If you choose the ‘Configurable Hardware’ option, you can adjust the performance at any time.
Thanks to free starting credit, you can test the IONOS cloud server for 1 month free of charge (or until the credit is used up) and experience the perfect combination of performance and security!
3 No One Survived server scenarios and suitable IONOS package
Below you will find three different scenarios for using a No One Survived server, to which we have assigned a suitable IONOS package. The examples serve as a guide for you when choosing your server.
| No One Survived server scenario | Suitable IONOS server package |
|---|---|
| 2 players; server permanently online | VPS Windows M |
| 3–8 players; server permanently online | VPS Windows L |
| More than 8 players; server permanently online | Dedicated Server AR6-32 SSD |
If you want to run your own server around the clock and prefer a fixed monthly price right from the beginning, a IONOS vServer is the right choice for you!
Step-by-step instructions for your No One Survived server
We have summarised the most important steps for IONOS (Cloud Server, vServer, Dedicated Server) customers to set up their own No One Survived server. The operating system used here is Windows Server 2022.
Step 1: Connect to the hosting server
In order to install No One Survived’s dedicated server software on the rented hardware, an active remote desktop connection to the server is required. This is easily to achieve thanks to setup help in the IONOS customer account:
- Log in to your IONOS customer account.
- Click on ‘Server & Cloud’.
- Select your rented IONOS server.
- Click on your server and scroll to the login data. Download the setup file for the ‘Remote Desktop connection’ by pressing the download button.
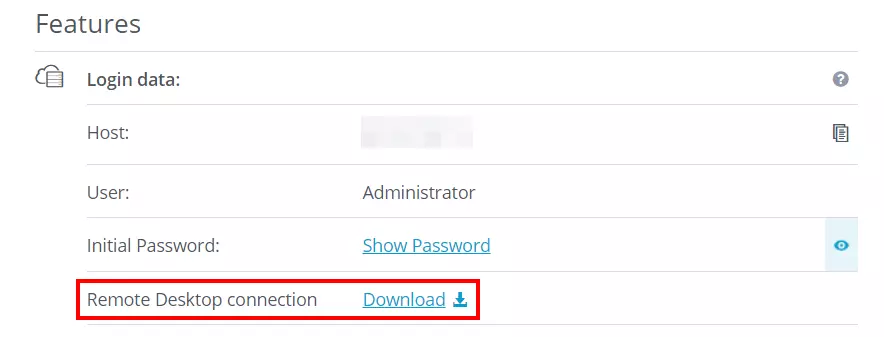
Execute the downloaded .rdp file by double-clicking and confirm the connection setup in the first dialog via ‘Connect’. Then log in to the server with your individual login data (‘user’ and ‘initial password’).
The first time you connect to your rented server, you will be asked to trust the security certificate. To do this, click on ‘Yes’ in the window that pops up.
Step 2: Install SteamCMD
The most convenient way to obtain the server application for hosting your own No One Survived server is via SteamCMD. The command line client offers you the possibility to connect to the Steam servers to download the appropriate files.
Download the handy tool by clicking on the following download link. Then unzip the ZIP file and save the steamcmd.exe in a new directory named C:\SteamCMD. Once you run the installation file, SteamCMD will automatically be installed in this directory and run directly.
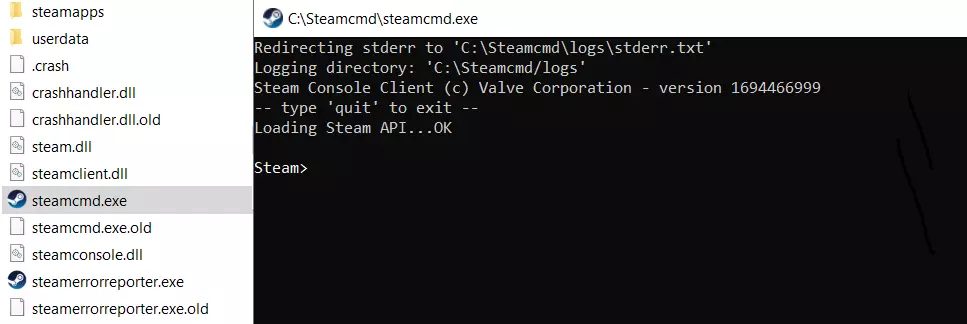
Detailed instructions for installing the command line client (Windows and Linux) can be found in our separate article ‘Install SteamCMD’.
Step 3: Download and install the No One Survived server
Using the command line tool, you can now connect to the public Steam servers to download the No One Survived server files. In the first step, create a suitable installation directory for the server files such as C:\no-one-survived-server:
force_install_dir C:\no-one-survived-serverThe next step is to log in anonymously to the public Steam servers:
login anonymousAfter logging in, you can download and install the No One Survived dedicated server application by entering the app ID 2329680:
app_update 2329680 validateAfter the installation has been successfully completed, use the command quit to log off from the servers and SteamCMD.
Step 4: Install Microsoft Visual C++ Runtime
In order to run the application, you must also install a current version of the Microsoft Visual C++ Runtime. You can find the appropriate installation files in the Microsoft Help Center. Be sure to choose the version that corresponds to the architecture of your rented server hardware. For example, for a 64-bit system, choose the download file vc_redist.x64.exe.
Restart your server after installing the runtime environment.
Step 5: Open server ports
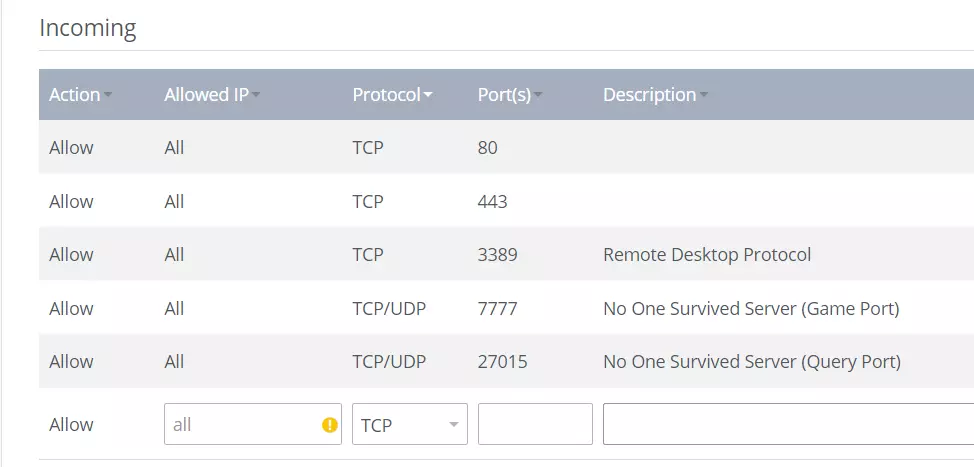
To enable client connections to your server and make it available later via the server listing, you must now enable the appropriate TCP/UDP ports in the server’s firewall settings. The recommended ports for the No One Survived server are TCP/UDP 7777 (game port) and TCP/UDP 27015 (query port). For IONOS servers, you can initiate the release directly in the customer account:
- Go to the ‘Servers & Cloud’ section again.
- Select the server that the No One Survived server software is installed on.
- In the left side menu, open the ‘Network’ section and then select the ‘Firewall Policies’ menu item.
- Create the rules for TCP/UDP ports 7777 and 27015 under ‘Inbound’. If you select ‘TCP/UDP’ directly in the ‘Protocol’ field, you only need to create one rule for each of them.
You want to make your server available via an individual domain name instead of a cryptic IP address? At IONOS you can register your own domain today!
Step 5: Configure the No One Survived server
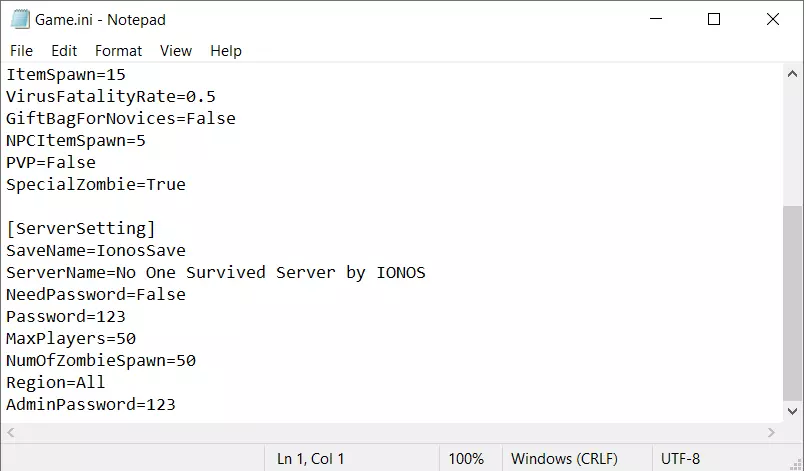
In the configuration file Game.ini you can define the basic settings for your own No One Survived server. You can find the file under the path .\WRSH\Saved\Config\WindowsServer\Game.ini in the previously created server directory.
The configuration file is divided into the following two categories:
GameSettings: Here you can specify the basic game properties. Are the zombie attacks activated and if so, on which day should these enemies start to appear on the screen? How many days should a game year have and is PvP allowed?ServerSetting: Under this category you define all important server properties like the name and the optional password or the maximum number of players.
Step 6: Start the server
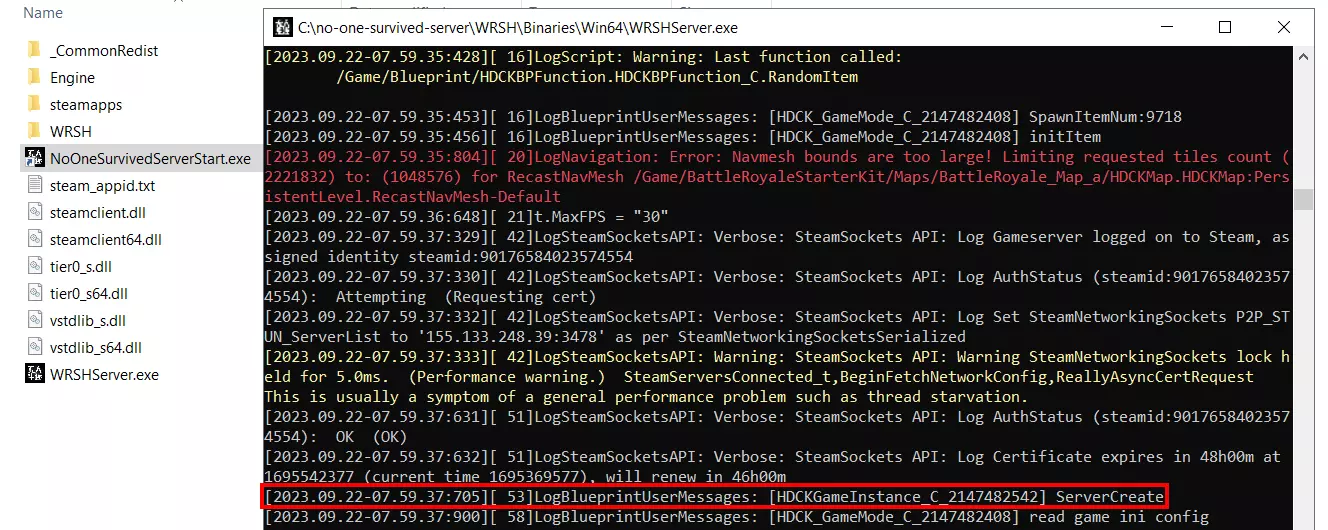
Once you have opened the ports and saved the desired settings, you can finally start your No One Survived server. All you have to do for this is run NoOneSurvivedServerStart.exe. The server application will then start automatically in a new CMD window. The initialisation of the game world will take some time. If ServerCreate is displayed, then it means the server start was successful.
 Zheka6120shutterstock
Step 7: Connect to the newly created No One Survived server
Once the server is up and running, you can share your IP address or server name (and password, if set up) with your fellow players. Using this information, you and others can now search for your No One Survived server and connect to the game world as follows:
- Start the No One Survived game in the usual way.
- Click on the ‘Multiplayer’ menu item.
- Press ‘Private server’ and restart the game.
- Navigate to the item ‘Private server’ via ‘Multiplayer’ one more time and you will get to the menu with the same name.
- Use the search function to look for your server. Use the full name you have defined in the
Game.ini, because there is no feature to search for part of the name. - Click on the appropriate search result and then press ‘Join in’.
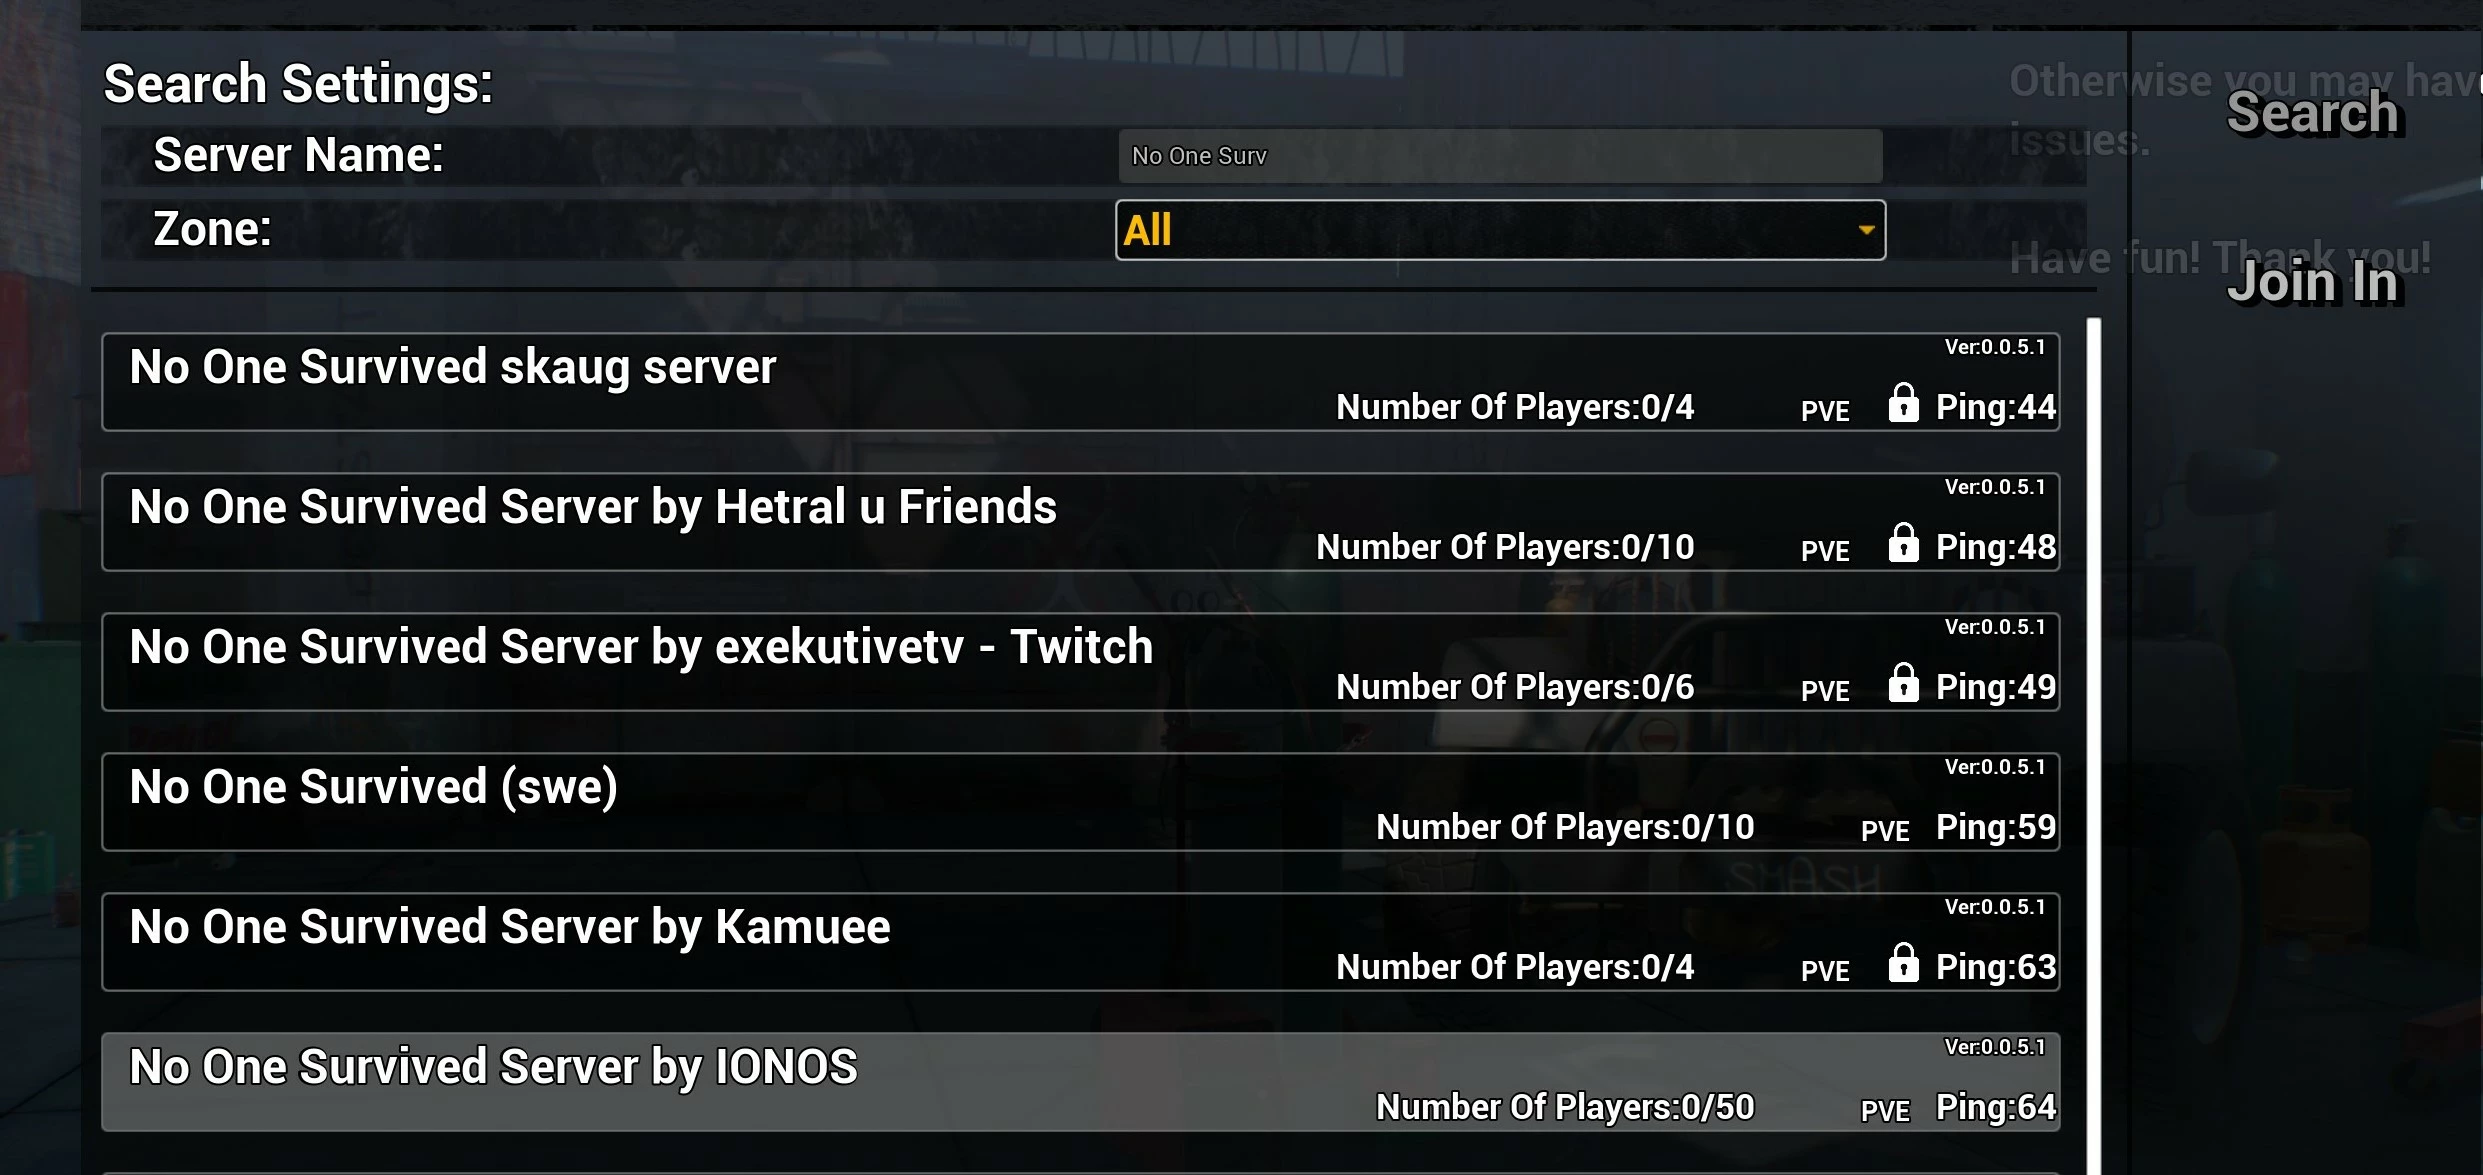
After successfully logging in to the server, you can finally start the dedicated multiplayer adventure on your newly created No One Survived server!
 Chinnapongshutterstock
Try out your VPS for 30 days. If you're not satisfied, we'll fully reimburse you.

