How to install and configure a dedicated FS25 server
Farming Simulator 25 (FS25) is the latest installment in the popular simulation series, bringing players into the world of modern farming. With improved graphics, new vehicles, and expanded gameplay options, players can enjoy a realistic and immersive experience on an FS25 server. Whether it’s fieldwork, animal husbandry, or forestry, FS25 combines strategic planning with a laid-back simulation. A dedicated Farming Simulator 25 server is perfect for playing together with friends.
What are the prerequisites for a dedicated FS25 server?
A dedicated Farming Simulator 25 server should be stable and powerful to ensure a smooth gaming experience for all players. The exact requirements for your FS25 server largely depend on the number of players, but you should keep the following minimum requirements in mind when choosing your server:
- Operating system: Windows Server 2019/2022
- Processor: Quad-core CPU with at least 3.0 GHz
- Memory/RAM: At least 8 GB (16 GB recommended for large multiplayer sessions)
- Storage space: 40 GB (allow additional space for mods and backups)
- Network: Stable broadband connection (upload speed of at least 10 Mbps)
Keep in mind that only Windows operating systems are suitable, as native Linux support isn’t available. Setting up a Farming Simulator 25 server on Linux distributions is only possible through workarounds – such as using the runtime environment WINE, for example. However, it’s recommended to use a Windows server directly. It’s crucial to ensure that the system has a 64-bit architecture and don’t forget to allocate additional hardware resources for the operating system itself. For example, Windows Server 2022 requires a 1.4 GHz processor, 512 MB or 2 GB of RAM (without or with a graphical interface), and 32 GB of disk space.
Please note that, as with the FS19 server and the FS22 server, you need your own dedicated license to create your FS25 server. This means that you cannot host and play the game with one license on a dedicated server, but must purchase it twice. The same applies to any DLC that you want to use on your dedicated Farming Simulator 25 server.
An overview of the various server options for an FS25 server at IONOS
Before setting up your own FS25 server, you’ll need to decide which provider you want to use. With so many available providers and server options, this choice isn’t always straightforward. For example, at IONOS, you can choose between two different server types. Both options, regardless of the package, guarantee an external broadband connection of up to 400 Mbps:
- vServer (VPS): VPSs work on the principle of virtualisation giving you access to virtualised resources. This means the hardware is shared with others, but this doesn’t affect the server’s performance or security. Billing is done at a fixed monthly rate.
- Dedicated server: A dedicated server has hardware exclusively reserved for you and your applications, making it a more expensive option. Billing is also monthly, based on the number of hours used, but it’s capped at a maximum amount.
The right IONOS servers for various FS25 scenarios
Choosing the right server type is just the beginning: Both vServers and dedicated servers are available in different packages. The best package for you depends largely on how you plan to use your FS25 server. For example, more players will require greater performance, which should factor into your choice. Below are some example scenarios for Farming Simulator 25 servers and the corresponding IONOS products that fit those needs.
| Recommended Dedicated Server | Recommended vServer | |
|---|---|---|
| 2-4 gamers (without DLC) | Dedicated Server AR6-32 HDD | VPS Windows L |
| 5–10 gamers (with DLC) | Dedicated Server AR6-32 HDD | VPS Windows XL |
| Up to 16 gamers (with DLC) | Dedicated Server AR6-32 HDD | VPS Windows XL |
- Enterprise hardware
- Configurable hardware equipment
- ISO-certified data centres
The right IONOS server to get you started
If you’re unsure which server is right for you, it might be worth starting with VPS Windows L. This package offers excellent value for money and is a great option for trying out your own FS25 server. Another advantage is that if you decide to invite more players to your Farming Simulator 25 server, you can easily upgrade the package to meet your needs.
Try out your VPS for 30 days. If you're not satisfied, we'll fully reimburse you.
How to create an FS25 server step by step
Once you’ve got the right hardware, you can start setting up your own Farming Simulator 25 server. The following guide shows you how the setup works. For this example, we’ll use an IONOS server with Windows Server 2022.
Step 1: Establish remote connection
In the first step, you’ll need to connect to your server. The easiest way to do this is through a remote connection. At IONOS, you can easily set this up in the Cloud Panel. First, log in with your personal credentials on the login page.
Once logged in, click on the ‘Server & Cloud’ section. You’ll see an overview of all the server packages you’ve purchased from IONOS. Click on the server you’ve designated for your FS25 server. Then, select the ‘Options’ tab. In the dropdown menu that appears, you can open the remote console.

Step 2: Open Ports
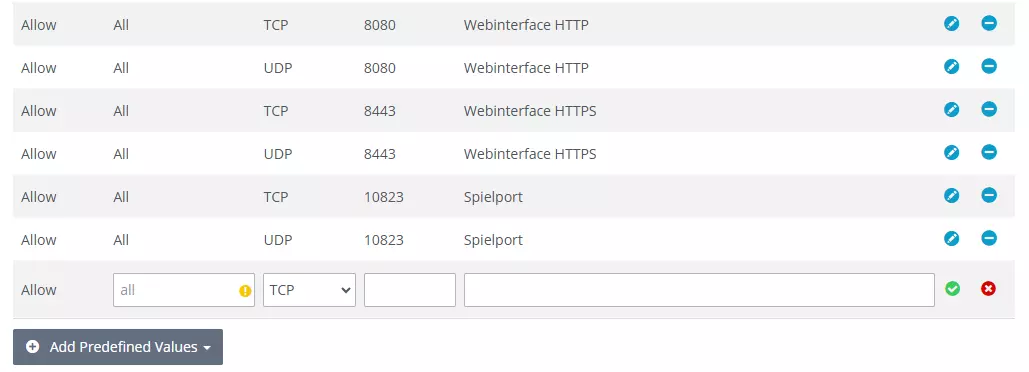
In order for you and your players to connect to the FS25 server or access the web interface of the dedicated server, you’ll need to open the necessary ports. The default ports used by Farming Simulator are Port 8080 (Web Interface HTTP), Port 8443 (Web Interface HTTPS), and Port 10823 (Game Port).
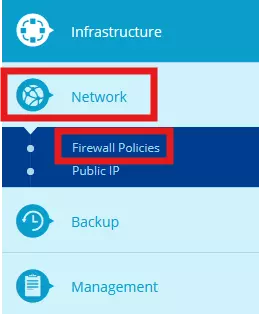
For IONOS servers, opening ports is straightforward via the Cloud Panel. In the left-hand menu, navigate to the ‘Network’ section and select the ‘Firewall Policies’ submenu. From there, you can configure the port forwarding by allowing specific IPs and specifying the protocols and port numbers.
Step 3: Install Farming Simulator 25
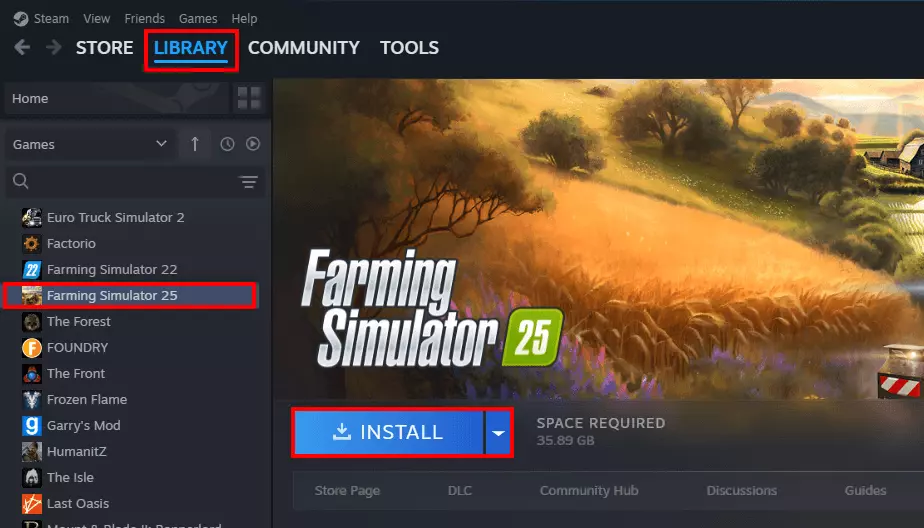
Once you’ve successfully connected to your server, you can install Farming Simulator 25 on it using a platform of your choice, such as Steam. As mentioned earlier, make sure to install a new license if you plan to connect to the FS25 server yourself later. After installation, launch the game to activate the license. If you receive an error message, simply click ‘No’ to cancel the startup process – a full program launch isn’t required for license activation.
Step 4: Set login data for the web interface
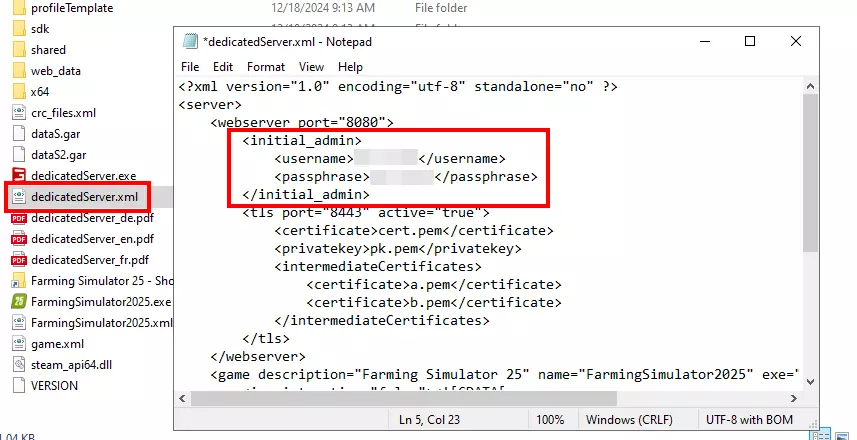
In the next step, adjust the login data for the web interface of the Farming Simulator 25 server. To do this, go to the installation directory and open the configuration file dedicatedServer.xml. Search for the entry initial_admin and enter the desired login information in the two fields username and passphrase. Then save and close the file to apply the changes.
Step 5: Log into the web interface
Now run the dedicatedServer.exe file as administrator by right-clicking on the file and clicking on the corresponding option. In the command prompt window that then opens automatically, you will be presented with two URLs — the HTTP and the HTTPS address for the web interface of your FS25 server. You can now call up the desired variant in the browser of your choice to access the login for the interface.
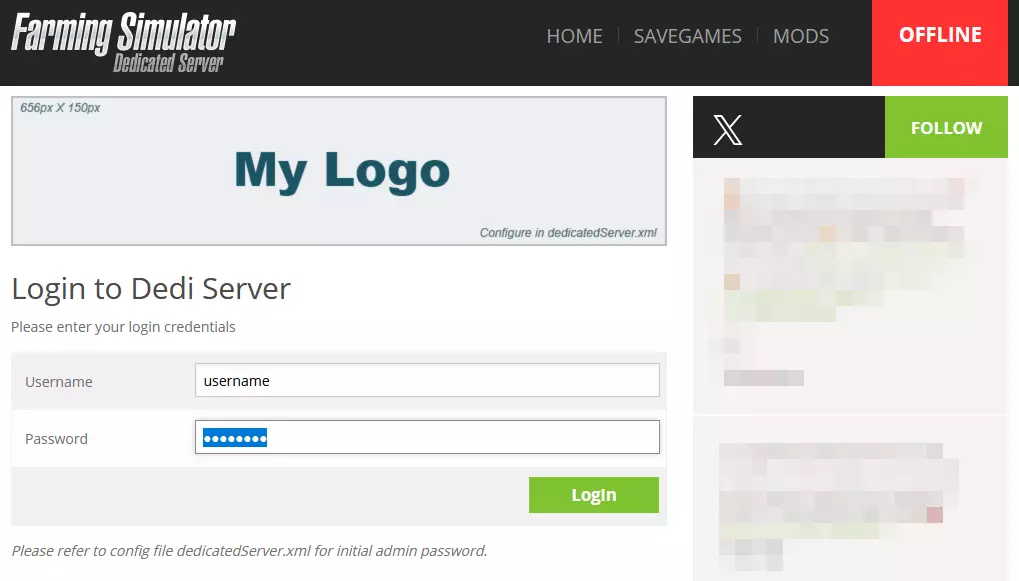
Enter your login data to log in to the web interface and press ‘Login’.
By closing the window of the executed dedicatedServer.exe, the web interface and thus also the FS25 server will no longer be available. So only close it if you want to take your server offline.
Step 6: Configure and start FS25 server
Once logged into the web interface, you can now define the desired setup for your FS25 server: game name, login password, map, starting capital, game language, number of players and many other settings are possible. If you want to integrate modifications, simply switch to the ‘Mods’ tab. There you can download the desired mod and then activate it in the initial ‘Home’ menu. Confirm your changes by clicking on ‘Save’ and then start the game session by clicking on ‘Start’.
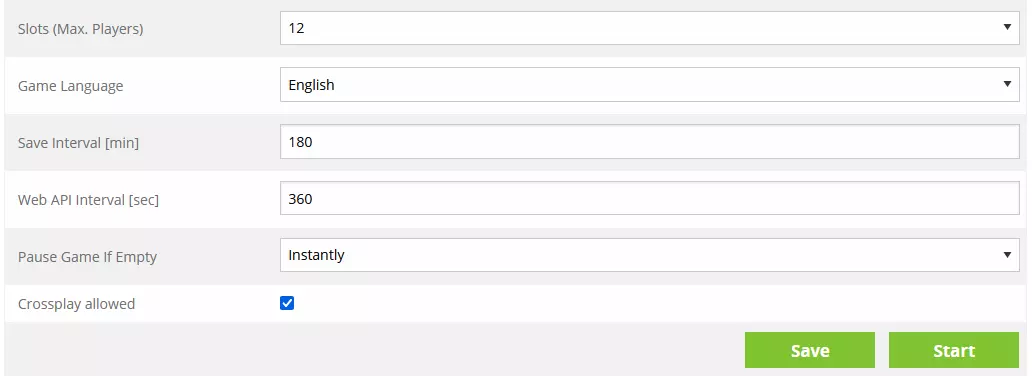
Once you confirm the start of the server application by clicking on ‘Continue’, another prompt window will open where you can watch as all the important files for the game world are gradually loaded.
Step 7: Connect to the dedicated Farming Simulator 25 server
Your own Farming Simulator 25 server is now always accessible online for you and your teammates. To connect, simply follow these steps:
1 Launch FS25 as usual. 2. Click on ‘Multiplayer’ in the main menu. 3. Select the option ‘Join game’. 4. Use the search function to search for your FS25 server. Make sure that the correct filters are set. 5. Select the appropriate entry and click ‘Start’. Enter the server password (if defined) and confirm the connection by clicking ‘Start’ again.
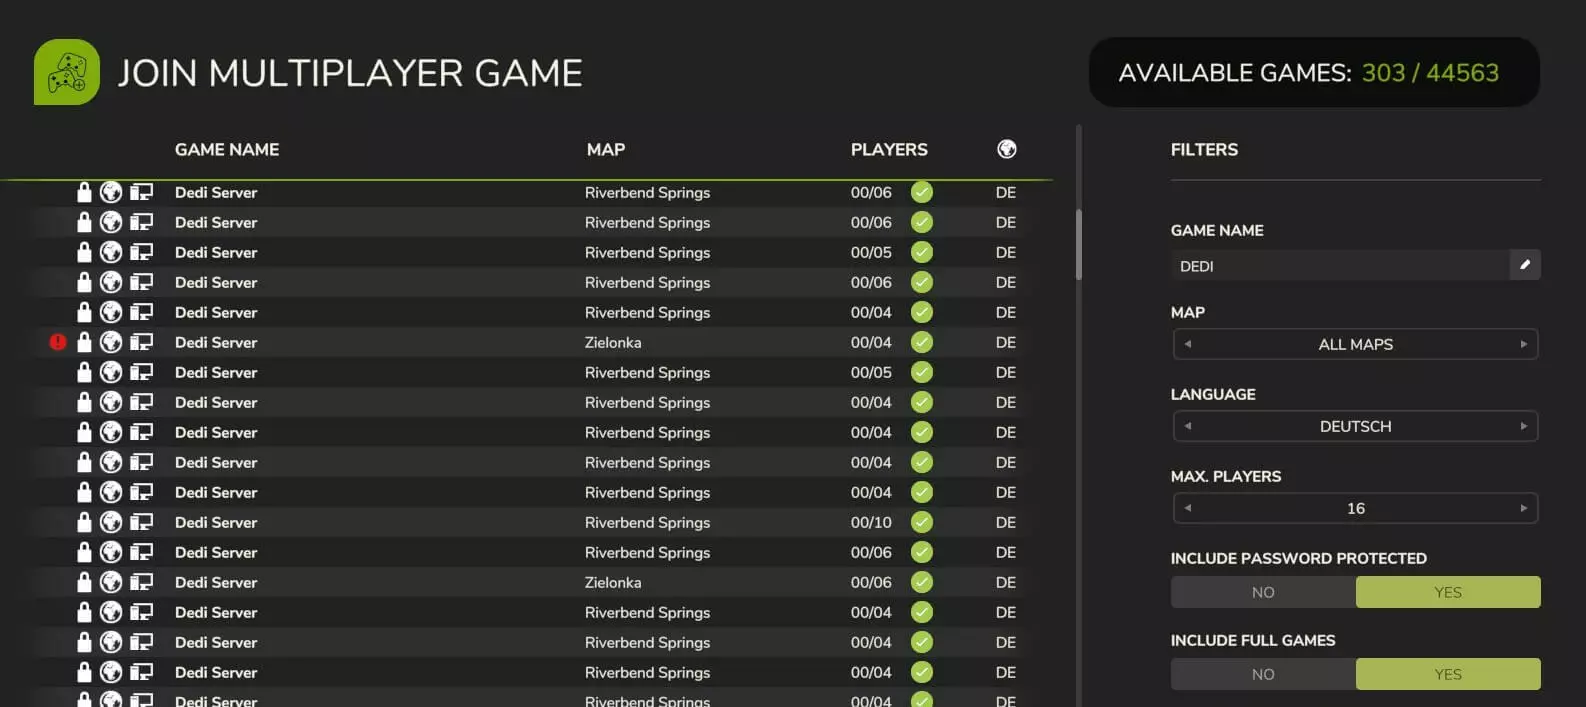
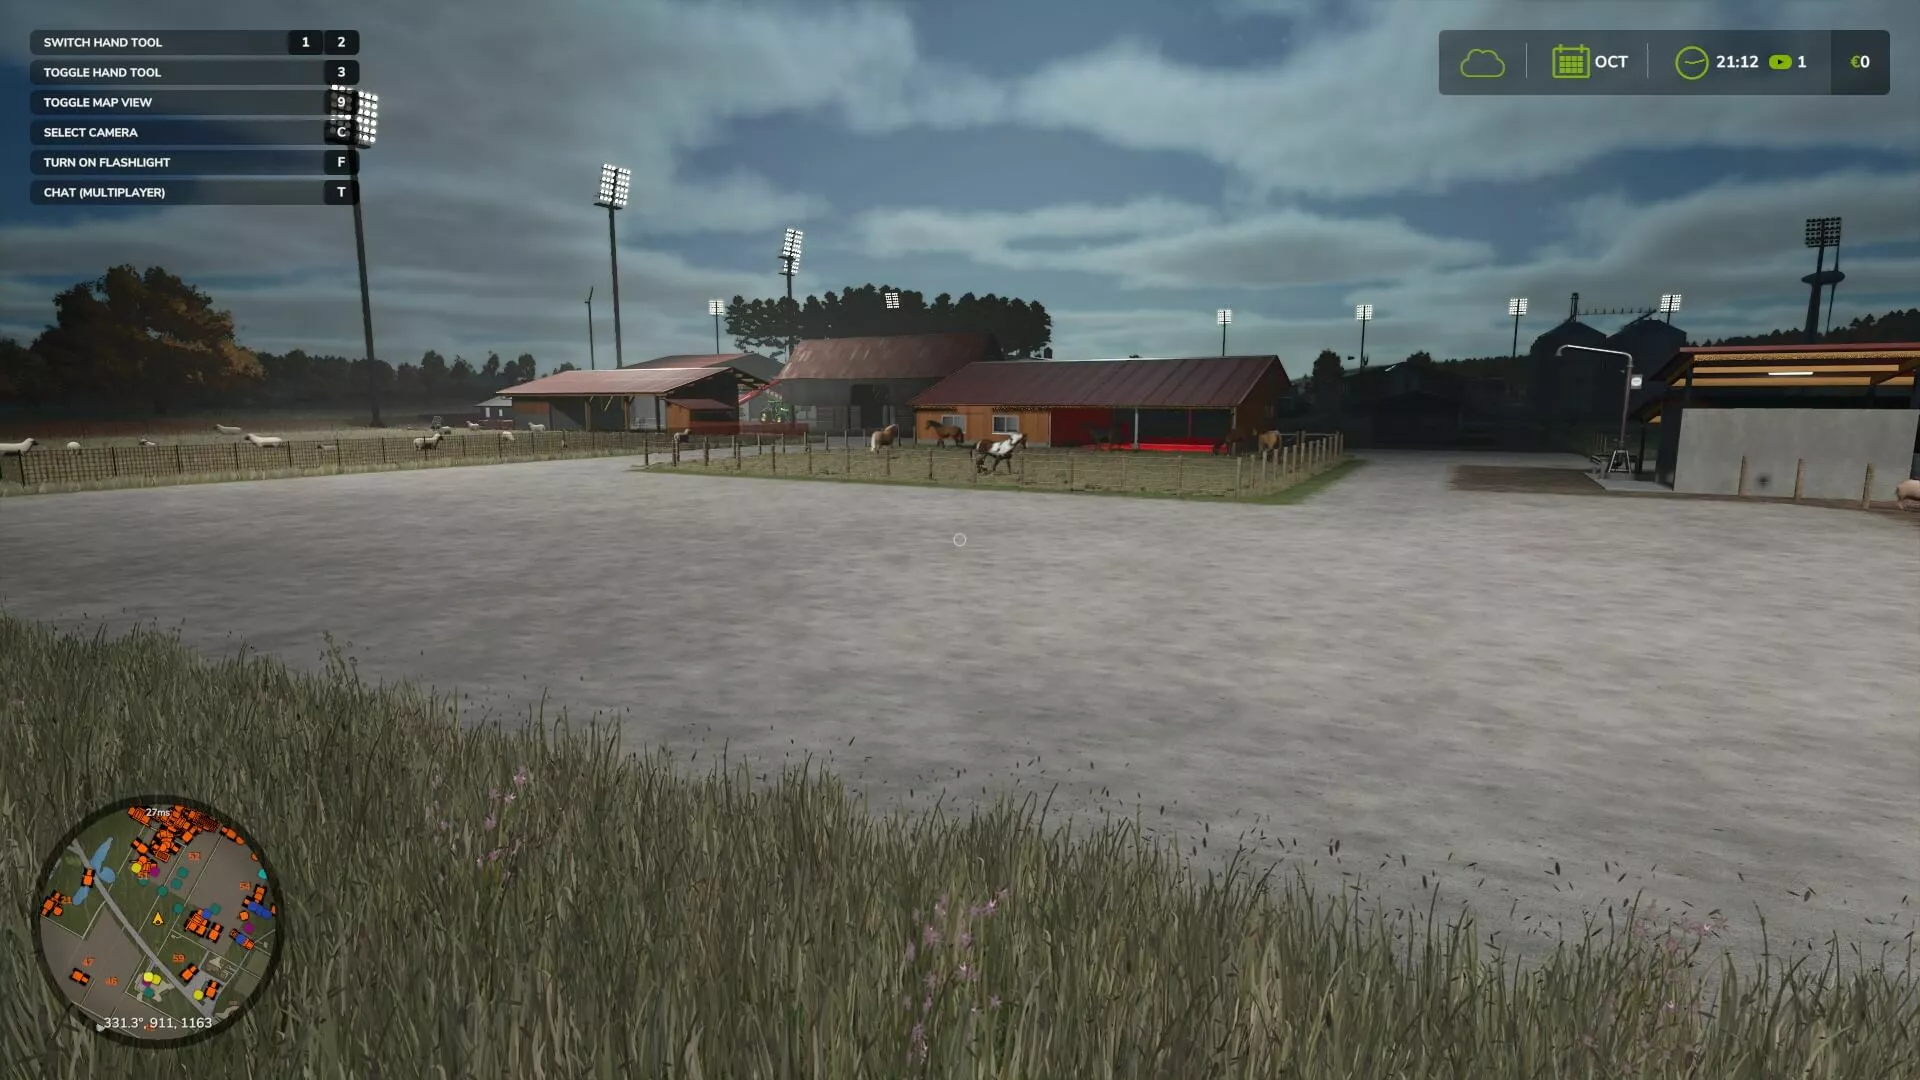
Now you can create your character and embark on a new multiplayer farming adventure!
Want to give your Farming Simulator 25 server a personal touch? Register your personal domain and link the address to the server!
