How to host a The Isle Evrima server in 10 simple steps
The Evrima update for The Isle is a new branch of the popular open-world dinosaur game. Since the game is exclusively multiplayer, it’s worth setting up your own server. This can be done in just a few steps with Linux.
What are the system requirements for an Evrima server?
In order to set up a The Isle Evrima server, your system has to meet a few minimum requirements so that the server setup runs as smoothly as possible. You should pay special attention to the amount of memory you have available.
- CPU: Make sure your processor has at least four cores.
- RAM: For your The Isle Evrima server, you’ll need at least 8 GB of RAM.
- Hard disk space: A sufficient amount of free disk space is required for the server. For Ubuntu about 30 GB is enough, and for a Windows server, you should plan at least 70 GB.
- Internet connection: A stable internet connection with a bandwidth of about 10 Mbps ensures that lagging won’t negatively affect your gaming experience. If you go with a professional provider, this won’t be a problem.
- Operating system: We recommend using a Linux distribution as the server operating system. In this step-by-step guide, we’ll be using Ubuntu. You can also use Windows Server, but the setup will be different from the one shown here.
Which server is best for Evrima?
There are different server types you can choose from when hosting your The Isle Evrima server. Taking individual needs into account is crucial to choosing the right server. The following types of servers are suitable:
- Cloud server: A cloud server uses virtualised resources and can also be scaled up or down at any time.
- vServer: VServers also rely on the use of virtualised resources.
- Dedicated server: In the world of server hosting, dedicated servers are a high-end product. Only you and your applications have access to the resources you purchase.
Five gaming scenarios for The Isle Evrima and their most suitable servers
The server that is most suitable for you depends on your gaming behaviour and the number of players that will be using the server. To make the decision easier for you, we have provided various scenarios along with corresponding servers:
| The Isle Evrima server scenario | The ideal IONOS server package |
|---|---|
| Server permanently online, up to 50 players | VPS Linux L |
| Server permanently online, up to 100 players | VPS Linux XL |
| Server permanently online, more than 100 players | VPS Linux XXL |
Our server tip for getting started with hosting
For starters, the value for money that cloud servers provide is practically unbeatable. Due to their excellent scalability, there’s not much that can go wrong when using cloud server hosting. In the event that you have more players than previously intended or are online for longer than you had planned on, there’s no need to worry. Cloud servers are flexible, allowing you to adjust your package as needed.
Try out your VPS for 30 days. If you're not satisfied, we'll fully reimburse you.
Step-by-step instructions for setting up your The Isle Evrima server
It takes just ten steps to set up your server and the process is similar to our instructions on hosting a dedicated The Isle server.
Step 1: Connect to your server
First, you need to establish a connection with your server. Normally the SSH protocol is used here.
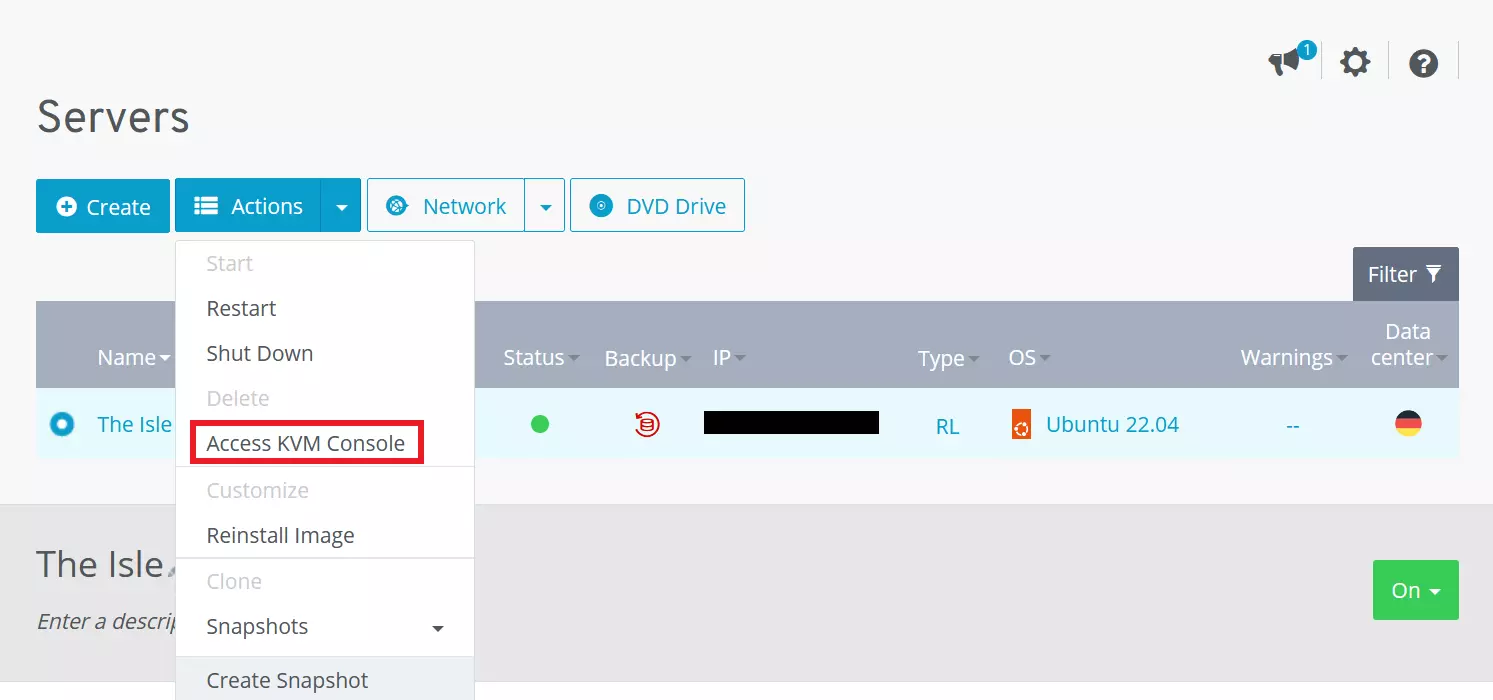
With the various IONOS solutions, you have access to an integrated KVM console, which you can operate with the following quick start guide:
- Log in to IONOS using your unique login details.
- Click on Server & Cloud and go to the server menu.
- Select your server product from the list.
- Click on the correct server and select the subitem Access KVM Console in the Actions drop-down menu.
- Log in with the server login credentials. You can find these in the Cloud Panel under Access data.

Step 2: Create a new user
Once a connection to your server has been established, the second step is to create a user. We have used isle as the name for the user that we created because it fits to the game. You can choose any username you like but remember to adapt the commands shown here accordingly by replacing isle with the username you have chosen.
sudo adduser isle
sudo usermod -aG sudo isle
su – isleStep 3: Install SteamCMD
SteamCMD is the command line edition of the Steam client and makes setting up your server a lot easier. Before installing SteamCMD, make sure that any existing system updates have been carried out:
sudo apt update
sudo apt upgradeYou then need to download the SteamCMD libraries. The following terminal commands can be used to download the libraries and create folders that are necessary for setting up your game server:
sudo add-apt-repository multiverse
sudo dpkg --add-architecture i386
sudo apt update
sudo apt install lib32gcc1 lib32stdc++6 libc6-i386 libcurl4-gnutls-dev:i386 libsdl2-2.0-0:i386
cd ~
mkdir steamcmd
mkdir isle
curl -sSL -o steamcmd.tar.gz https://steamcdn-a.akamaihd.net/client/installer/steamcmd_linux.tar.gz
tar -xzvf steamcmd.tar.gz -C steamcmd
cd steamcmdStep 4: Start SteamCMD
The Steam command line version should now be successfully installed on your system, which means that the following command can now be used to start SteamCMD:
sudo chmod +x steamcmd.sh
./steamcmd.shStep 5: Install The Isle Evrima
In the next step, you can start installing The Isle Evrima. To do this, run the following commands:
Steam>force_install_dir /home/isle/isle
Steam>login anonymous
Steam>app_update 412680 -beta evrima +quit
Steam>exitStep 6: Place the Steam client in a suitable folder
The Isle Evrima server will look for the Steam client in a specific folder. This means you’ll need to move it there first. To do this, create the directory and then move the file to the new folder:
mkdir /home/isle/.steam/sdk64
mv /home/isle/steamcmd/linux64/steamclient.so /home/theisle/.steam/sdk64/steamclient.soStep 7: Download the configuration files
To configure your server, you’ll need specific configuration files, which you can easily download from GitHub. However, you should first create a few folders where you can store the configuration files in a way that’s easy for you to find them:
mkdir /home/isle/isle /TheIsle/Saved
mkdir /home/isle/isle/TheIsle/Saved/Config
mkdir /home/isle/isle/TheIsle/Saved/Config/LinuxServerAfter creating the folder, go to the one named LinuxServer. Now download the necessary configuration files into this folder using the following commands:
cd /home/isle/isle/TheIsle/Saved/Config/LinuxServer
wget https://raw.githubusercontent.com/modernham/The-Isle-Evrima-Server-Tools/main/Engine.ini
wget https://raw.githubusercontent.com/modernham/The-Isle-Evrima-Server-Tools/main/Game.iniStep 8: Edit the configuration files
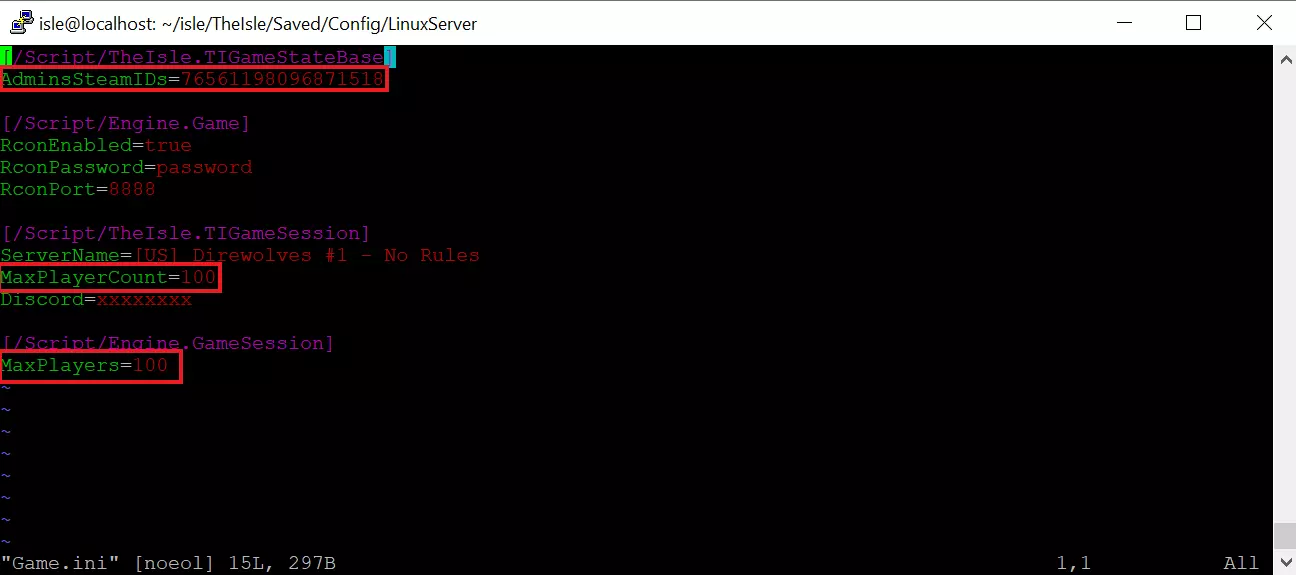
To edit the configuration files and adapt them to your preferences, you can use a text editor of your choice. We decided to use vim, because the text editor is already pre-installed and can be called directly in the terminal, meaning that the operation is simply done from the command line. The file that you need to edit is called Game.ini and contains important configuration settings. It can be opened and edited with vim by using the following command:
vim Game.iniNow, it’s time to specify the number of players that will be using your The Isle Evrima server. You can enter this information next to your SteamID, which you can find in your Steam account by clicking on your display name in the upper right corner and then on Account details. You can also specify the RCON password in the Game.ini or alternatively, choose not to use the password by entering RconEnabled:false.

Step 9: Start The Isle Evrima server
Now you can finally start your own The Isle Evrima server. To do this, you have to find the correct folder:
cd /home/isle/isleYou can start your server by entering the command shown here into your terminal. Be sure to replace the placeholder [ip-address] with your own IP address.
./TheIsleServer.sh MultiHome=[ip-adresse]?Port=7777?QueryPort=7778 -logStep 10: Connect to your server
After the server has been successfully set up, you and your fellow players can connect to it. To do this, simply open the game and enter the details of the The Isle Evrima server you just created. It’s best to check beforehand whether the Evrima branch has been successfully installed on Steam. Let the dinosaur fun begin!

