Creating a CS:GO Server: system requirements and how-to
If you want a CS:GO server where you can play alone or privately with your friends (or, optionally, with the best known AI-controlled bots), this is also possible by hosting your own dedicated CS:GO server. How exactly this works and whether it makes sense to rent hardware for a CS:GO server is explained below.
CS:GO: Own server on home PC or rent CS:GO server?
If you want to play CS:GO together with your friends, you have three different options:
- Start a shared, private game via training with bots
- Join a Steam community server together.
- Create and host your own CS:GO server
A joint game via the training with bots mode is quick to set up. Just invite your friends to the joint game beforehand, then start the server and adjust the number of bots as required. In this case, however, you are limited in terms of further settings. The restrictions are even stronger when you join a public community server together, because on there the operator is who will decide the configuration of the CS:GO server. In addition, it is possible for other players to join these servers at any time.
The official CS:GO servers differ from CS:GO dedicated servers (Steam Community or self-hosted) in one important way that has been hotly debated for years: Game information is processed at 64 ticks per second – on dedicated servers it is 128 per second. Player actions (movements, hits, etc.) are therefore processed with twice the intensity here, which - at least in theory - enables a more precise game evaluation. In practice, the difference is not noticeable for most players due to server lag and insufficient tech-specs (especially Internet connection).
If you want to have complete freedom in terms of game mode and server configuration, the third option is the right solution for you. On a dedicated server that you host yourself, you can decide who can join, and customise the setup entirely according to your preferences in real-time. Since the dedicated server software takes up its own computing capacity and does not run together with the client, you will need additional hardware and broadband power for the CS:GO server in this case. Renting these network and server resources from a provider is not only a practical, but also cost-effective alternative to a second PC, which would be associated with additional acquisition and electricity costs.
These are the system requirements for a CS:GO server
The hardware requirements of an own server for ‘Counter-Strike: Global Offensive’ are not too demanding. There are regular updates, including smaller performance updates, but the game has already been around for a few years. However, the developer Valve does not provide any concrete information about the minimum setup needed. Therefore, specs gathered from experience are the best point of reference for the composition and creation of a new CS:GO server.
Processor (CPU)
The clock rate required depends on how many players are active on your CS:GO server at the same time. In a minimum configuration for a few server participants, Intel or AMD CPUs with 2 GHz are adequate. However, if you are planning a server for lots of players (12 players or more), a CPU with 2.8 GHz or more will be required. An important factor to consider here is that the CS:GO server application is basically designed as a single-core application. To ensure optimal performance, a host system with high single-core performance is therefore recommended, as distributing it across multiple cores will be suboptimal and automatically reduces performance.
Memory (RAM)
In terms of RAM, a CS:GO server is not very demanding. In principle, you can plan on 100 MB per user for hosting the standard modes and maps. With a base value of 2 GB RAM, you can theoretically serve up to 20 players. In practice, however, you should provide a certain buffer here. If you want to use mods and plugins on your CS:GO server, this will put some strain on the RAM: In this case, additional RAM is recommended.
Hard disk space
When you create a CS:GO server, you must of course also make sure that there is enough storage space for the individual game files. For the basic installation without additional mods, maps, plugins, etc. you should plan around 15 to 20 GB. If you want to create regular backups, you should of course expect to need much more hard drive space (recommendation: 50 GB or more).
Whether you choose classic HDD data carriers or more powerful SSDs, this only plays a small role in a CS:GO server. However, due to the faster write and read speeds that SSDs feature, and the fact that they have dropped considerably in price, there is a lot to be said for using the more modern storage solution.
Operating system
To manage your server hardware you also need an operating system. The CS:GO server software ‘SteamCMD’, which incidentally also enables hosting of various other Steam games, is basically available for all three major systems - Windows, macOS and Linux. However, there are always problems when installing on macOS, which is why we recommend using the server systems from Microsoft (Windows Server 2016 or 2019) and UNIX/Linux (Ubuntu, CentOS, Debian, openSUSE).
Keep in mind that you also need to budget hardware resources for the operating system.
For Windows Server 2016, for example, Microsoft recommends at least:
- a 1.4 GHz processor (64-bit)
- 512 MB or 2 GB of RAM (without or with graphical user interface, respectively)
- 32 GB hard disk space
For installing Ubuntu, which is popular among Linux fans, the developer Canonical recommends the following minimum values (version 20.04):
- a 2 GHz processor (64-bit)
- 4 GB of RAM
- 25 GB hard disk space
Alternatively, the Ubuntu Server Edition, which does not have a graphical user interface by default, is a much neater edition that is fine with a 1 GHz processor (64-bit), 1 GB of RAM and 2.5 GB of hard drive space.
Broadband requirements
As a shooter, ‘Counter-Strike: Global Offensive’ is one of the types of games where it is particularly important that players and servers have the lowest possible ping. In other words, the time it takes for data packets to travel from the players’ devices to the server, or vice versa, should be as short as possible. This means that your CS:GO server needs to have a good broadband connection. From the server’s point of view, the upload value (also called ‘uplink’) is important, as it determines how fast the server can send data to the players.
Valve specifies 53.4 Kbit/s per player as the upload guideline for Source games like CS:GO. This results in the following in relation to the server size:
| Players on server | Upload capacity requirements |
|---|---|
| 2 players | 128 Kbit/s |
| 4 players | 256 Kbit/s |
| 12 players | 640 Kbit/s |
| 24 players | 1.280 Kbit/s (1,28 Mbit/s) |
| 32 players | 1.708 Kbit/s (1,71 Mbit/s) |
Compared to the downstream, the upstream is significantly lower for Internet access. Classic tariffs, for example, usually offer up to 16 Mbit/s download speed, but often only between 1 and 2 Mbit/s upload speed!
Rent a CS:GO server with IONOS: Which model is best?
Renting hardware for a CS:GO server is much more convenient than assembling and purchasing it yourself. In addition, you are much more flexible with a rented solution for your CS:GO server, because in most cases you can increase or decrease the booked performance or cancel it completely. In addition, you can now rent servers or server resources at very affordable prices.
However, the search for a suitable provider is not that easy - especially since you often have to choose the right server model. At IONOS, the following three variants are available to you:
- CS:GO Dedicated Server (dedicated server, optionally self-administered or as managed solution by IONOS)
- vServer (Virtual Private Server, or VPS)
- Cloud Server
The three IONOS servers in comparison: Dedicated server with slight advantages
To address the question of which IONOS model is best for creating a CS:GO server, let's take a brief look at the three available solutions:
Decide on a Cloud Server, you get access to virtualised resources, whose concrete performance capacity depends on the selected tariff. If you want to make your CS:GO server spontaneously available for more players, you can conveniently increase and then decrease these capacities at any time via your account. Since the performance is billed per minute, you only pay for the resources that you have used.
An external broadband connection of the server with up to 400 Mbit/s is guaranteed by IONOS regardless of the selected server model.
With a vServer, you also rent virtualised resources. However, this is basically a fixed setup for which you pay a fixed amount each month – regardless of whether you use your CS:GO server or not. If you plan to make your server available continuously, however, this model is significantly more cost-effective than a cloud server.
However, the best option for creating a CS:GO server with IONOS is a Dedicated Server. With this model, you get access to hardware that is specifically assigned to you and is optimal for hosting individual applications. In particular, the strong single-core CPU power with up to 3.8 GHz is a good argument for a CS:GO dedicated server.
CS:GO server: Three scenarios and the matching IONOS server tariffs
As mentioned, IONOS also offers different tariffs for each of the three server models shown, which differ in terms of performance and costs. As between the options vServer and Dedicated Server, you also choose one option here.
In the table below, we’ve presented three possible scenarios for your own CS:GO server.
| Recommended vServer | Recommended Dedicated Server | ||
| 2-8 players (standard modes/maps) | Virtual Server Cloud L (VPS L) | IONOS Dedicated Server L-16 HDD or SSD | |
| 8-24 players (standard modes/maps) | IONOS Virtual Server Cloud XL (VPS XL) or IONOS Virtual Server Cloud L RAM (VPS L RAM) | IONOS Dedicated Server L-16 HDD or SSD | |
| More than 24 players (community modes and maps) | IONOS Virtual Server Cloud XL (VPS XL) or IONOS Virtual Server Cloud L RAM (VPS L RAM) | IONOS Dedicated Server L-16 HDD or SSD |
Try out your VPS for 30 days. If you're not satisfied, we'll fully reimburse you.
Create CS:GO server: step-by-step guide (Windows Server)
Once you have found the right hosting solution for your own CS:GO server, all that remains is to install the required operating system. The classic server operating systems like Windows Server, Linux or Debian are recommended - ideally, you won’t be running any other applications on the server besides the system software and the SteamCMD.
In the following instructions, we will show you how to get a CS:GO server running on Windows Server 2016 as a IONOS customer (vServer, Cloud Server, Dedicated Server).
Step 1: Connect to the server
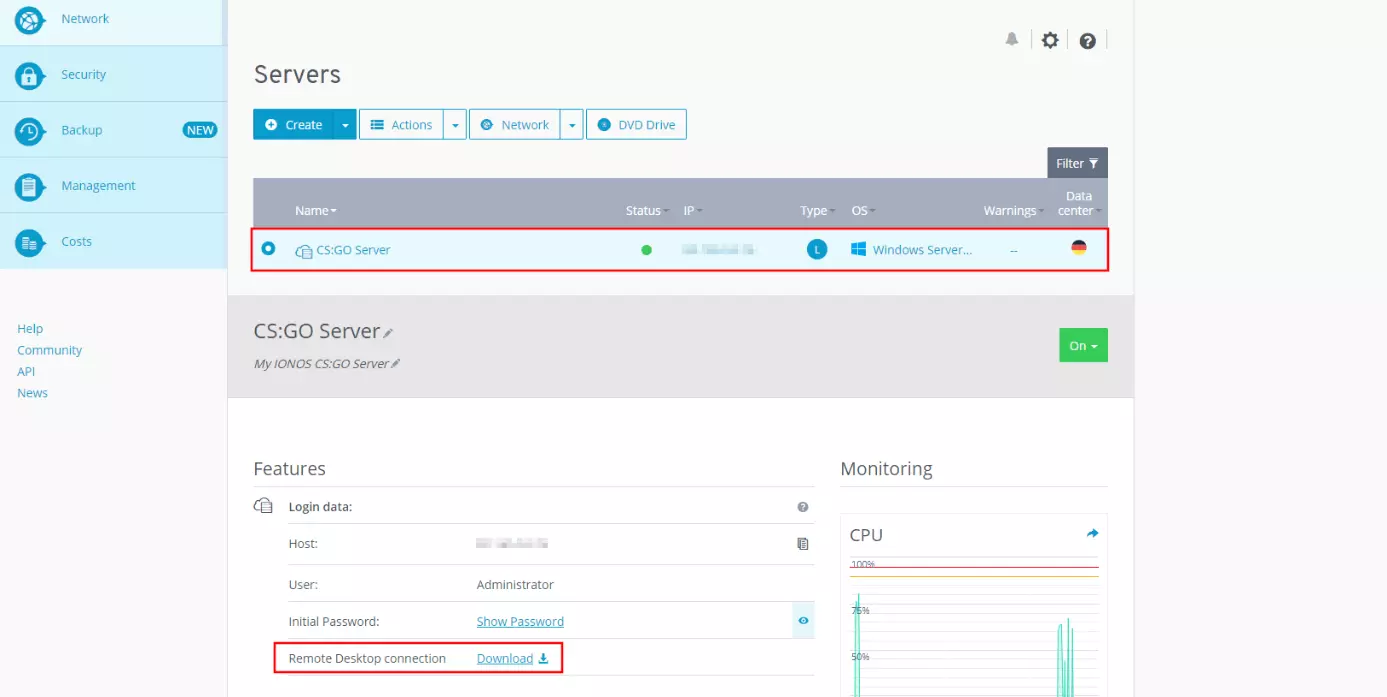
Before you can create your CS:GO server, you must first establish a remote connection to the server. If you have not set this up yet, you can easily do this via the IONOS Cloud Panel. For this purpose, log in to the Login page with your data and go to the ‘Server & Cloud’ section in the panel.
In the listing, now select the server on which you want to install and run ‘Counter-Strike: Global Offensive’. In the data and information about the server that is then presented, you will find the entry ‘Remote desktop connection’ under ‘Access data’, including a download link, which you can click in the usual manner:
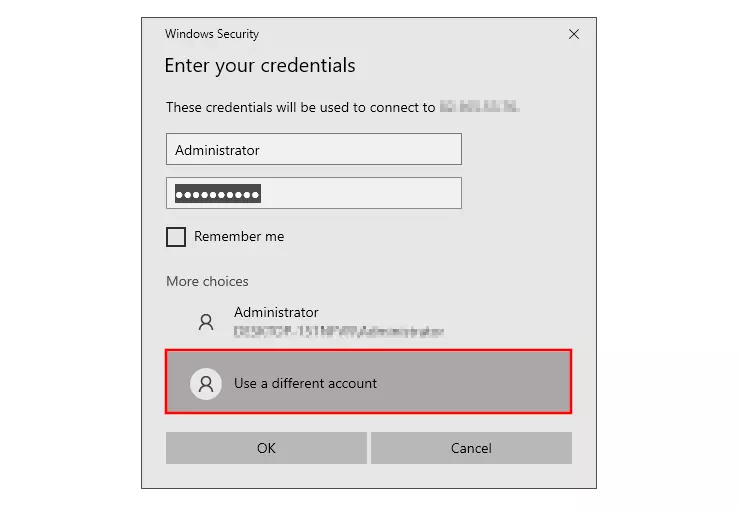
In the next window, click on ‘More options’ to select the ‘Use another account’ item there. Enter the login information for your CS:GO server. If you have not yet assigned an individual password, you will find the ‘Initial password’ in the access data in the Cloud Panel.
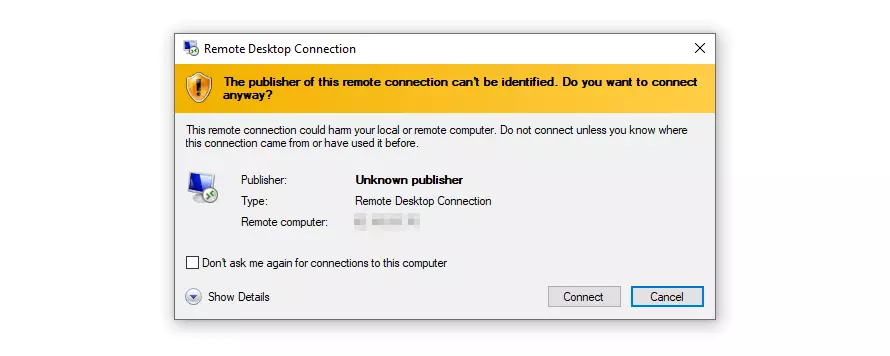
The first time you connect to the server, you will receive a security warning: the certificate is not yet trusted. You can finally establish the remote connection by confirming your action.
The remote connection to your CS:GO server can be stopped at any time by clicking on the ‘X’ in the connection bar presented at the top of the screen.
Step 2: Install SteamCMD
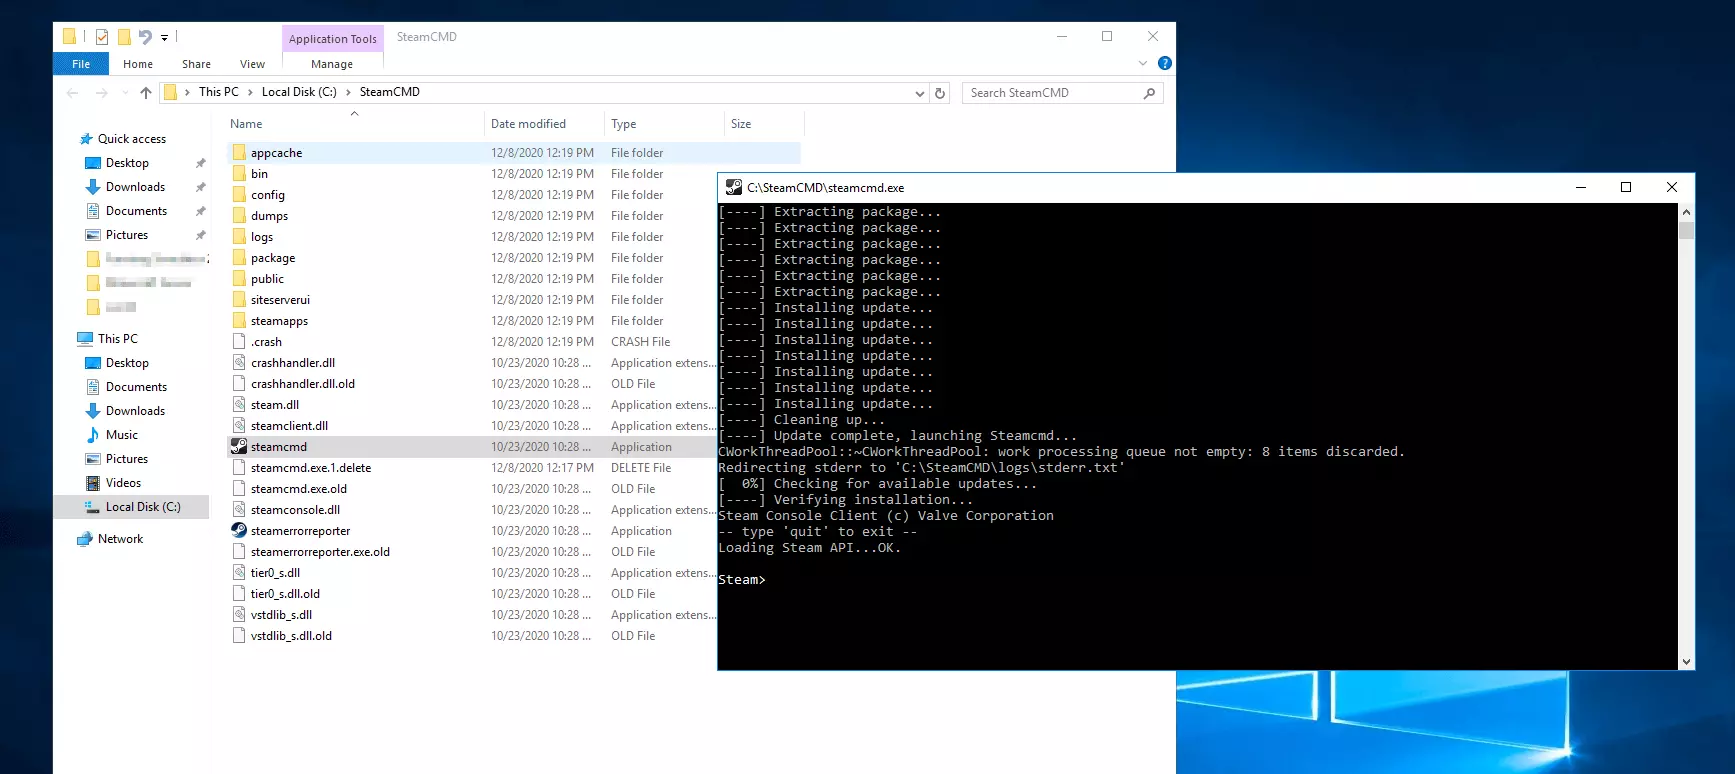
To create a CS:GO server, you will need the SteamCMD server application, which can be downloaded from the following download link.
Step3: Install CS:GO Dedicated Server
Now type the following command into the Steam input line ‘Steam>’ to set the installation directory (here in C:) for the CS:GO server:
force_install_dir C:\csgo-ds\In the next step, log in to the public Steam server as an anonymous user:
login anonymousFinally, install the latest dedicated server version of ‘Counter-Strike: Global Offensive’ with the following input:
app_update 740 validateThe number ‘740’ used in the command is the app ID of the CS:GO server application on the Steam network. For a later update, the command ‘app_update 740’ is enough.
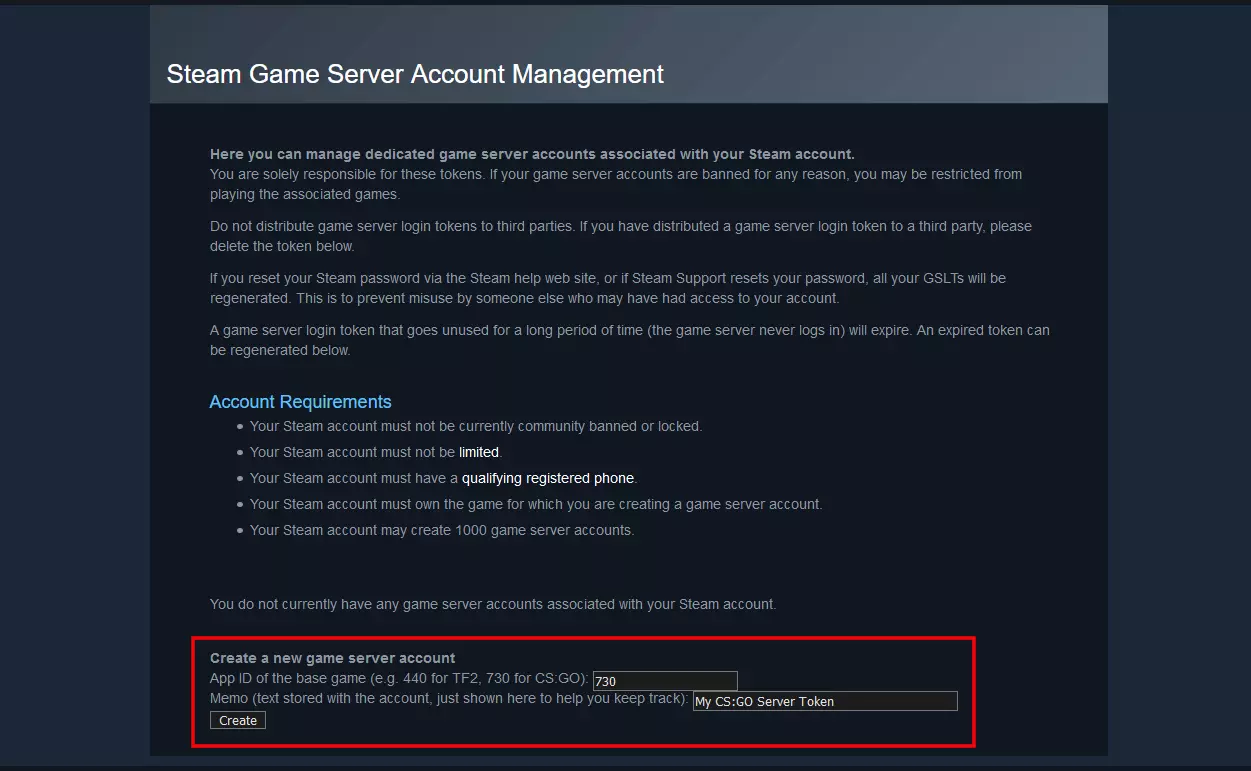
Step 4: Generate Game Server Login Token (GSLT)
When you create a CS:GO server, link it to an official Steam account using a Game Server Login Token (GSLT). Otherwise, you’ll only be able to deploy your server on a local network.
The reason for linking the server to an official Steam account is so that developer Valve can target users who violate the guidelines when running a CS:GO server.
To generate a token, go to Steam game server account management and log in with your Steam account or the Steam account you want to link the server to. After logging in, enter the app ID of the base game (not the server app ID!) – ‘730’ for ‘Counter-Strike: Global Offensive’ – as well as an optional description of the token and click ‘Create’:
Make a note of the generated token or save it in a separate document to have it ready when you connect to the server. You can also find the code in the Steam game server account management at any time.
Step 5: Share port
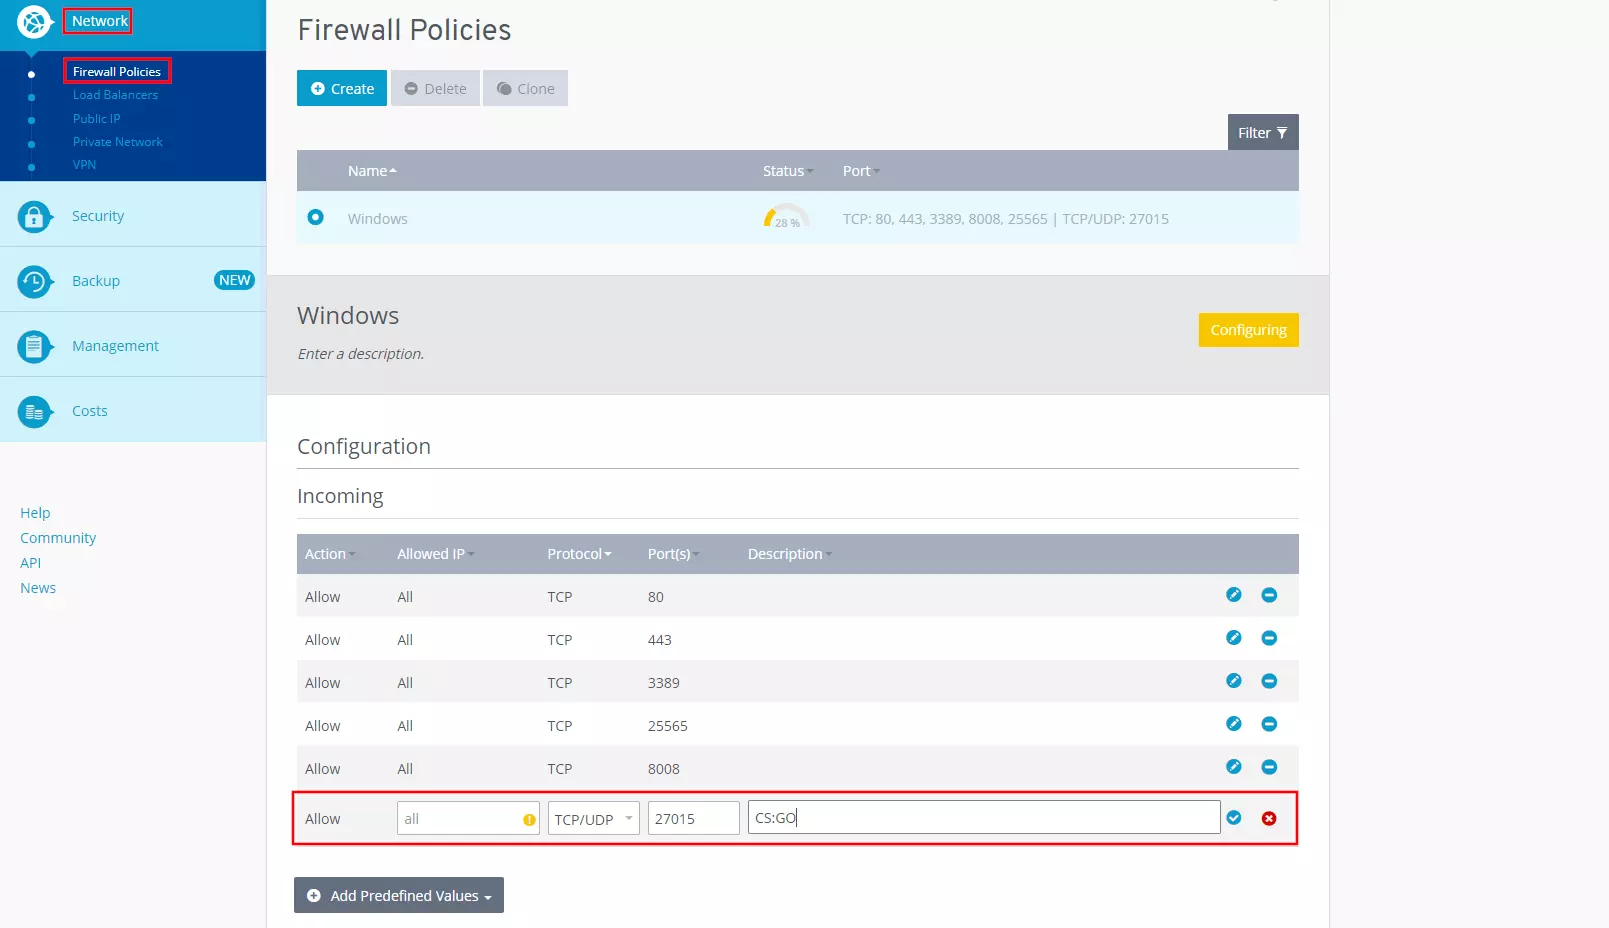
Before you start your CS:GO server, you have to release the appropriate ports to make the server discoverable in the community server browser. Specifically, these are the TCP and UDP ports with the number 27015, which you must open so that your server can communicate with the individual clients via the Internet. With an IONOS server, you can do this conveniently via the Cloud Panel.
For this purpose, call up the ‘Cloud & Server’ section as you did when setting up the remote connection. In the left side menu, first select ‘Network’ and then ‘Firewall Policies’. Click on your CS:GO server and navigate down to the ‘Incoming’ section. Finally, create a new rule with the following properties:
-
- Allowed IP: all (just leave the field blank for this)
- Protocol: TCP/IP
- Port(s): 27015
- Description: individual description of port sharing
Confirm the new rule via the ‘Add rule’ button and wait until the server reconfiguration is completed. In some cases, it may be necessary to restart the server after port sharing.
Step 6: Start CS:GO server
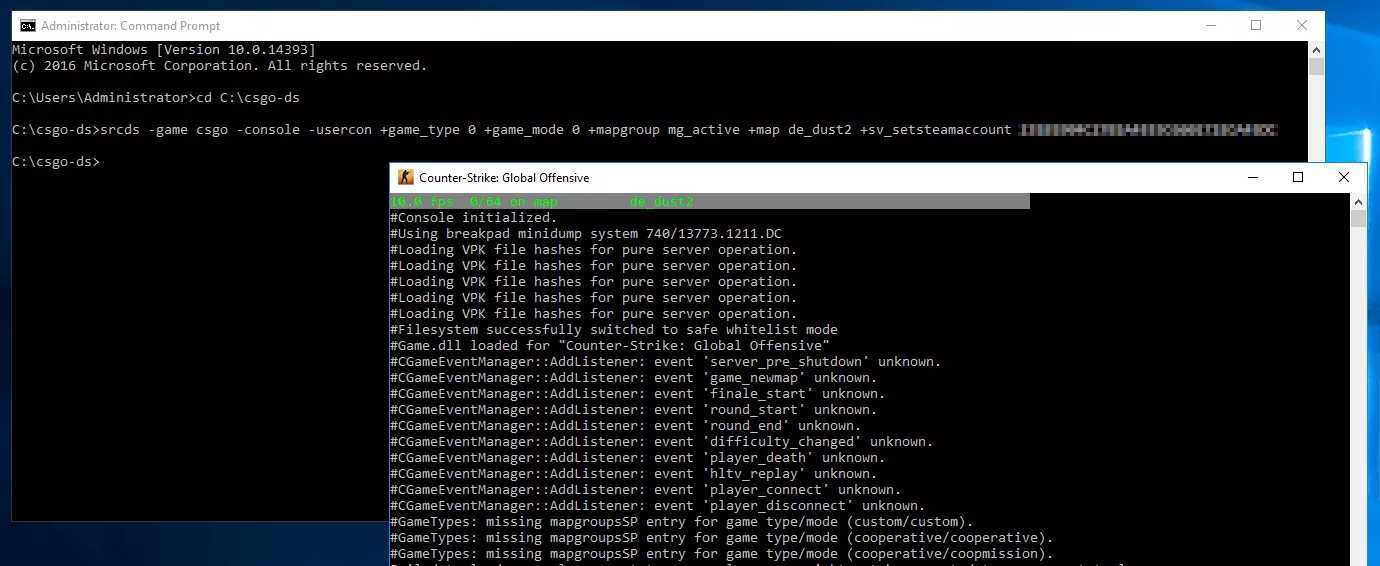
Now you can finally start your own public CS:GO server. The easiest way is via a command prompt. Open the Windows command line and change to the CS:GO Dedicated Server directory. We have placed the server application under C:\csgo-ds, so the appropriate CMD command in our case looks like this:
cd C:\csgo-dsWith the appropriate CS:GO console parameters, you can now start the server in the directory. It is important that you add the Game Server Login Token in addition to the information about the game mode, map and so on. A possible start setup (Casual Game, Arms Race, Startmap: de_dust2) including the attached GSLT can be executed with the following command:
srcds -game csgo -console -usercon +game_type 0 +game_mode 0 +mapgroup mg_active +map de_dust2 +sv_setsteamaccount INDIVIDUAL GAME SERVER LOGIN TOKENYou can find a list of various commands for configuring the CS:GO server in the following Post on Total CS:GO. Detailed information on advanced server settings with separate configuration files is provided in the Dedicated Server article in the Valve Developer section.
Step 7: Join CS:GO server
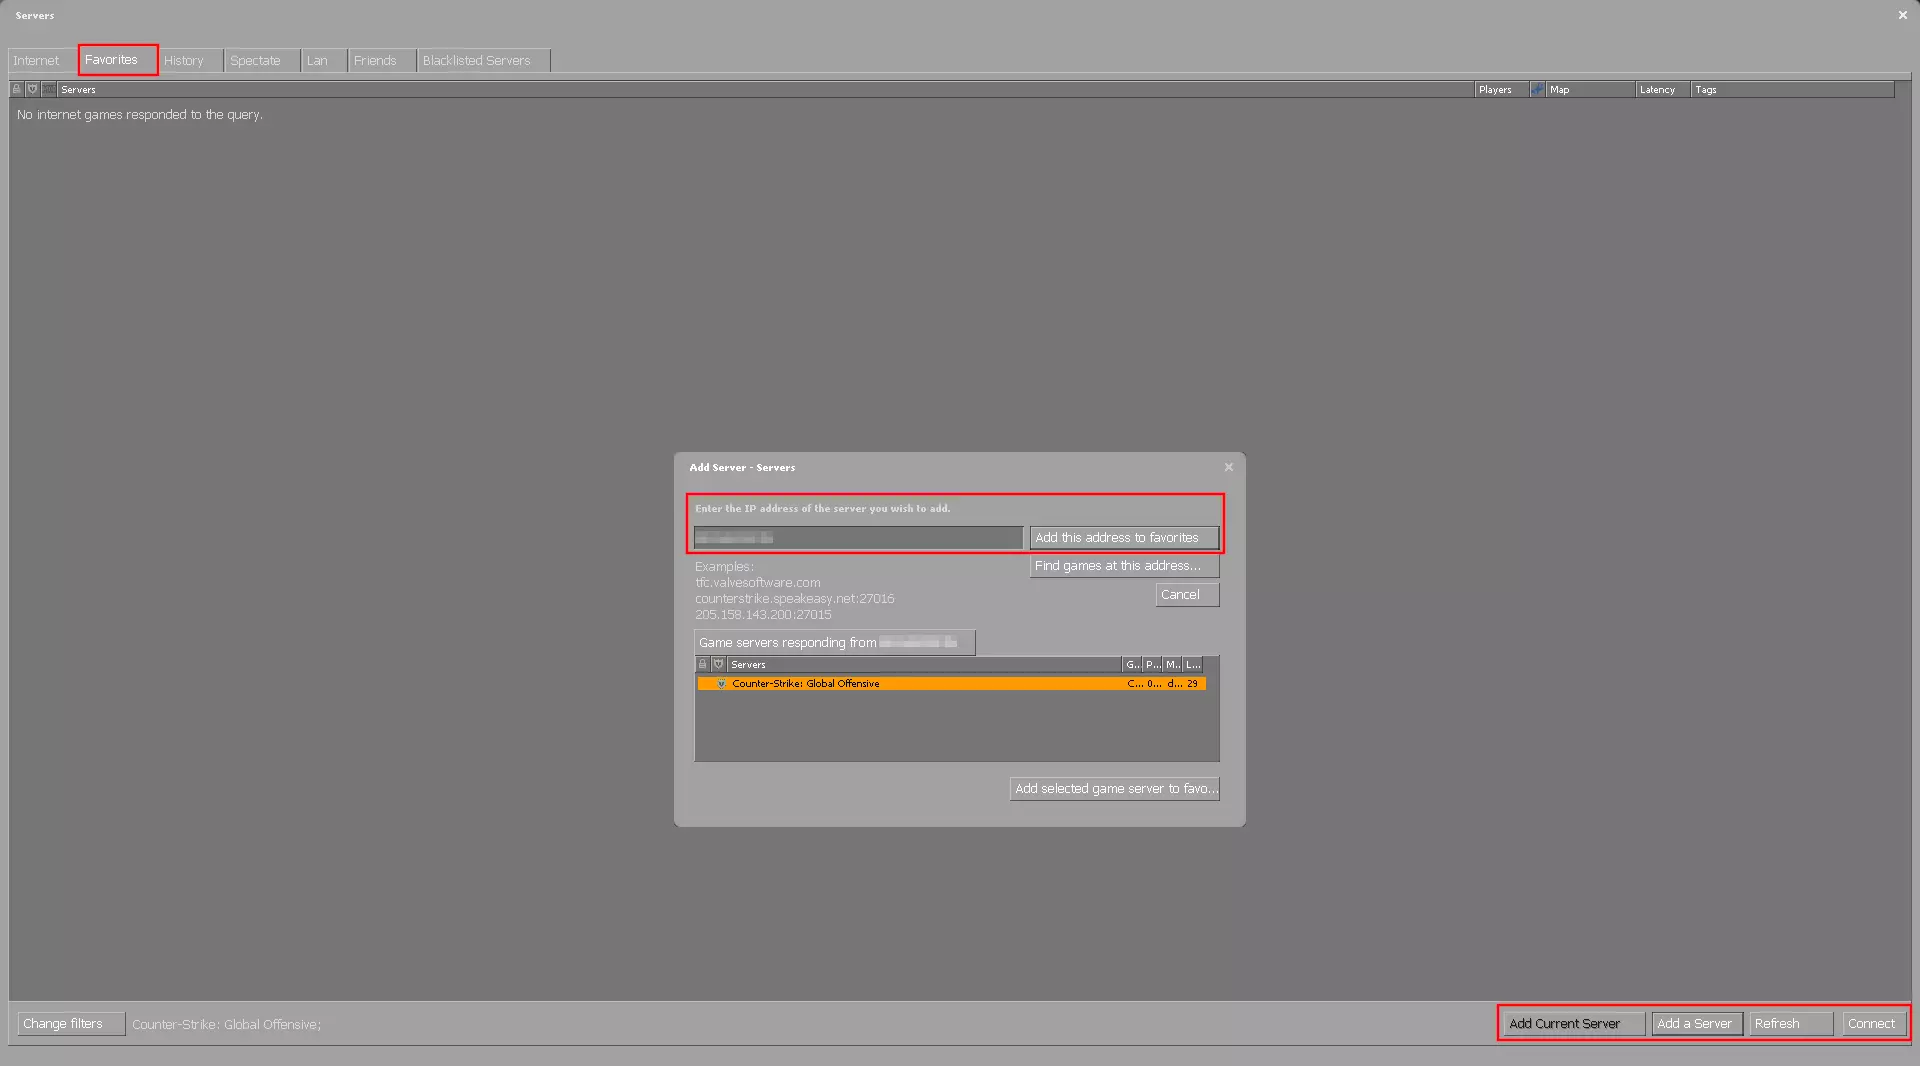
You and any other players you want to share your newly set up CS:GO server with can now join the game at any time as long as you keep the server application running. To do this, you need to complete the following steps:
- Launch Counter-Strike: Global Offensive.
- Click on ‘Play CS:GO’.
- In the game menu, select the ‘Community Server Browser’ option.
- Switch to the ‘Favorites’ tab and click on ‘Add Server’.
- Type in the IP address of your CS:GO server (found in the IONOS Cloud Panel) and press ‘Add this address to Favorites’.
- In the server browser, you should now be presented with your server for selection - it may be necessary to press ‘Refresh’ first. Click on ‘Connect’ or double-click on the server entry to establish the connection.
Make a statement with your own .gg domain and let the games begin. Register your own .gg domain now with IONOS.


