Rust server hosting: Create your own server
Hunger, thirst and cold - these were the first ‘opponents’ that players faced in the online survival game Rust. As things progress, hostile animals and, of course, the other players on the Rust server await in the form of life-threatening challenges. In February 2018, Rust was released as a full-fledged game on Steam after a long Early Access phase, although the developer team Facepunch Studios probably only dreamed that the game would become one of the hottest multiplayers in the Twitch scene.
The player community is distributed among the Rust servers, with a difference between the developer’s official servers and community servers or modified servers that are hosted and managed by the gamers themselves. We’ll reveal the advantages of a private Rust server and what requirements your system must meet for this. We will then show you how to create your own Rust server and get it up and running, step by step.
Thanks to free starting credit, you can test the IONOS cloud server for 1 month free of charge (or until the credit is used up) and experience the perfect combination of performance and security!
Rust Server: Hosting on home PC or rent a server?
Creating your own dedicated Rust server gives you the possibility to enjoy Rust the way you’ve always wanted to. As the administrator of a server, you have the power to decide whether PvE or PvP is the focus, which map to play, and how big the game world should be in general. Use a whitelist extension like the uMod-Plugin ‘Whitelist by Wulf’, so you can also play a private Rust round that only you and your friends can join. In other words, you have complete control and can customise the survival game to your own liking.
Rust’s dedicated server software can basically run in parallel with the game, so you can theoretically host your own Rust server directly on your home PC and join that server from the same device. However, it’s important to keep in mind that both applications take up computing capacity, power, and broadband resources. Unless you have a high-end system and an excellent Internet connection, it is recommended that you rent the Rust server from a provider.
What are the system requirements for a Rust server?
The hardware requirements for a Rust server should not be underestimated. Even though the multiplayer mode doesn’t have the highest graphics requirements, the server has to provide a lot of power to make the huge in-game world available to all players. The type and size of the map are therefore just as important for the required hardware as the number of active players. The number of plugins used also plays a big role in how much computing power you need. We have summarised the most important performance data for a smoothly functioning Rust server setup for you.
Processor (CPU)
If you want to run a Rust server, a very good CPU performance is one of the most important requirements. Even for smaller private servers for you and your friends, you should use a processor with at least 3.4 GHz. For a game world that wants to offer space for several hundred players, 4 GHz is required. There is one important factor that you have to keep in mind: Rust’s dedicated server software is basically designed as a single-core application. For this reason, a host system with high single-core performance is recommended to ensure optimal performance, since distributing it across multiple cores is compromising, and automatically reduces the performance potential.
Memory (RAM)
When thinking about what size RAM or memory you need, it is crucial that you have a basic idea of the size of your Rust server. If you are planning with the standard map size of three square kilometres for a select, small group of players of five to ten people and without using lots of mods, you can plan with the minimum recommendation of 4 to 6 gigabytes of RAM for your dedicated server. If you want to create and host a Rust server that can accommodate hundreds of players at a time (on average, public Rust servers actively host around 50 players), at least 8 to 16 gigabytes of RAM is recommended.
Inform yourself about the additional resources needed if you want to expand and individualise your Rust server with modifications later on!
Hard disk space
You’ll likely need about 6 gigabytes of hard disk space for the basic installation of a dedicated Rust server. However, you should plan for additional storage space for the user files and any mods right from the start. For long-term Rust server hosting, a minimum storage quota of 32 gigabytes is therefore recommended, which you can easily achieve in today’s hardware setups.
Classic HDD disks or more powerful SSDs? This question isn’t hugely important when hosting a Rust server. However, due to the faster write and read speeds of SSDs and the fact that they have fallen sharply in price, there is much to be said for using the more modern storage solution.
Operating system
In terms of operating system, you can choose between Microsoft (Windows Server 2019, Windows Server 2016) and Linux applications (Ubuntu, Debian, CentOS, OpenSUSE). The server software ‘SteamCMD’, with which you can also use other dedicated servers like a CS:GO Server, is technically also available for macOS, but problems often occur during installation on Apple’s iOS system.
Your operating system will also use resources on your server. For a Windows Server 2016, for example, Microsoft has stated the following minimum requirements:
1.4 GHz processor (64-bit)
- 512 MB or 2 GB of RAM (without or with graphical user interface, respectively)
- 32 GB hard drive space
For the installation of the popular Linux distribution Ubuntu, developer Canonical recommends the following minimum values (version 20.04):
- 2 GHz processor (64-bit)
- 4 GB RAM
- 25 GB hard disk space
The significantly slimmer Ubuntu Server Edition (without graphical user interface) alternatively already runs with a 1 GHz processor (64-bit), 1 GB RAM and 2.5 GB hard disk space.
Broadband demand
The internet connection of your Rust server is just as important as the hardware of the server itself. A low ping (also known as ‘latency’) on both the server and player side will allow the action-heavy world of Rust to become an unforgettable online experience. In terms of the server, the upload value (‘uplink’ or ‘upstream’) is crucial. The more upload speed your server has available per player, the faster the server data reaches the players.
The upstream of Internet connections turns out to be significantly lower than the downstream: Classic DSL 16,000 lines, for example, offer up to 16 Mbit/s download speed, but often only between 1 to 2 Mbit/s upload speed!
The developer Facepunch Studios does not provide any official information about the recommended upload rate per user. However, you can orientate yourself on the guideline published by Valve (developer of the server tool SteamCMD) for Source games like CS:GO, CS:Source or Apex Legends, which is 53.4 Kbit/s per player. In relation to the number of players, this results in the following broadband requirements for a Rust server:
| Players active on server | Min. upload speed |
|---|---|
| 5 | 267 Kbit/s |
| 50 | 2.670 Kbit/s (2,67 Mbit/s) |
| 100 | 5.340 Kbit/s (5,34 Mbit/s) |
| 200 | 10.680 Kbit/s (10,68 Mbit/s) |
| 500 | 26.700 Kbit/s (26,7 Mbit/s) |
Rust-Server hosting with IONOS: Which server model is ideal?
The listed requirements make it clear why it is more convenient to rent hardware for a Rust server from a provider. You don’t have to worry about whether your Internet connection provides enough upload capacity and you almost always have the option of increasing or decreasing the booked capacity at any time.
Once you have found a suitable provider for server hosting, you usually have several different models to choose from. At IONOS, for example, you can choose one of the following three variants:
- Dedicated Server (either self-managed or managed by IONOS)
- vServer (Virtual Private Server)
- Cloud Server
A distinction is often made between ‘dedicated’ and ‘shared’ hardware for servers. What these two approaches are all about and how they differ from each other is revealed in our article ‘Shared Hosting vs. Dedicated Hosting’.
IONOS Server options – a useful comparison
The three mentioned server options of IONOS differ in the price as well as in the way the resources are provided.
Whichever server solution you choose, IONOS guarantees an external broadband connection with up to 400 Mbit/s.
If you rent a Cloud Server, for example, you’ll have access to virtualised resources that you can adjust at any time via the IONOS Cloud Panel. Since the service is billed by the minute, at the end of the month you only pay for the resources you have used. This exact billing represents the difference to a vServer package. In this case, the rented resources are virtualised - but in a fixed setup, for which a fixed monthly amount is charged. Whether you use the Rust server during this period or not won’t affect the pricing. However, if you plan on continuous operation, a vServer is significantly cheaper than a cloud server.
However, the option we recommend for a Rust server at IONOS is the third model: a Dedicated Server. Renting a dedicated server, you’ll have access to resources that are provided exclusively for you. The strong single-core CPU performance with up to 3.8 GHz (4.2 GHz Turbo Boost) is ideal for Rust server hosting.
Three Rust server examples and their matching IONOS server tariffs
There are different tariffs for the three listed server examples from IONOS, which differ primarily in terms of performance and cost. So, if you want to create your Rust server with IONOS, first choose the model and then a tariff that gives you access to the resources you need - CPU, memory, and disk space.
In the table below, we have compared three possible scenarios for a Rust server and assigned the respective matching tariffs for a vServer and Dedicated Server with IONOS.
| Minimum requirements (including operating system) | Recommended vServer | Recommended Dedicated Server | ||
| Server for 2-5 players (standard map without/with few mods) | Windows: 3.4 GHz (min. 3 vCores), 6 GB RAM, 40 GB storage space Linux: 3.4 GHz (min. 3 vCores), 5 GB RAM, 10 GB storage space | IONOS Virtual Server Cloud XL (VPS XL) or IONOS Virtual Server Cloud RAM L (VPS L RAM) | Dedicated Server L-16 HDD or SSD | |
| Server for 50 players (individual map/mods) | Windows: 4.0 GHz (min. 3 vCores), 10 GB RAM, 50 GB storage space Linux: 4.0 GHz (min. 3 vCores), 9 GB RAM, 20 GB storage space | IONOS Virtual Server Cloud RAM L (VPS L RAM) | Dedicated Server L-16 HDD or SSD | |
| Server for 500 players (individual map/mods) | Windows: 4.6 GHz (min. 4 vCores), 16 GB RAM, 70 GB storage space Linux: 4.6 GHz (min. 4 vCores), 16 GB RAM, 40 GB storage space | IONOS Virtual Server Cloud RAM XL (VPS XL RAM) | Dedicated Server L-16 HDD or SSD |
Try out your VPS for 30 days. If you're not satisfied, we'll fully reimburse you.
Rust server hosting: Step by step guide (Windows Server)
As soon as you have the hardware ready, you can start creating your personal Rust server. The steps to be taken as an IONOS customer (vServer, Cloud Server, Dedicated Server) are described in the following instructions. In this case, we have chosen the Microsoft operating system Windows Server 2016 as the system basis.
Step 1: Create a connection to the server
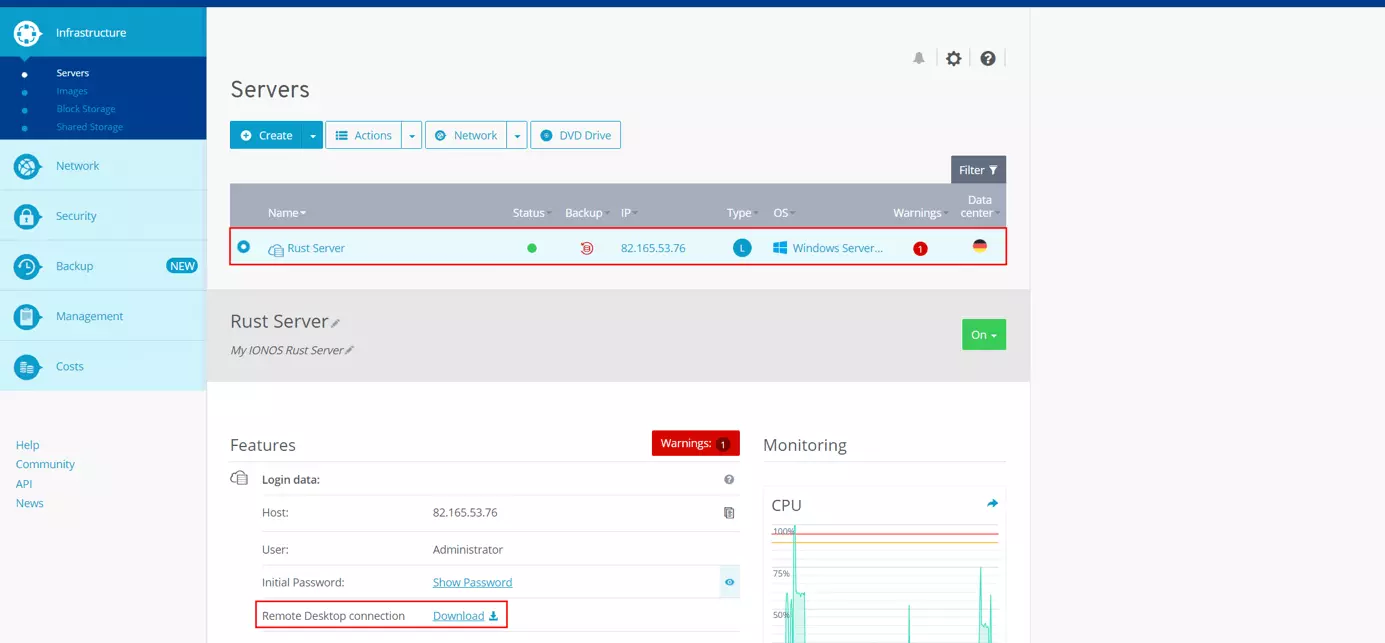
To work with rented resources, you need to connect to the server in the first step. For this purpose, you can establish a remote connection to the server from your computer, which can be conveniently set up via the IONOS Cloud Panel. Log in via the login page with your personal customer data, then switch to the ‘Server & Cloud’ section.
Now click on the entry of the server on which you want to run your Rust server. The panel will automatically show you the most important information and access data. At this point you will also find a download link for setting up the remote connection, which you now click on:
Confirm with the selected default choice (‘Remote Desktop Connection’) with ‘OK’ or save the file locally first and then execute it via double-click. In the subsequent dialog, press ‘Connect’.
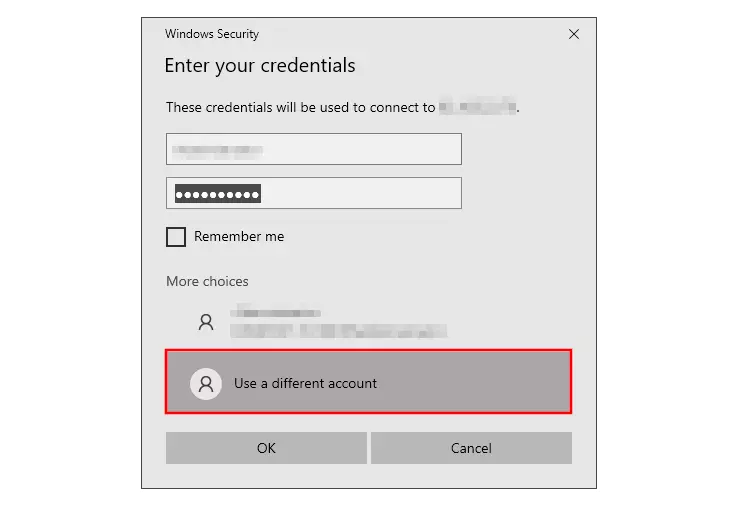
You will now be asked to enter your access data for the server. To do this, click on ‘More options’ and ‘Use another account’. If you have not yet defined any individual login data, you will find your personal ‘initial password’ in the access data in the Cloud Panel.
The first time you connect to the server, you will receive a security warning because the server security certificate is not yet trusted. You can agree to the remote connection via the ‘Yes’ button.
Step 2: Install SteamCMD
Once the connection to your server is established, install the SteamCMD server software – available for Windows from the following download link.
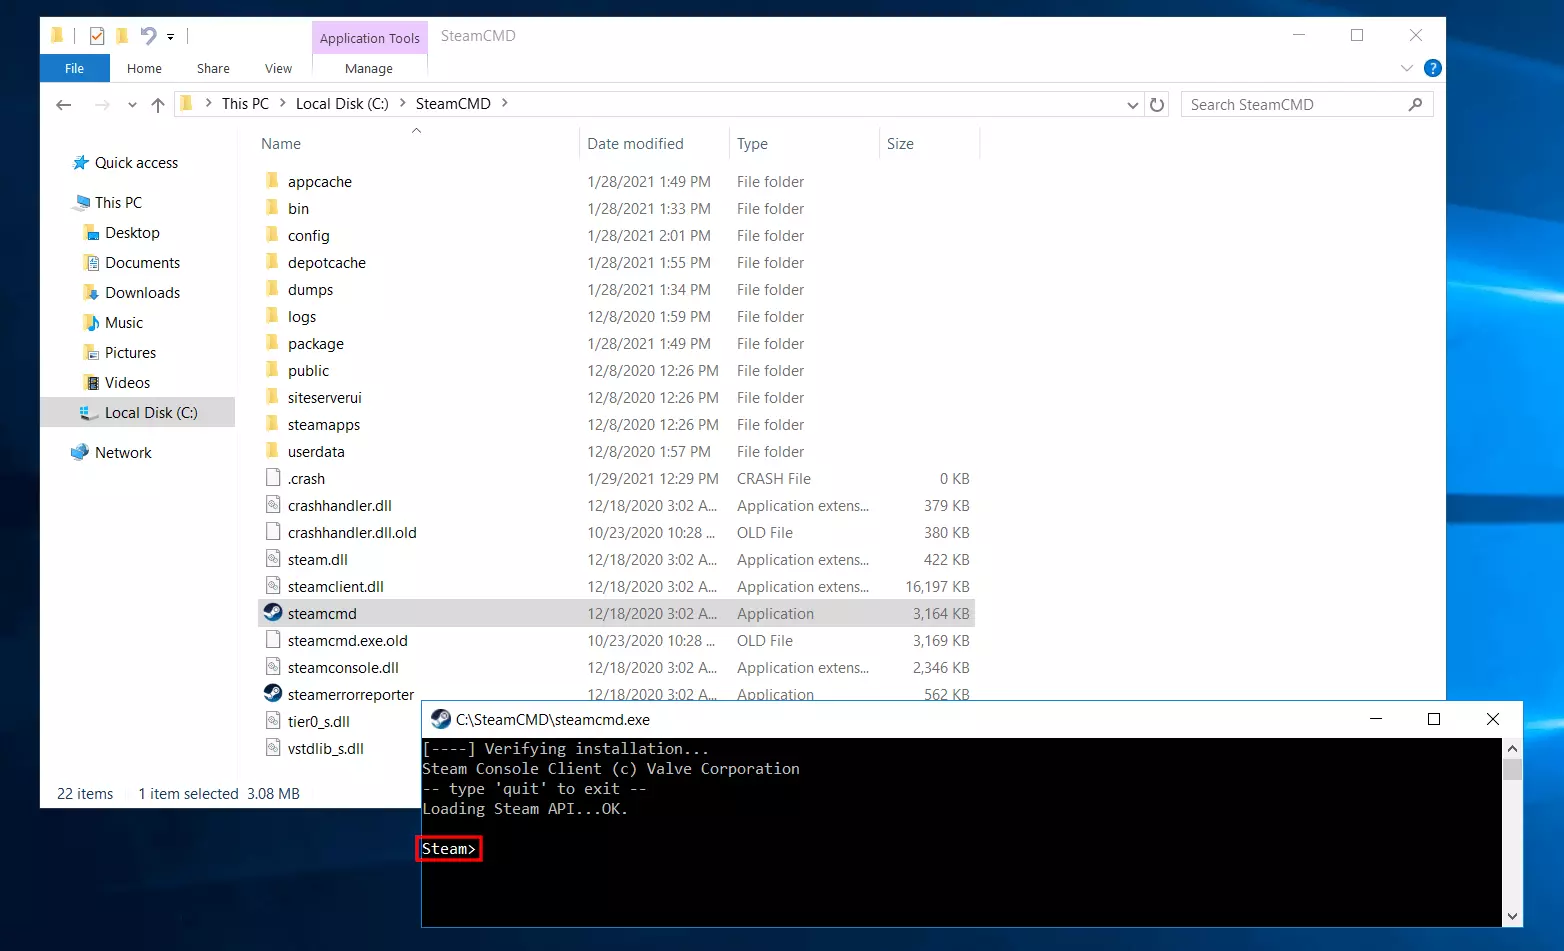
After downloading, unzip the zipped file to any directory on your server, for example C:\SteamCMD, and then double-click the unzipped steamcmd.exe to start the installation from the Windows command prompt. After successful installation, you will be presented with the Steam> prompt.
Step 3: Install Rust Dedicated Server
You can now download and install the dedicated server software for Rust via the Steam command line. To do this, first specify the installation directory (we use C:\rust-server ) by typing and executing the following command:
force_install_dir C:\rust-server\The next step is to log in as an anonymous user on the public Steam servers (Steam Public):
login anonymousFinally, start downloading and installing the latest version of the Rust server software using Steam App ID 258550 wrapped in the following command:
app_update 258550 validateIf you want to update the Rust server software later, the command ‘app_update 258550’ is enough.
Step 4: Forward Ports
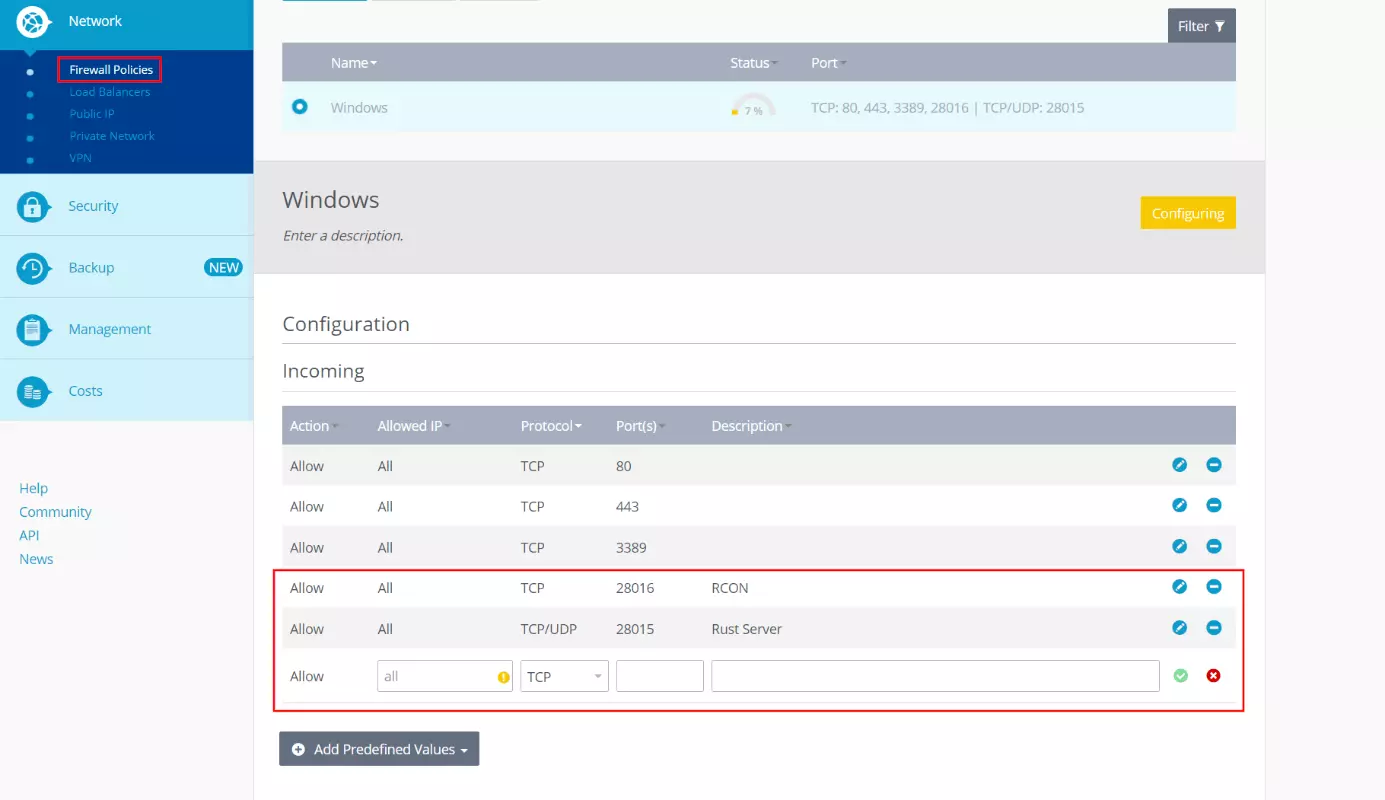
To ensure that the Rust server you have created also appears later in the selection in the game, forward the UDP port 28015. Only if your server allows communication via this port, will the communication with the clients succeed. If you want to execute administrator commands via the command line, it is also recommended to forward the TCP port 28016: This way you can later send commands via RCON (Remote Console) directly from the command prompt or the console in the game (with the administrator role).
Forwarding TCP and UDP ports can also be done very conveniently via the IONOS Cloud Panel: To do this, open the ‘Server & Cloud’ category again and then the ‘Network’ and ‘Firewall Policies’ items in the left-hand side menu one after the other. Click on the Rust server or operating system in the listing and under ‘Incoming’ create the following rule for the general communication of the Rust server:
- Allowed IP: all (just leave the field blank for this)
- Protocol: UDP
- Port(s): 28015
- Description: individual description of port sharing
To use the RCON commands, add another rule where you select the TCP protocol and port 28106 instead. Confirm both rules by clicking the ‘Add rule’ button.
Step 5: Start Rust Server
With the ports enabled, the setup is complete, and you can finally start your own Rust server. The easiest way to do this is to create a BAT file in the directory of the Rust server, which contains all the basic information about the server and the game world.
So, create a text file with any editor and enter the following code there:
echo off
: start
RustDedicated.exe -batchmode +server.port 28015 +server.level "Procedural Map" +server.seed 50000 +server.worldsize 3000 +server.maxplayers 50 +server.hostname "Rust Test Server" +server.description "Rust Test Server" +rcon.port 28016 +rcon.password test
goto startFor detailed information on the individual parameters used here, as well as all other commands available for starting and administering Rust servers, see the Rust Dedicated Server Page in the Valve Developer section.
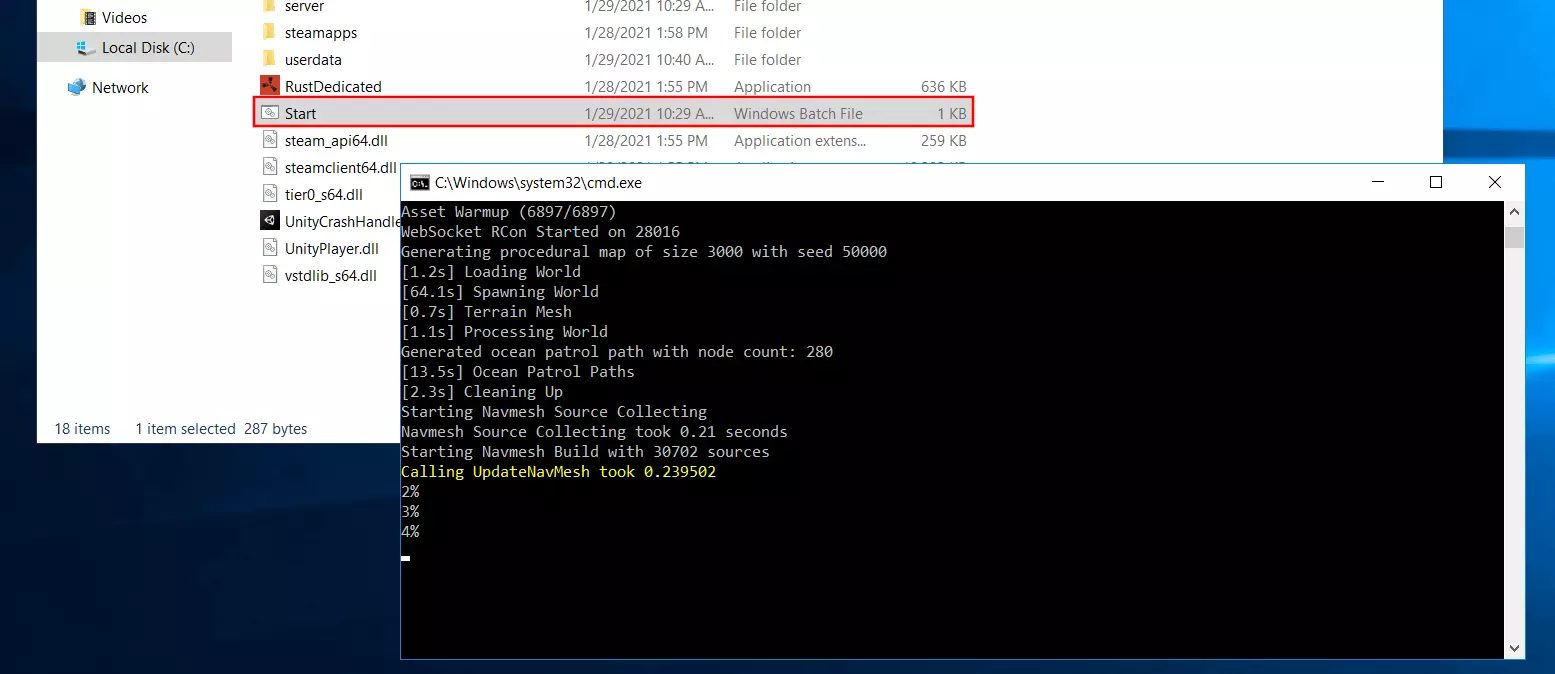
Save the file as a batch file by selecting ‘Save as...’, defining ‘All files’ for file type and finally typing in the name ‘Start.bat’. If you now execute this file by double-clicking, you will start your Rust server with a simple basic setup. Since the entire in-game world is built during this first start, the process usually takes a few minutes.
Step 6: Joining the Rust server
Once the world is created, you and your friends can join the newly hosted Rust server. The procedure is as follows:
- Launch Rust from your Steam account.
- Click the ‘Play’ button.
- Select the appropriate server category - ‘Community’ for a standard server or ‘Modified’ for a server with mods.
- Enter either the server name you defined in the BAT file or the IP address of your server (available in the IONOS Cloud Panel) to filter the list.
- Establish the connection to your server.
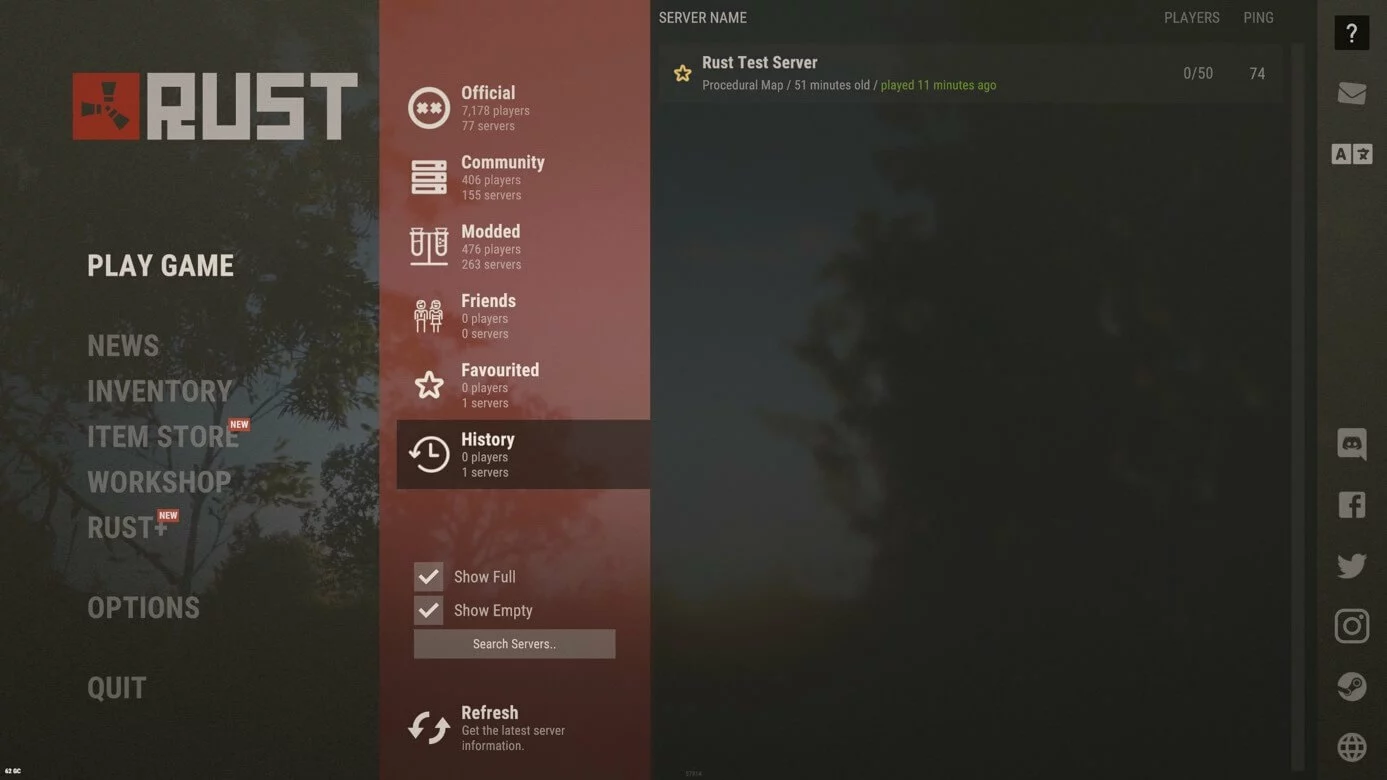
If you have already connected to your server once, you will find it again under ‘History’:
If you can’t find your server in the listing, you can alternatively try to establish the connection via the console. To do this, press the [F1] key in the game and run the following command (replace the ‘IP address of server’ entry with the IP):
connect IP-Address of Server:28015If you like, you can always embellish your server with your own domain name and make it available through this server (instead of just the IP address). Register your desired domain today conveniently and easily with IONOS!


