Create a Last Oasis private server – system requirements and tutorial
PvP battles for resources and fighting for survival aren’t everyone’s cup of tea. A Last Oasis private server with its own rules for PvE adventures is the perfect solution. We’ll show you what hardware you need for your server and how to create a Last Oasis server.
Since its release on March 26, 2020, Last Oasis has had some ups and downs. Shortly after its release, the survival game quickly became one of the top sellers on Steam with up to 33,000 simultaneously active players at its peak. However, the initial euphoria faded fast, since many players weren’t up to the hardcore PvP aspect of the game. By adding new features, such as the possibility to host your own Last Oasis dedicated servers, developer Donkey Crew was able to stem the downward trend. Explore how to set up your own Last Oasis server step by step.
Last Oasis: Privat server on your PC or through a third-party provider?
You can choose to host a Last Oasis dedicated server on your PC or rent hardware from an external provider.
The advantage of using a private device is that you don’t need to purchase or rent additional hardware. You’ll also retain full control over the server. However, hosting from home has significant disadvantages that make running the Last Oasis server on rented resources a preferable option:
- Once you shut down your PC, the server stops automatically. With the right plan, you can make an externally hosted server available around the clock.
- Most home PCs lack the suitable hardware for running a dedicated server that participants and they themselves can join.
- Internet connections available to private households are often inferior to those provided by server hardware in data centres.
Rented server hardware can be claimed for other purposes. For example, it is possible to add your own in-game communication solution to your Last Oasis private server by creating a Mumble server. In case you wish to test other gaming servers, – like creating a Conan Exiles server – you’ve got the perfect hardware base at the ready.
What are the prerequisites for a Last Oasis dedicated server?
The developer does not provide official information on the hardware requirements for hosting the Last Oasis dedicated server software. As with other gaming servers, a good approach is to plan for additional resources if multiple players are active on the server at the same time. The following minimum setup for 1 to 4 players is based on experiences with other gaming servers:
- CPU (Processor): AMD or Intel (2 cores) from 2.8 Gigahertz; strong single-core power preferred
- RAM (working storage): 4 Gigabyte RAM
- Hard disc space: 20 Gigabyte
If you plan on running a typical Last Oasis server with 50+ players attending, you should upgrade your hardware to at least:
- CPU (Processor): AMD or Intel (4 cores) ab 3,6 Gigahertz; strong single-core power preferred
- RAM (working storage): 8–16 Gigabyte RAM
- Hard disc space: 40 Gigabyte
Don’t forget to allocate hardware resources to run the system software (Windows or Linux). For example, for Windows Server 2019 to run smoothly, you need to plan for a 1.4 GHz processor (64-bit), 512 MB or 2 GB of RAM, and 32 or 36 GB of hard disk space (without or with a graphical interface, respectively).
Last Oasis server: hosting options from IONOS
Various providers offer hosting hardware for a Last Oasis private server. However, newcomers often find it difficult to choose a suitable provider, because there are not only different infrastructure models, but also a wide variety of packages, which differ in terms of costs and performance.
IONOS offers three different plans as a basis for your Last Oasis server:
- Cloud Server: IONOS cloud servers rely on virtualized resources. Although the hardware is shared with other customers, this does not affect performance. Since you are billed by the minute, you only pay for the resources you actually use.
- vServer: With an IONOS vServer (Virtual Private Server, VPS) you can access virtualized resources. The decisive difference to the cloud server is monthly billing at a fixed rate.
- Dedicated Server: IONOS’s dedicated server option provides access to high single-core power (AMD or Intel) in a hardware setup. You can choose to pay monthly at a fixed rate or opt for pro-rata (by-the-minute billing).
When you select a Dedicated Server from IONOS, you benefit from 100 percent dedicated hardware with the latest memory and processor technologies as well as comprehensive security thanks to central firewall and the latest SIEM and IDS/IPS systems.
Last Oasis: typical private server scenarios and matching IONOS server packages
Simple entry server for your closest friends? Medium adventure with regular clashes? Or even a giant server for PvP battles? Whatever scenario you have in mind for your Last Oasis dedicated server, IONOS offers suitable server solutions:
| Last Oasis server scenario | Recommendend IONOS-Server |
| 2–4 players, permanently online | VPS XL |
| 5–50 players, permanently online | VPS XL RAM |
| 50–100 players, permanently online | Dedicated Server AR6-32 SSD |
Register your desired domain with IONOS, to make your server accessible on a dedicated domain. SSL/TLS certificate and webmail with 2GB of memory are included.
Create a Last Oasis private server: step-by-step tutorial
Once you’ve chosen your desired server setup, it’s time to create and configure your Last Oasis server. The following tutorial provides a deep dive into the individual steps. In our example, we describe the process from the perspective of IONOS customers (vServer, Cloud Server, Dedicated Server) using Windows as the operating system.
Step 1: Establish connection to the server
You can access your rented server hardware remotely. Login data and instructions to register should be provided by your provider. Alternatively, you may find this information in your dashboard or customer panel.
IONOS customers can conveniently set up a remote connection via the Cloud Panel in the browser. Login to the web-based customer centre using your customer number and password via the official IONOS login page for customers.
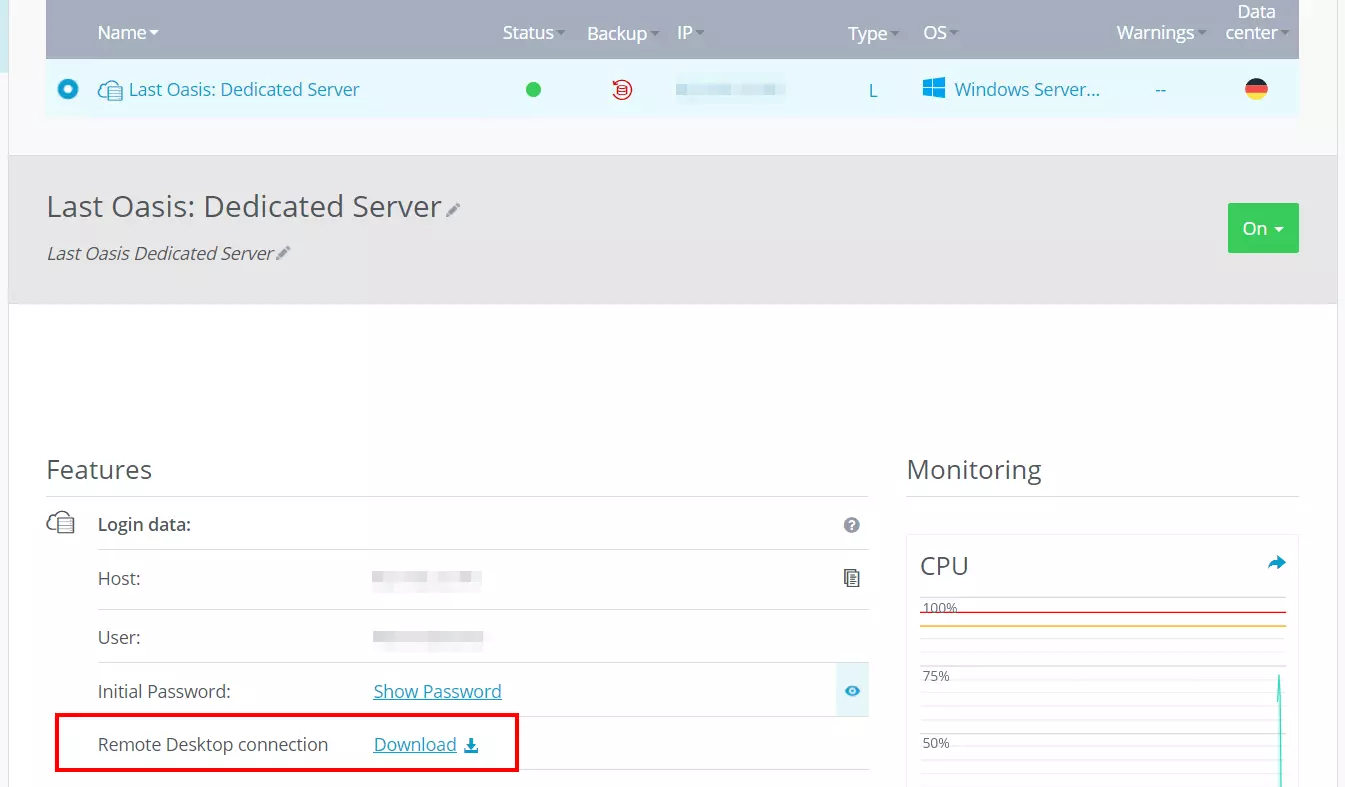
Once logged in, go to the `Server & Cloud´ section and select the rented hardware package for your Last Oasis server. The page provides an overview of the most important server data. Click on the download link for setting up the remote desktop connection under `Access data´.
Keep the option `Open with remote desktop connection´ and confirm the security notice by clicking `Connect´ to continue the setup process. Enter the login credentials for the server (`More options´ and `Use other account´) and rate the server’s certificate as trusted.
Not yet swapped the credentials for remote access? The dashboard of the Cloud Panel shows automatically generated start-up data for your server – `Users´ and `Initial password´. However, be sure to change the password for subsequent logins!
Step 2: Install SteamCMD
After successfully logging in to your server, you need to install the Steam command line tool SteamCMD, which makes it as easy as 1-2-3 to connect to the Steam servers to download applications such as the Last Oasis dedicated server software.
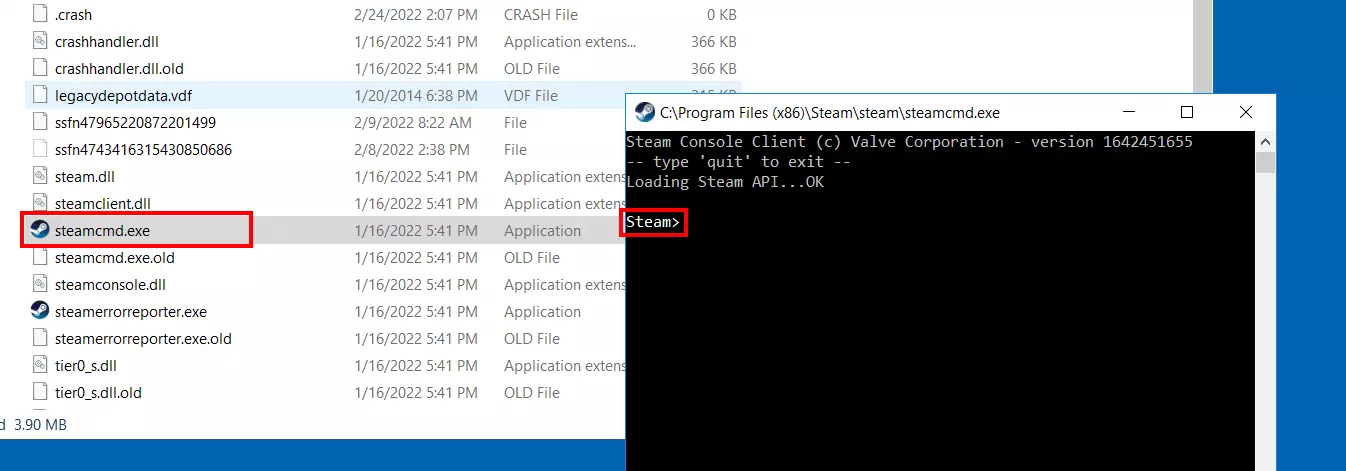
Unzip the contents of the ZIP file into any directory and launch the tool by double-clicking on the steamcmd.exe. SteamCMD starts automatically via the Windows command prompt and executes available updates. Finally, the input line `Steam>´ is displayed.
Step 3: Install Last Oasis dedicated server via SteamCMD
Now use the input line to connect to the Steam servers. To login all you need are the username and password of your Steam account. Connect with the following command – replace the placeholder username with your account name:
login usernameThe password is requested and, when logging in to the Steam servers for the first time, also the Steam Guard code. This would have been shared to your linked email address.
Optionally, you can define the installation directory for your Last Oasis server. With the following command you can place the server files in the directory C:\last-oasis-server:
force_install_dir C:\last-oasis-serverFinally, use the command `app_update´ and the Steam ID `920720´ to download the Last Oasis server software. The prerequisite is that you have purchased Last Oasis on the Steam account with which you previously logged into the servers.
app_update 920720 validateYou can always update Last Oasis server software later from the Steam command line using the `app_update 920720´ command.
Step 4: Obtain Customer and Provider Key via MyRealm
The developers of Last Oasis want to assign each game server to a Steam user. Therefore, the next step is to log into MyRealm. You’ll need your Steam account details and the Steam Guard code when you first log in.
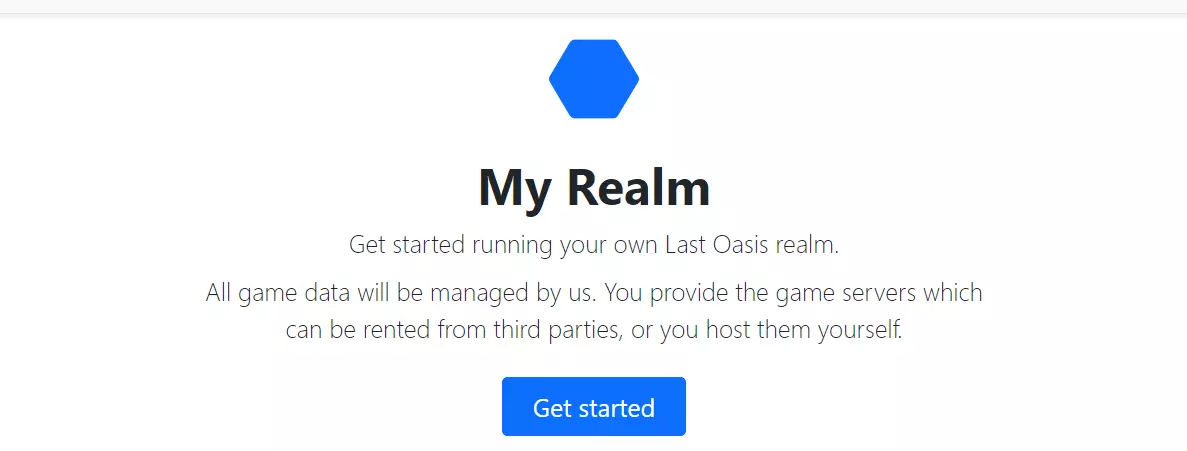
Should you receive the message `A Last Oasis account is required, run the game client to create one´ after logging in to the website, a quick start of the game is required. Head to the server overview (`Join server´) once and try again on the MyRealm website where the official start screen is displayed.
Click `Get Started´ and then `Hosting´ and `Providers´. You will now find a pre-generated `Customer Key´. Copy it to a document of your choice.
Click to `Add key´ in the `Provider Keys´ window, enter a name and optionally a description for the key and generate the key via `Add´. Copy the value and save it to an external document.
Step 5: Create Last Oasis server batch
With the help of the two keys you can now create a batch file for the execution of your Last Oasis private server. To do this, create a text file in the server’s directory with the following content:
MistServer.exe -log -force_steamclient_link -messaging -NoLiveServer -EnableCheats -backendapiurloverride="backend.last-oasis.com" -identifier=LastOasisServer -port=5555 -CustomerKey=Costomer Key -ProviderKey=Provider Key -slots=10 -QueryPort=27015 -OverrideConnectionAddressEnter the values from the previous steps in `CustomerKey´ and `ProviderKey´. Finally, save the file as a batch file, for example as last-oasis-server.bat.
Step 6: release ports
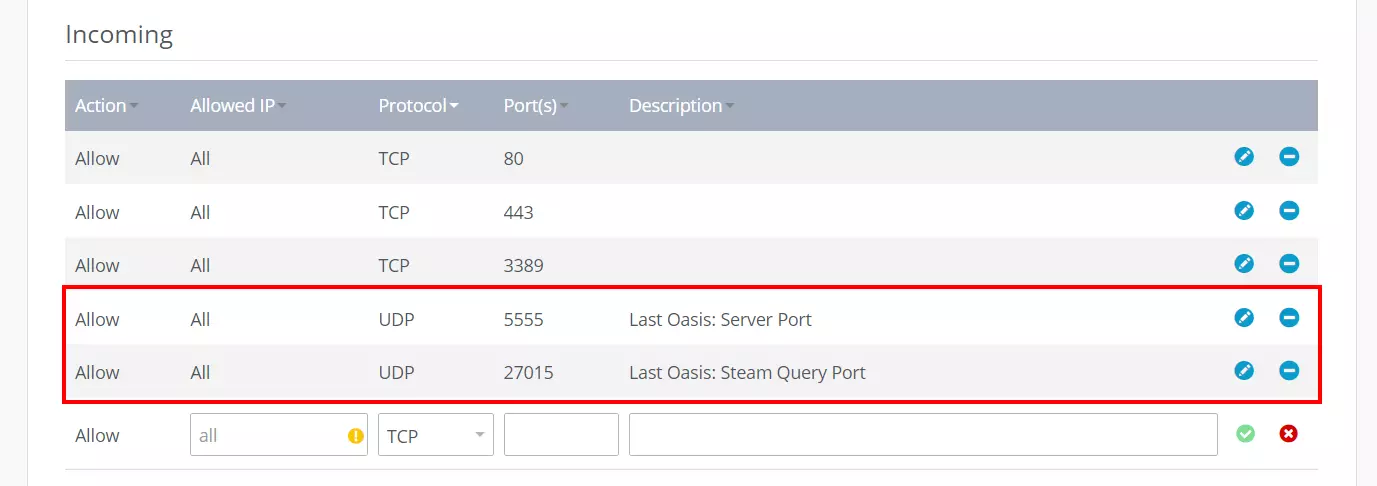
Before you start your Last Oasis private server, you should enable ports for communication. One is UDP port 27015, which is used for communicating with Steam. The second port is UDP port 5555 or any other port that you define as a server port in the server BAT.
IONOS customers can conveniently release server ports via the Cloud Panel. Once you’ve logged into the Customer Centre, follow these steps:
- Select `Server & Cloud´.
- Click the server package where you installed the Last Oasis dedicated server application.
- Select `Network´ and then `Firewall Policies´ from the left.
- Add the rules for the two ports by specifying protocol and port number and an optional description and press `Add rule´.
Step 7: Launch Last Oasis private server
You can now start the Last Oasis server by double-clicking the created batch file in the server file directory. Two command prompt windows will open. Close the window that contains the executed script summary if you wish.
If the launch was successful, the active server will be visible in the MyRealm web application:
Step 8: configure server
You can now perform the basic configuration of your server via the MyRealm app. To do this, first press `Create my own realm now´ and enter a name for your server realm.
Next, set the map for your server as follows:
- Access the MyRealm dashboard.
- Click `Manage´ under `Oases´.
- Select any field and click `Add´.
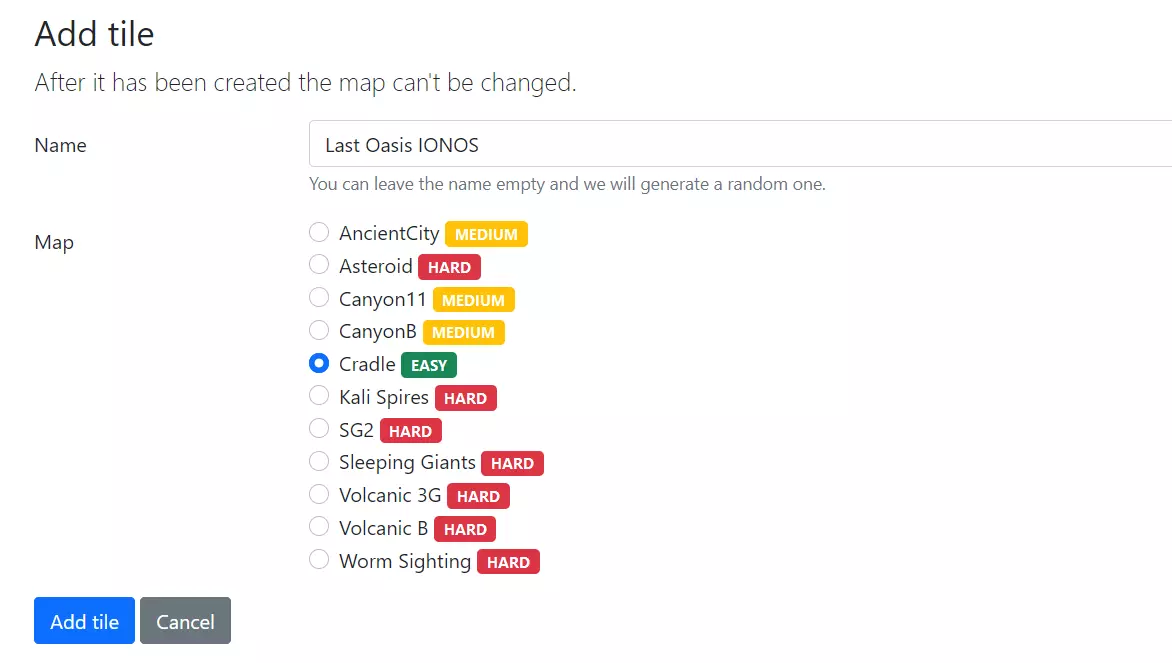
- Decide on one of the available maps and name the game world.
- Create the map by clicking on `Add tile´.
- Select the created oasis and click `Activate´.
For detailed instructions on how to configure multiple maps for different Last Oasis private servers (only one map can be activated per server), an explanation on server password, crossplay, and advanced settings, see the following Google Doc `Last Oasis Self Hosting Documentation´.
Step 9: connect to server
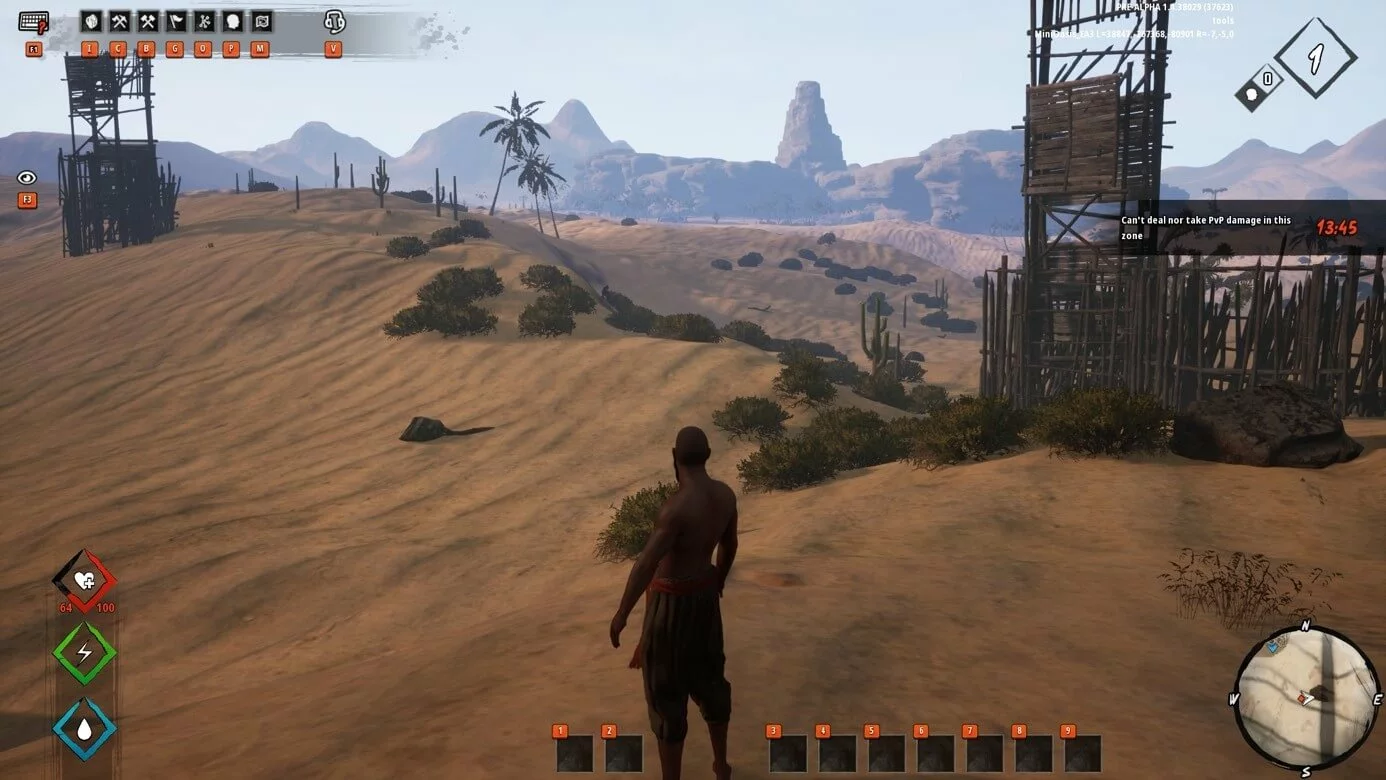
Now, nothing stands in the way of your adventure with your Last Oasis private server. You and your fellow players can now connect to the game via the client as follows:
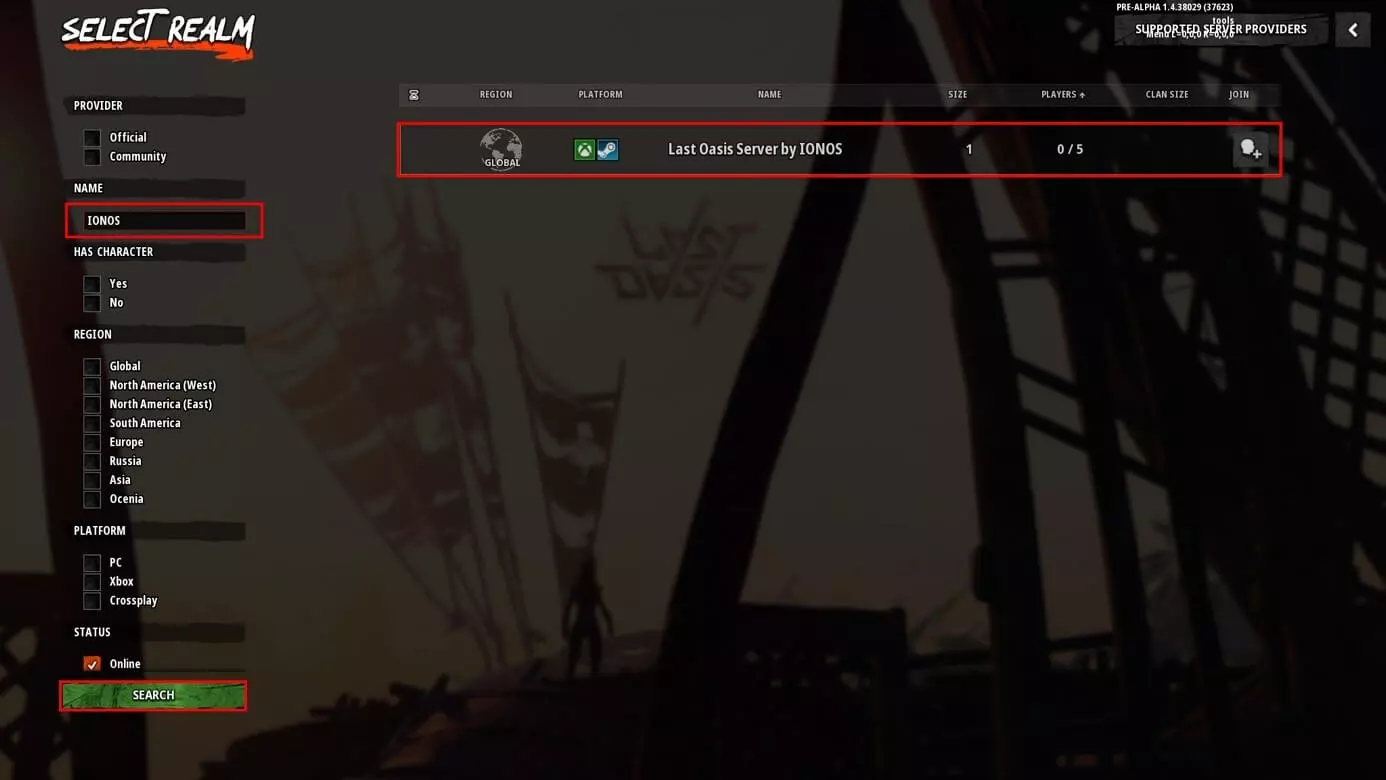
- Start the game and click on `Join Server´.
- Use the search function to search for your server.
- Use the `Search´ button and select the appropriate result by left-clicking.
- Click `Play´ and wait until the connection to the server is established.
Make a statement with your own .gg domain and let the games begin. Register your own .gg domain now with IONOS.


