How to create your own HTTP Live Streaming server
You have complete control over your content’s transmission with your own streaming server. This can be easily set up with a web server thanks to the HTTP Live Streaming (HLS) protocol.
How does HTTP Live Streaming work?
HTTP Live Streaming (HLS) was originally developed by Apple for its own devices. It has since become one of the most popular protocols for streaming audio visual media on the internet. HLS can run on any internet-enabled device as the transmission runs over HTTP (one of the cornerstones of the internet).
HLS involves small packets being generated from the stream of data while it is taking place. These can then be quickly downloaded by the end device and joined together. This ensures fast transmission and the viewers do not notice the splitting in a best case scenario. HLS also includes an index file to ensure the video’s correct composition. This tells the end device the correct order of the data packets.
Splitting the video also has another advantage: The video quality can be adjusted during the stream without having to completely reload the stream. The next package will be simply loaded in higher or lower quality.
A great advantage of HLS is that you can integrate the stream into your own website with a player which can display the stream via HTML5.
There is the Real Time Messaging Protocol (RTMP) in addition to HLS. Although this has lost importance in recent years due to the Adobe Flash’s discontinuation, the protocol is still needed for your own streaming solutions with a HSL Server. If you don’t want to present your stream on a website, creating a RTMP server is also an option.
Why do you need your own streaming server?
Streaming is becoming more and more popular — and not only thanks to movie and series platforms such as Netflix or Amazon. Private individuals and smaller companies are also becoming more aware of the advantages of live streaming. Companies are realising how interesting the broadcasts are for product presentations. Webinars or workshops can also be streamed.
However, streaming is also hugely relevant in the gaming scene. Twitch is a platform which is mainly known for video games streams, whereby some streamers attract an audience of millions. But you don’t have to commit to Twitch or other services to showcase your gaming experiences to other people. You can have full control with your own streaming server.
Want to try your hand at Twitch before setting up your own streaming server? The following articles in our Digital Guide will help you get started:
Processor power (CPU)
You do not need a lot of computing power especially if the streaming server is only needed for distributing the data stream. 2 cores with 2 GHz each should be sufficient for small projects. However, 4 CPU cores are recommended to be prepared for increasing requirements.
Working memory (RAM)
The RAM is mainly used for caching during streaming. 2 GB of RAM is sufficient for small projects. You should upgrade to 4 GB if you want to carry out larger projects.
Hard disk space (HDD/SDD)
You need very little storage space for the server files as the web server is basically streamlined. 10 GB should be sufficient. However, fast SSD storage is recommended so a bottleneck does not occur at this point. Memory requirements are mainly based on the video files which you want to store on the server. Therefore, you will need a lot more storage space if you record your stream on the server hard drive
Bandwidth
A fast connection is of utmost importance when streaming. The bandwidth should always be sufficient to ensure that viewers do not have to put up with poor picture quality or long loading times. The size of the data stream which the server infrastructure transmits depends on the quality of the video and the number of viewers. A home internet connection will probably not be sufficient for this, meaning a streaming server should be run in a professional data centre.
Stop worrying about your bandwidth and create your streaming server with IONOS. You will have at least 400 Mbit/s at your disposal. Or get 1 Gbit/s with a dedicated server. And this is regardless of your usage: You can rely on the complete bandwidth at any time thanks to Unlimited Traffic.
Host HLS Streaming Server at IONOS
IONOS has several server solutions in its portfolio:
- Dedicated Server: Your own hardware with AMD or Intel processors and per-minute billing
- vServer: Virtualization at the highest level - for independence and security
- Cloud Server: Completely scalable and suitable for different uses
The servers differ not only in the equipment, but also in the billing model. While a vServer is always associated with monthly fixed costs, dedicated servers and cloud servers are billed by the minute. The costs will go down if you reduce the models’ resources. The cloud server is extremely flexible. Try to only book the resources which really need, whether it’s storage space, RAM, or the number of processor cores.
Tutorial: Set up streaming server
Your own server for HTTP live streaming can be set up in just a few steps. The required software is available on the internet. In the following example, we use a Windows server with Nginx software.
Step 1: Establish server connection
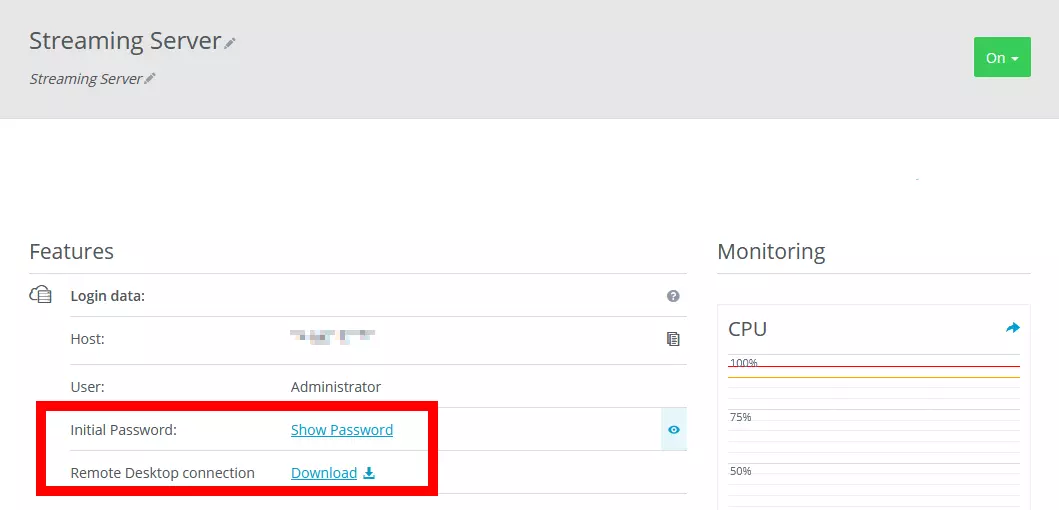
Connect your server to begin working on it. Log into your IONOS user account and open the Cloud Panel which can be found in the `Server & Cloud´ section. There is a download link in the `Remote Desktop Connection´ section. Click this to download the data required for the connection.
Double-click on the downloaded file to launch the `Remote Desktop Connection´ program in Windows. You will have to enter the password, which you can also find in the Cloud Panel. A window opens which shows the server’s desktop.
You can of course establish a connection to the server if you do not use a Windows PC. But you may require an additional remote desktop software.
Step 2: Install Nginx
An ordinary web server based on Nginx can be used for HTTP streaming. Make sure that the software contains the RTMP module when you are downloading as this is required for the transfer and is designed for use with a Windows server.
Unzip the software package to a location of your choice, then open the Windows command prompt or the Windows PowerShell and go to the newly created Nginx folder. Use the following command to start the web server:
start nginxYou will not notice any change at first. You can enable your own IP address in a browser to check if the server is actually working. You should see a message from the web server there.
Step 3: Adjust configuration
In the next step, the web servers’s configuration must be adjusted. You should find the file nginx.conf in the corresponding folder. Add the following RTMP part to the end of it:
rtmp {
    server {
        list 1935;
        chunk_size 4000;
        application show {
            live on;
            hls on;
            hls_path /nginx/hls/;
            hls_fragment 3;
            hls_playlist_length 60;
            deny play all;
        }
    }
}
You can choose the path for your HLS stream. The name of the “application” (shown as “show”) is also entirely up to you. However, ensure that you continue to use the configurations consistently in other places.
You also need to add the HTTP settings to the configuration file:
http {
    include       mime.types;
    default_type application/octet-stream;
    sendfile        off;
    server_names_hash_bucket_size 128;
## Start: Timeouts ##
        client_body_timeout   10;
    client_header_timeout 10;
    keepalive_timeout     30;
    send_timeout          10;
    keepalive_requests    10;
## End: Timeouts ##
    server {
        listen       80;
        server_name localhost;
		location /hls {
        add_header Cache-Control no-cache;
        if ($request_method = 'OPTIONS') {
            add_header 'Access-Control-Allow-Origin' '*';
            add_header 'Access-Control-Max-Age' 1728000;
            add_header 'Content-Type' 'text/plain charset=UTF-8';
            add_header 'Content-Length' 0;
            return 204;
        }
        types {
            application/vnd.apple.mpegurl m3u8;
            video/mp2t ts;
        }
        root /nginx/;
    }
}
Save the file and restart the web server. Simply stop the Nginx process in Task Manager and restart the server using command.
Step 4: Release port
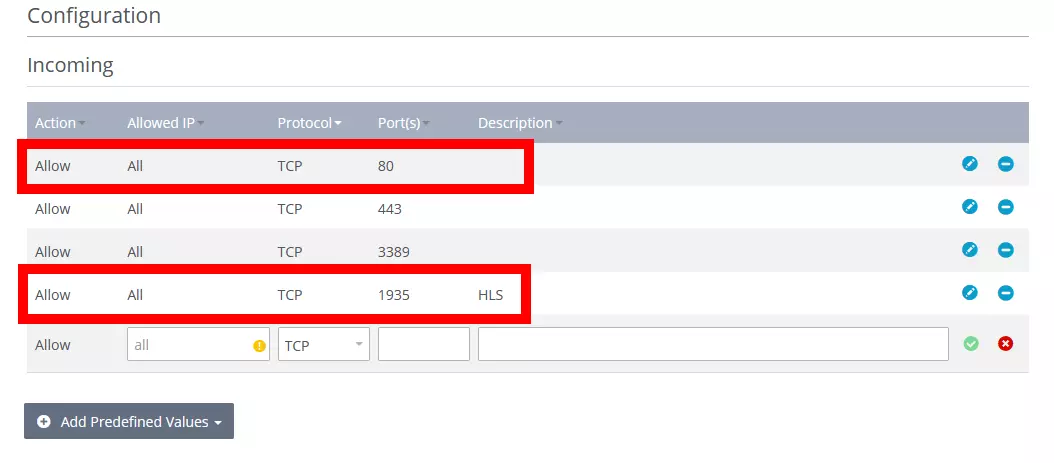
You need to release a port to retrieve your stream. This can also be done using the Cloud Panel with IONOS. You have to create a new entry and release TCP port 1935 in the firewall settings (under “Network”). You should also release port 80 for HTTP if your server hasn’t already released this port. These two ports have been previously released in Nginx’s configuration file.
Step 5: Start HTTP Live Streaming
You still need the appropriate software for a live stream. Open Broadcaster Software (OBS) is particularly popular among streamers. Enter the following address there:
rtmp://<ip address>/showYou must enter your server’s IP address at this point. IONOS customers can find this in the Cloud Panel. You can also enter localhost instead of the IP address for test purposes.
Step 6: Integrate stream on website
You should now be able to access your stream using a media player such as VLC. However, HLS makes it possible to also offer the stream on a website, which requires you to modify an existing website or create a new HTML document. The Nginx web server already comes with an HTML document: index.html. Enter the following source code:
<!DOCTYPE html>
<html>
    <head>
    <meta charset=utf-8 />
    <title>HLS</title>.
        <link href="js/video-js.css" rel="stylesheet">
        <script src='js/video.min.js'></script>
        <script src="js/videojs-http-streaming.js"></script>
    </head>
<body>
<div align="center">
    <video-js id="live_stream" class="video-js vjs-default-skin vjs-big-play-centered" controls preload="auto" autoplay="true" width="1280" height="720" poster="/poster.jpg">
    <source src="/hls/test.m3u8" type="application/x-mpegURL">
    <p class='vjs-no-js'>
      To view this video please enable JavaScript, and consider upgrading to a web browser that
      <a href='https://videojs.com/html5-video-support/' target='_blank'>supports HTML5 video</a>
    </p>
    </video-js>

  <script>
    var player = videojs('live_stream');
	player.play();
  </script>
</div>

</body>
</html>
This is a rudimentary website which only displays the player Video.js with your stream. If you want to make the stream available to others, some additional content should be included and the website should be updated. You could use CSS for this or build the part into an existing fully designed website. It is important that the path to the video files is specified correctly:
>. Just adjust the name here if you would like to change the name.
You still need the appropriate JavaScript and CSS files for the player to work. You can find them in the official GitHub registry of Video.js. Put them in the same subfolder where the HTML documents are located. A video player with your stream will be visible on the website.
If you don’t have a website yet, you probably also looking for a domain. You can quickly check if your dream address is still available and register the new domain with just a few clicks with IONOS Domain Check.


