Arma 3 Server: Requirements and Tutorial
If you host Arma 3 on a dedicated server, you’ll have the best possible basis for a shared online adventure with your friends. Due to the comparatively high hardware requirements, renting external resources is recommended. You can then easily install and set up the Arma 3 server via SteamCMD.
The first version of the military simulation Arma 3 was released on September 12, 2013. The main content of the computer game by Bohemia Interactive is a military conflict set in the near future, and the developers place the focus on managing the crisis in multiplayer mode. We clarify the requirements for your own Arma 3 server and also provide detailed instructions for installation and setup.
Thanks to free starting credit, you can test the IONOS cloud server for 1 month free of charge (or until the credit is used up) and experience the perfect combination of performance and security!
Arma 3: Dedicated Server in a data centre or hosting on your own PC?
To host a multiplayer server in Arma 3, you have two options: Either you run the multiplayer instance on your own device or you host an Arma 3 server on rented hardware resources with a provider of your choice.
The advantages of hosting on your own machine are obvious — you don’t have to rent additional hardware and you have the maximum access to your server. However, a look at the disadvantages makes it clear why an Arma 3 dedicated server in a remote data centre is the better choice:
For one, home Internet access is rarely enough to provide a smooth and stable gaming experience for multiple players. Secondly, only absolute top PCs provide the necessary computing power (especially if you want to participate in the game yourself). Another argument in favour of third-party hosting is the fact that the server is available around the clock, which would only be the case with hosting on your own PC if you don’t turn off your device.
When you rent resources for hosting your own Arma 3 server, you are not automatically bound to hosting the military simulation. You can also use the hardware to create a Valheim server or a Minecraft server setup. Furthermore, you can use the resources to host your own TeamSpeak server.
What are the system requirements of an Arma 3 host server?
Hosting an Arma 3 dedicated server is taxing on the underlying hardware. The rule of thumb is that the more players are active at the same time and the more mods you want to use for your server, the more resources you need to plan for. For a simple co-op adventure, you can get away with a leaner hardware setup than for a multiplayer server where 16 or more players are in action together or against each other.
In the official Arma 3 Wiki, Bohemian Studios lists the following minimum requirements:
- CPU (processor): 2.4 gigahertz (dual core)
- RAM (working memory): 2 gigabytes
- Hard disk space: 32 gigabyte HDD
In the same place, the development team recommends the following hardware for all Arma 3 server scenarios that are intended to go beyond hosting a simple co-op adventure:
- CPU (processor): 3.5 gigahertz (quad-core)
- RAM (working memory): 4 gigabytes
- Hard drive storage: 32 gigabyte SSD
However, the performance for running the Arma 3 dedicated server software isn’t the only thing you need to consider when it comes to the hardware for your server. The operating system of your choice also requires resources that should be planned for from the start. For Windows Server 2019, for example, the following additional requirements need to be covered:
- 1.4 GHz processor (64-bit)
- 512 MB or 2 GB memory (without or with graphical user interface)
- 32 or 36 GB hard disk space (without or with graphical user interface)
For hosting an Arma 3 server, you can choose to use a Windows operating system or a Linux distribution such as Ubuntu.
Arma 3: Server hosting with IONOS — these are your options
You can rent server hardware for hosting your own online adventure from various providers. However, choosing the right provider is not that easy — especially since every provider usually has several hosting packages in their portfolio. Different infrastructure approaches have to be taken into account, as well as different performance and cost spectrums. At IONOS, for example, you can choose between the following three server models, each with different packages:
- vServer: IONOS vServer (also Virtual Private Server, VPS) gives you access to virtualised resources. You share the hardware with other customers (without any performance loss). Billing is monthly at a fixed price.
- Cloud Server: IONOS cloud servers are also based on virtualised resources. However, they only pay for the performance actually required, as billing is on a per-minute basis.
- Dedicated Server: You can get hardware reserved for you with high single-core power in the dedicated server package from IONOS.
If you are looking for a powerful and secure server environment where you can host your own Arma 3 server in addition to other gaming servers without performance problems, think about renting your dedicated server from IONOS today to be as well prepared as you need!
Arma 3: Possible host server options and suitable IONOS packages
You won’t go wrong with a starter plan, thanks to the easy scalability of each package. You can still opt for a more powerful package right from the start if you already know that you need more CPU, RAM and so on. If you want your server to be online permanently, it also makes sense to choose a different server model.
We have summarised three possible options in the following table and assigned the most suitable IONOS server package to each.
| Arma 3 Server Option | Recommended IONOS Server |
| 2-4 players, permanently online | VPS L |
| 5-16 players, permanently online | VPS XL |
| > 16 players, permanently online | Dedicated Server AR6-32 SSD |
You want your server to be accessible via an individual domain? Register your personal domain with IONOS — including SSL/TLS certificate, domain lock, and its own email inbox with two gigabytes of storage.
Host an Arma 3 server: Tutorial
Once you have access to your own hosting environment, you can put your plan into action and set up Arma 3 as a dedicated server. The easiest way to install the software is via the Steam command line SteamCMD. In the following tutorial, we will go through the individual steps for IONOS customers (vServer, Cloud Server, Dedicated Server). Windows Server 2019 is used as the operating system.
You do not need the game to install and run the dedicated server software for Arma 3! You do need a verified Steam account, though. However, if you want to connect to the server yourself later, this will logically only work with your own Arma 3 license.
Step 1: Connect to sever
You manage the rented server hardware from any device after establishing a remote connection to the server. Consequently, the first step is to set up and establish this remote connection. As an IONOS customer, you can perform the configuration in the browser-based Cloud Panel. To do this, first log in with your individual customer data on the Login page.
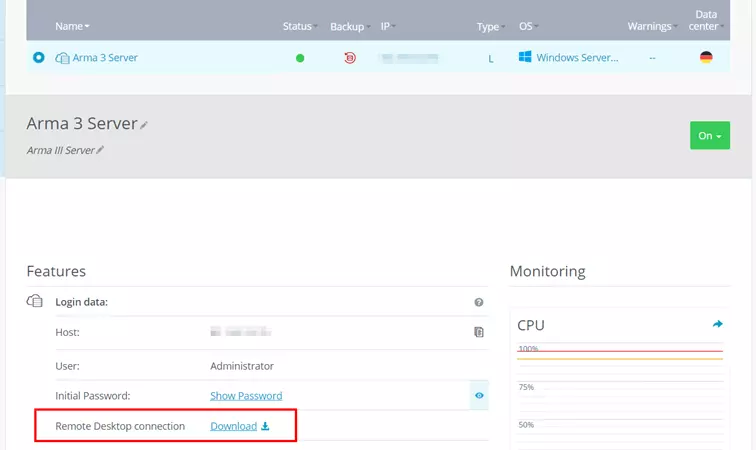
After successful login, call up the ‘Server & Cloud’ category. Here you can select the rented hardware setup on which you want to set up the Arma 3 host server. In addition to the most important access data for your server, you will also find a download link for setting up the remote desktop connection on the following page, which you can now click on and execute directly.
When configuring the connection for the first time, a security notice will pop up - continue by clicking ‘Connect’. Specify the credentials for your Arma 3 server by clicking ‘More options’ and ‘Use another account’. If you haven’t changed the credentials for your IONOS server yet, you can find the automatically generated startup data in the server data overview in the Cloud Panel - under ‘Users’ and ‘Initial Password’.
When establishing the remote connection to your server for the first time, you must first classify the server certificate as trusted. Take this opportunity to tick the ‘Do not ask for connections to this computer again’ box so that you will not receive the message on subsequent connection attempts.
Step 2: SteamCMD install
The easiest way to get Arma 3’s dedicated server software is via the Steam command line SteamCMD. As soon as the connection to your server hardware is established, download the installation files of the tool via the following download link. Then unzip the ZIP file into any directory on your server.
Finally, double-click on the SteamCMD.exe to start the installation from the Windows command prompt. After successful execution, the Windows command line tool presents you with the input line ‘Steam>‘.
Step 3: Install Arma 3 dedicated server software via SteamCMD
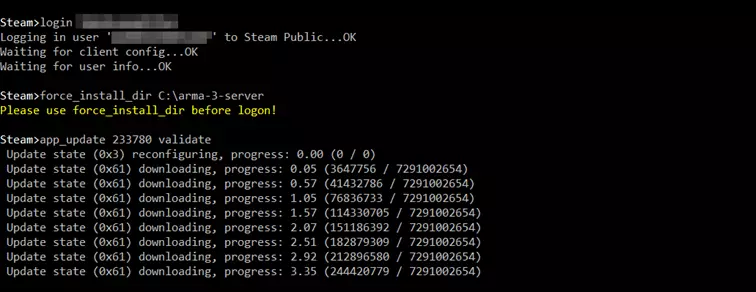
You can now download Arma 3’s dedicated server software via the Steam command line. First, connect to the official Steam servers, for which you will need the username and password of your Steam account. Type the following to start (instead of ‘username’ use your individual Steam username):
login usernameAfter that, enter your password and — when logging in to the server for the first time - the Steam Guard code that you receive on your linked email address.
Optionally, in the next step you can specify in which directory the Arma 3 server should be installed. For example, for the path C:\arma-3-server the appropriate command is:
force_install_dir C:\arma-3-serverFinally, combine the ‘app_update’ command with the Steam app ID of the Arma 3 dedicated server software (233780) to download the application via SteamCMD:
app_update 233780 validateIf the installation was completed successfully, log out of the Steam servers with the command ‘quit’.
Using SteamCMD, you can keep your Arma 3 host server up to date after the installation. For this, the command ‘app_update 233780’ is enough — after logging in to the Steam servers first.
Step 4: Release ports
In the next step, you need to open all relevant ports so that users can interact with your Arma 3 host server. For optimal communication between server and clients, the following ports should be opened:
- TCP/UDP 2302: Game port, under which the server itself runs and can be reached.
- TCP/UDP 2303: Query port, which is used to query information such as the number of players or the server name
- TCP/UDP 2304: Port of the game platform Steam
- TCP/UDP 2306: Port for the traffic of the anti-cheat software BattlEye
As an IONOS customer, you can also realizise port sharing in the Cloud Panel. To do this, log in as usual, open the ‘Server & Cloud’ section and select the server on which you have just installed the Arma 3 dedicated server software. Then switch to the ‘Network’ category in the left side menu, where you will find the ‘Firewall Policies’ menu.
Under ‘Incoming’, now create the rules for the four ports mentioned. Make sure that ‘UDP/TCP’ is selected as the protocol in each case.
Unblocking the ports via the IONOS Cloud Panel takes some time. You can read the current progress via the status display in the upper part of the firewall menu.
Step 5: Configure server
You need a basic configuration for your Arma 3 server. To do this, either manually create a configuration file named server.cfg and add the desired parameters using the Server command list in the official Arma 3 Wiki.
Or you can use the web-based Arma 3 Server Config Generator to create the desired server configuration. Once you have all the settings, click on ‘Generate’ to create the appropriate server.cfg.
Independently of the way you chose, copy the created server.cfg file into the directory of your Arma 3 server.
Step 6: Start Arma 3 server
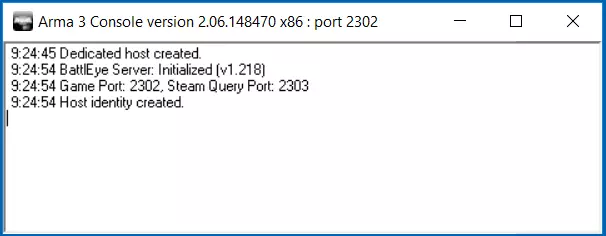
Now you can finally start your Arma 3 host server. In principle, it is enough to run the arma3server.exe file for this purpose. However, to include the created configuration file, an additional step is required beforehand:
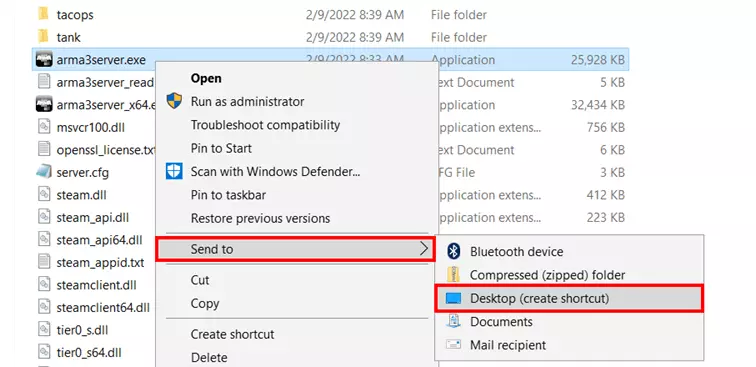
Right-click on the arma3server.exe and create a desktop shortcut by selecting ‘Send to’ and ‘Desktop (create shortcut)’ from the menu one after the other.
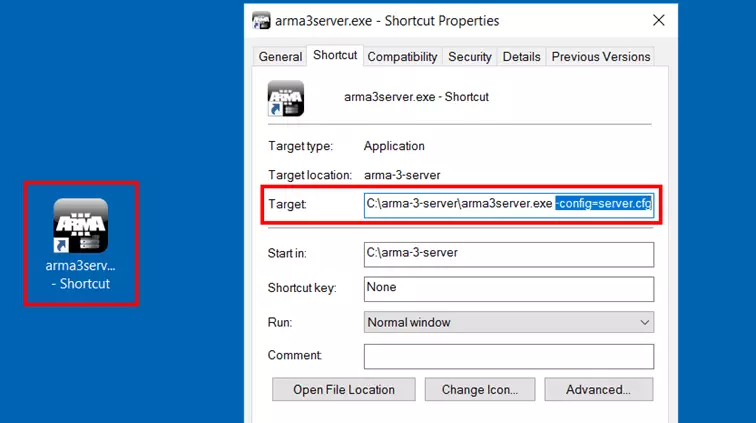
Also go to the created shortcut with right click and open the ‘Properties’ menu. Now expand the ‘Target’ line in the ‘Shortcut’ tab with the following addition:
-config=server.cfgStep 7: Connect to Server
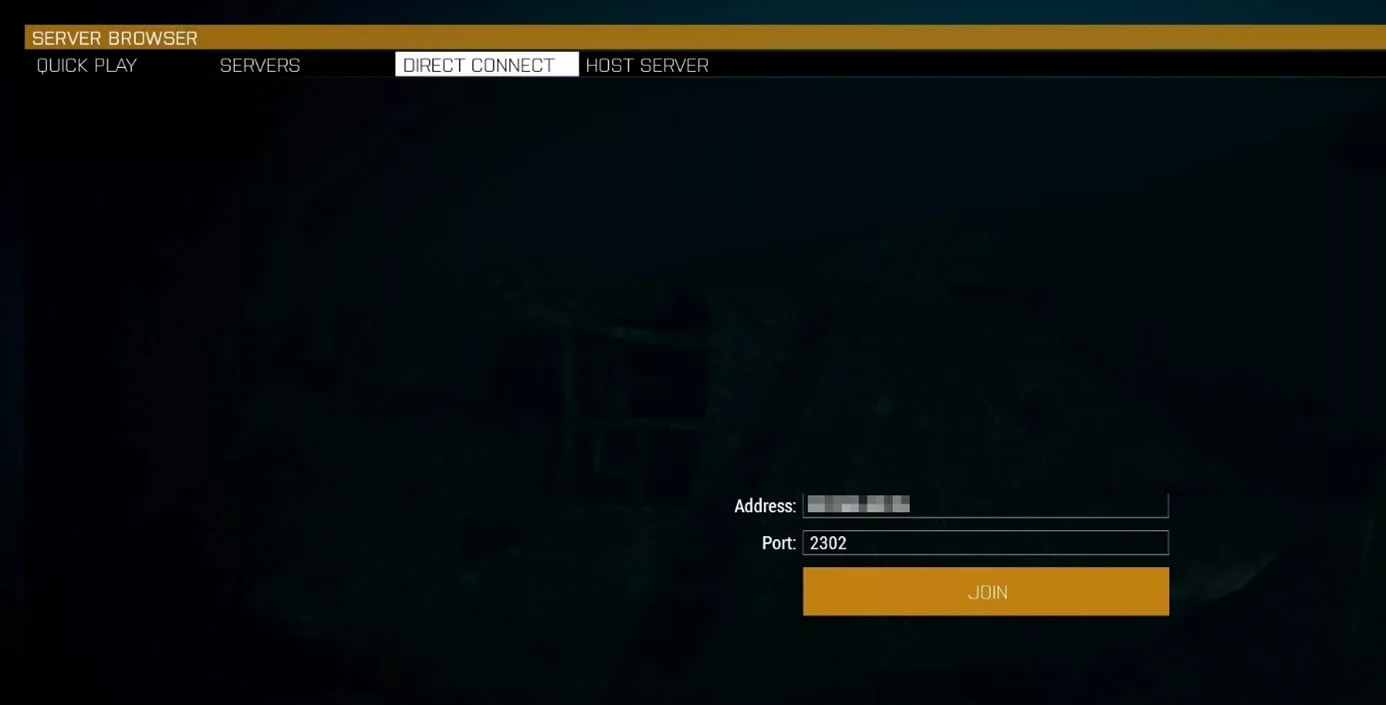
Your own Arma 3 dedicated server is ready for your exciting online adventures! Players who want to connect to the server only need to own the game and have the IP address and password (if defined in the server.cfg) of your server. Equipped with these components, the connection setup proceeds as follows:
- Launch Arma 3 from the Steam client.
- Press ‘Multiplayer’ and ‘Server Browser’ one after the other.
- Select the ‘Direct connection’ tab.
- Enter the IP address of the server.
- For ‘Port’, enter the value ‘2302’ (for the game port).
- Click the Join button.
After that, your server will show up in the list. Click on the entry and go to ‘Join’ one more time. After that, type in the password and select the mission you want - or join the running game if a scenario has already been started.
Make a statement with your own .gg domain and let the games begin. Register your own .gg domain now with IONOS.


