How to change startup programs in Windows 11
During startup in Windows 11 and other operating systems, applications and documents are automatically launched or reopened after a computer has been switched off. The applications are sometimes predefined by the system, but users can adjust which applications they would like to automatically launch. But why does startup in Windows 11 make sense? And how do you define programs for automatic startup or exclude them?
- Free website protection with SSL Wildcard included
- Free private registration for greater privacy
- Free 2 GB email account
What is a Windows 11 startup folder?
Automatic startup is a useful feature of operating systems to ensure that certain system services and applications are automatically executed following system startup. In Microsoft, startup applications could previously be managed via the Start menu. However, with Windows 8 startup, Windows 10 startup, and Windows 11 startup, changes can only be made via a folder in the user file or the Windows directory.
The user-specific startup folder determines the startup settings for the individual user. The configuration of the parent startup folder in the Windows directory is always loaded for all users of the system. They are set by the administrator and by the operating system itself (as part of software installations).
Usually, the startup folders contain shortcuts of the programs that should be launched automatically. Theoretically, however, you can store files in one of the folders that are to be executed at system startup – for example, a batch file. The native applications and services such as the registry keys ‘Run’ and ‘RunServices’ that Windows 11 loads as part of startup are not found in the folders.
Why you should monitor startup in Windows 11
Retaining an overview of the programs, services, and scripts that are loaded during Windows 11 startup is useful for several reasons.
First and foremost, startup saves time and is convenient. Applications like email clients or collaboration tools are automatically run after user login. This means you don’t have to repeatedly launch common work applications every time you log in.
While Windows 11 startup may be useful for most, it’s not well-suited to systems with performance problems. When too many applications are running and launching automatically, it can put a strain on system resources. It is therefore advisable to regularly inspect the components of the Windows 11 startup to exclude unnecessary programs and scripts.
Finally, a regular examination of the components of the startup folder is recommended for security reasons. Many types of malware take advantage of the properties of Autostart to be loaded at every system startup.
Windows 11: how to launch the startup folder
There are two options to access the startup folder in Windows 11. You can click through the directories of your system until you arrive at the user-specific or the general startup folder. However, both folders can be accessed more conveniently via the shell command.
The paths to launch both startup options are:
C:\Users\USERNAME\AppData\Roaming\Microsoft\Windows\Start Menu\Programs\Startup
C:\ProgramData\Microsoft\Windows\Start Menu\Programs\Startup
If you don't want to click through folders one by one (for the latter path you have to show hidden items), you can enter paths into the address bar of the File Explorer to navigate to the respective startup folder.
To launch the Windows 11 startup folder directly via shell command, use the ‘Run’ dialogue via the key combination [Windows] key + [R]. Then type one of the following entries:
User-specific startup folder:
shell:startupGeneral, overlapping startup folder:
shell:common startupAdding applications to the Windows 11 startup folder – a tutorial
Many applications include a setting option to launch them on startup. It’s a good idea to check whether the respective application has this option before adding it manually to the Windows 11 startup folder.
To add an application manually to the startup folder, you just need to place a shortcut of the executable startup file – recognisable by the file extension .exe – in the startup folder.
Step 1: Call file location
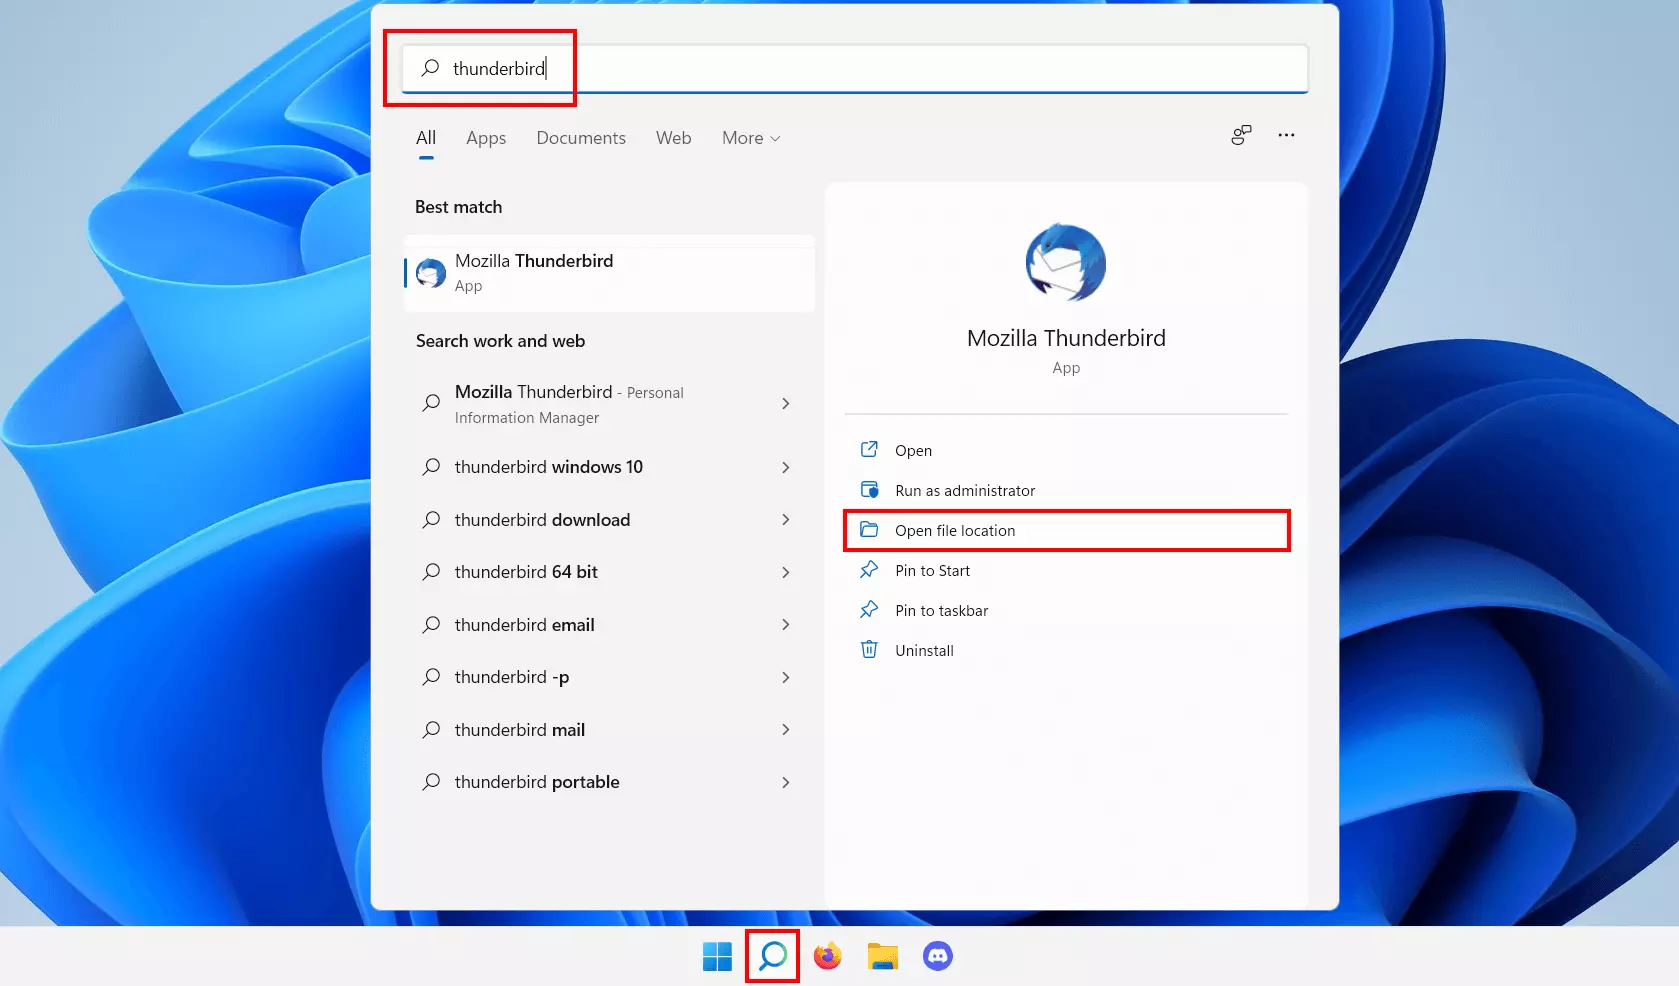
Navigate to the installation directory of the program you want to add to the Windows 11 startup folder. If necessary, use the search function to find it. Click the magnifying glass icon in the taskbar and type the name of the application you are looking for. Select ‘Open file location’.
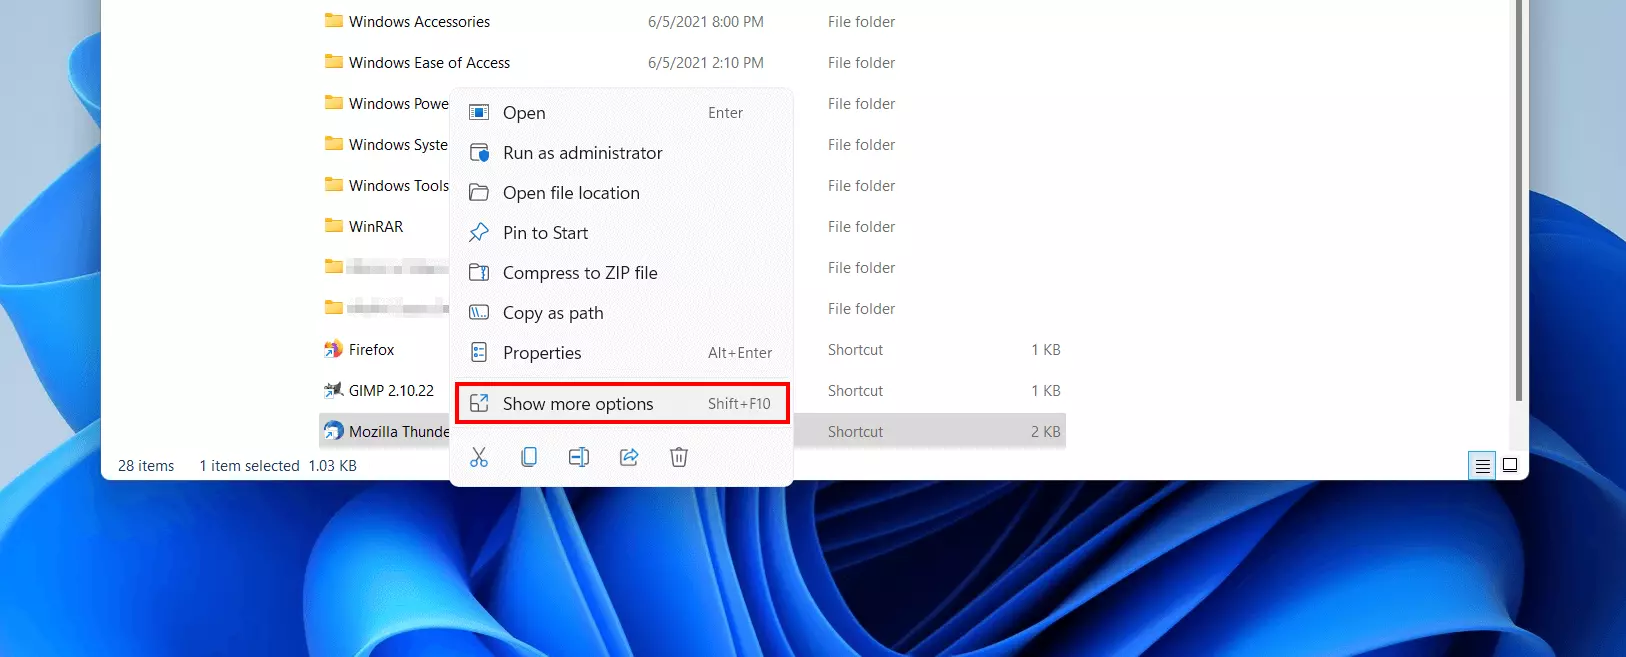
Step 2: Create shortcut
Step 3: Copy shortcut to Windows 11 startup folder
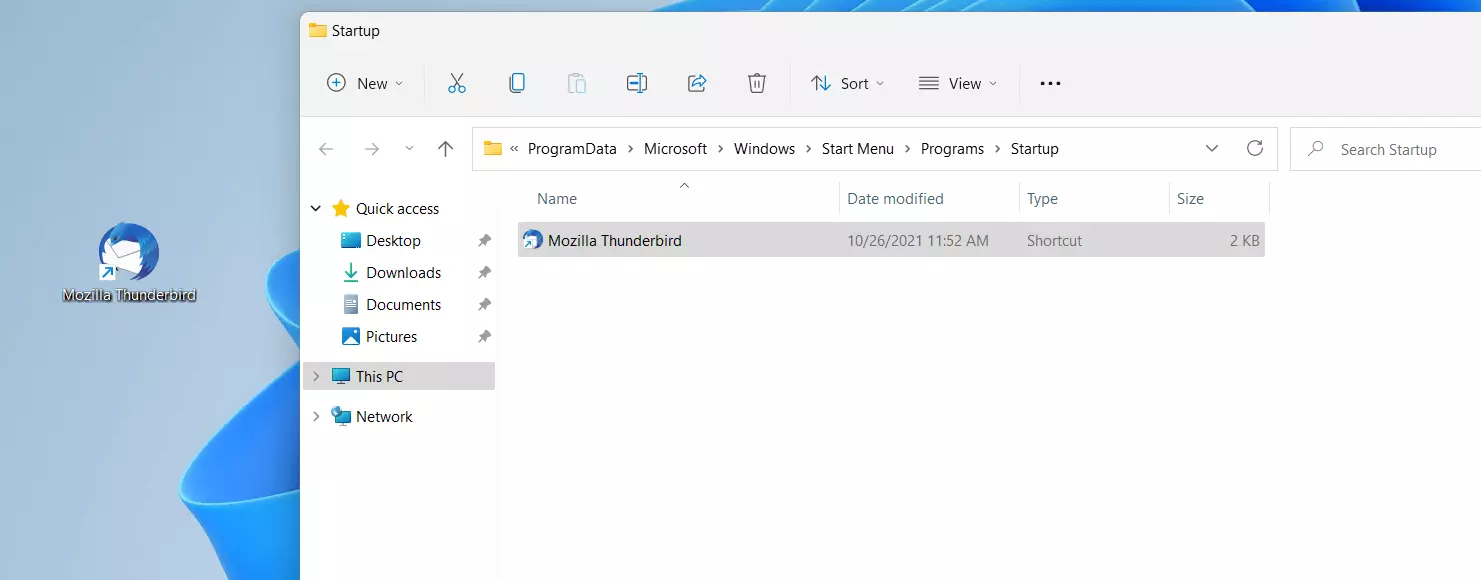
Now copy and paste, or drag and drop the shortcut to one of the two startup folders.
If you wish for the shortcut to apply only to yourself, select the user-specific folder:
C:\Users\USERNAME\AppData\Roaming\Microsoft\Windows\Start Menu\Programs\StartupIf the startup entry is intended for all users of the system, copy the shortcut to the general folder:
C:\ProgramData\Microsoft\Windows\Start Menu\Programs\StartupHow to exclude programs from Windows 11 startup
In case an application that you never or no longer use starts automatically after login, you can exclude it from startup. To do so, you can either change the settings in the respective application or delete the shortcut from the startup folder(s).
To delete entries in the general startup folder and exclude programs from startup in Windows 11, you need administrator rights.
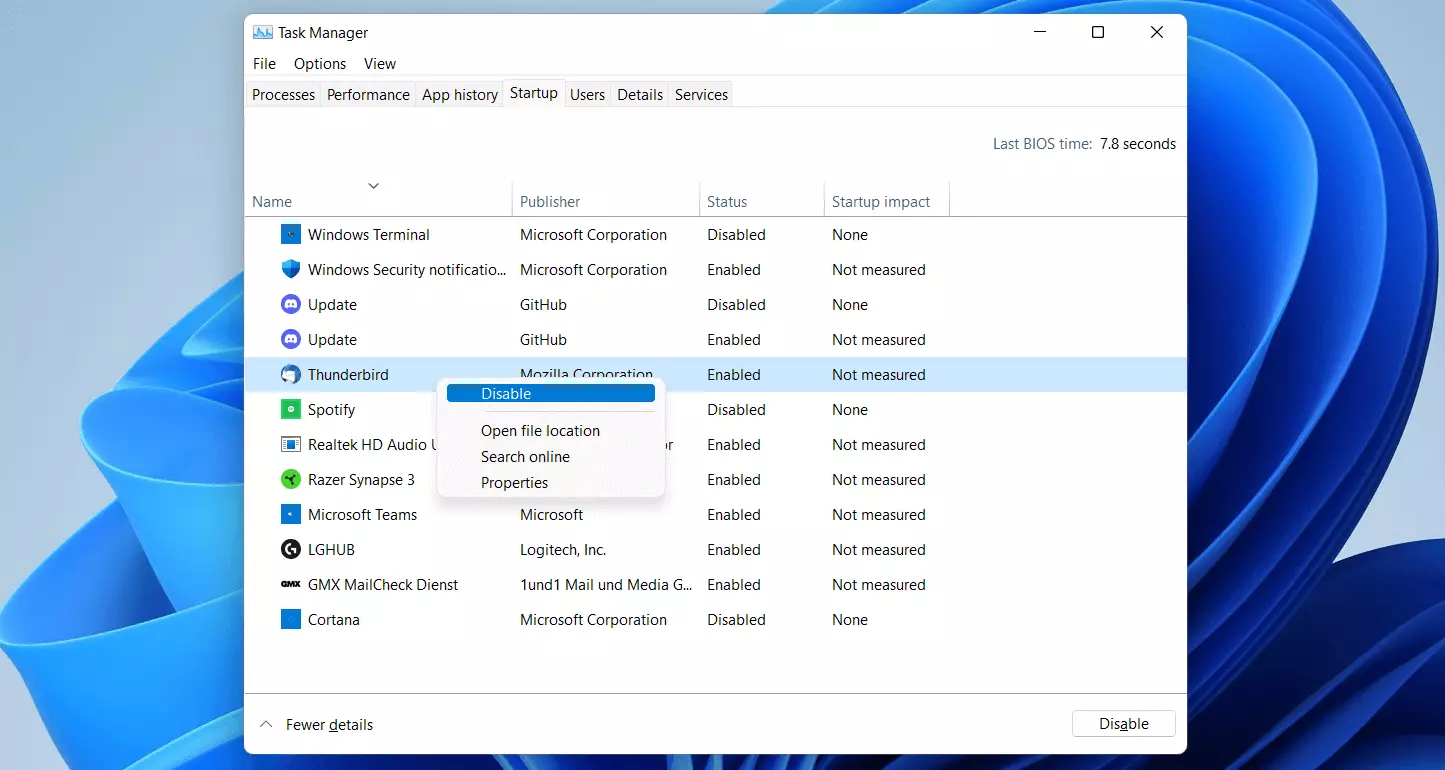
In addition, you can disable program startup via the task manager. Launch the help tool by using the key combination [Ctrl] + [Shift] + [Esc] and switch to the ‘Startup’ tab. Select the desired application for which you wish to prevent auto-startup by right-clicking on it and selecting ‘Disable’.
FAQs
To conclude, we have summarised the most important questions and answers about startup in Windows 11.
How to add applications to the Windows 11 startup folder?
To add an application to the Windows 11 startup, you just need to place a shortcut of that application’s executable file in one of the two available startup folders.
What are the paths of the Windows 11 startup folders?
You can find the user-define startup folder here:
C:\Users\USERNAME\AppData\Roaming\Microsoft\Windows\Start Menu\Programs\StartupThe general startup folder can be found here:
C:\ProgramData\Microsoft\Windows\Start Menu\Programs\StartupCan Windows 11 startup folders be accessed by command?
Yes. Simply open the ‘Run’ dialogue with the key combination [Win] + [R] and execute either the command ‘shell:startup’ or ‘shell:common startup’. The latter opens the general startup folder.
How do you exclude applications from startup in Windows 11?
If a corresponding option exists, you can disable startup in the application’s settings. Otherwise, the task manager lets you exclude programs. To do this, proceed as follows:
- Launch the Task Manager using the key combination [Ctrl] + [Shift] + [Esc].
- Call ‘Startup’.
- Select the desired application via right-click.
- Click on ‘Deactivate’.
What applications should be part of the Windows 11 startup folder?
Startup management is exclusively about third-party applications. You do not have to worry about the management of programs and services that are necessary for the proper operation of the system. For example, recommended applications for Windows 11 startup include:
- Security programs such as malware scanners, antivirus software or firewalls
- Backup software
- Regularly used programs such as email clients, VPN programs, or cloud storage applications


