How to boot Windows 11 in safe mode
Windows 11 has a bare-bones version of its operating system, called Safe Mode. This can be a valuable support when troubleshooting problems with applications and devices. Drivers, services, and various other functions are temporarily disabled in this special mode to give your device or system the best possible stability. Learn what exactly happens when you start Windows 11 in Safe Mode and how to launch it.
- Intuitive website builder with AI assistance
- Create captivating images and texts in seconds
- Domain, SSL and email included
Windows 11: What is Safe Mode?
Safe Mode is a restricted Windows startup mode that you can use at any time for troubleshooting. In contrast to a normal startup, not all drivers and programs are loaded, but only the basic components that are absolutely necessary for the system to run. The drivers that are left out in Safe Mode include, for example, the device drivers for printers, scanners, or graphics cards. In addition, colour depth and resolution are automatically lowered by the system. When it comes to Internet capability in Safe Mode, the user has a choice: both starting with and starting without network drivers is possible.
Windows 11 Safe Mode is optimally suited for detecting and correcting errors that are based on installed programs and drivers. It also provides a good platform for removing malware from the system and serves as a possible point of contact if you have forgotten your user account’s password.
Perhaps you’ve not yet switched to Windows 11? Read how to start Safe Mode in Windows 10 in our guide!
Here’s how to start Windows 11 in Safe Mode
To initiate Safe Mode while the system is running, you have two options, including the following:
1. Initiate Windows 11 Advanced Startup and start Safe Mode by using the troubleshooter.
2. Initiate special mode by using the msconfig configuration tool.
The requirement for these two methods is that the system is somewhat functional. If you can no longer make any entries or if, for example, logging into the system doesn’t work, try an installation method or switch the computer on and off quickly several times.
Starting Windows 11 Safe Mode via Troubleshooting – here’s how
The troubleshooter has lots of solutions. Among other options, you can use it to start the usual Safe Mode (with or without network drivers) as well as the Safe Mode with command prompt. We have summarised the individual steps here:
Step 1: Initiate an ‘Extended Start’
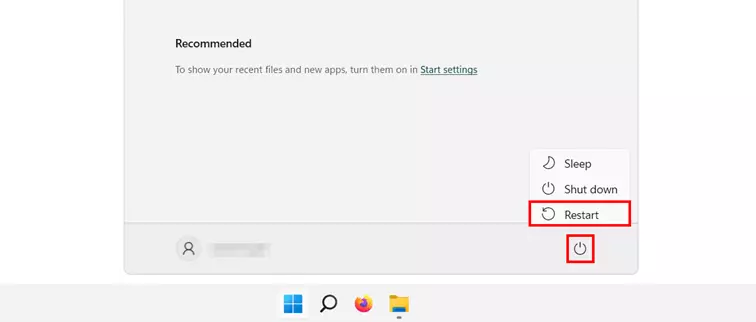
If you want to start the restricted Safe Mode of Windows 11 with the help of the troubleshooter, you first have to initiate the extended start of the system. The easiest way to do this is via the ‘On/Off’ button in the Start menu:
Click on it, then hold down the Shift key and then press ‘Restart’ with the left mouse button. Windows 11 will now shut down and then boot in extended startup mode.
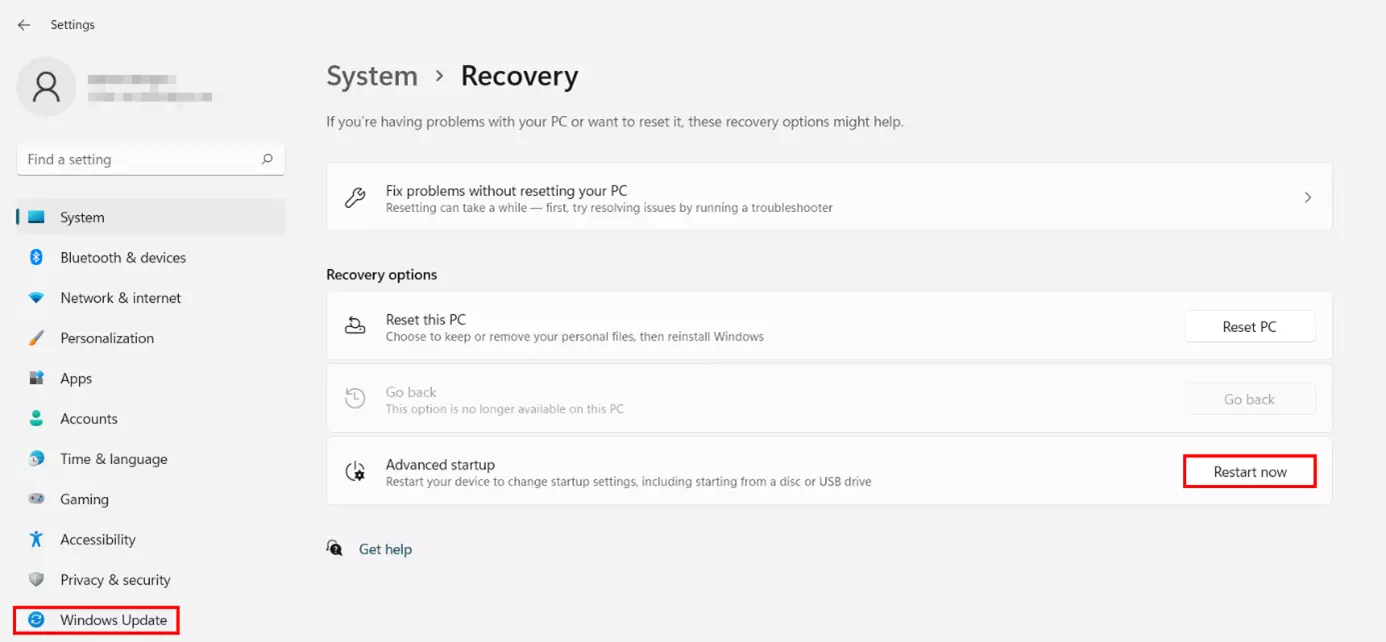
However, you can also initiate the extended startup via the system settings by following the instructions below:
Open the Start menu.
- Open the settings
- Select the ‘Windows Update’ entry in the left side menu.
- Open the ‘Advanced options’ section.
- Click on ‘Recovery’.
- Press the ‘Restart now’ button in the ‘Advanced startup’ section.
Step 2: Start Safe Mode in Windows 11 using the troubleshooter
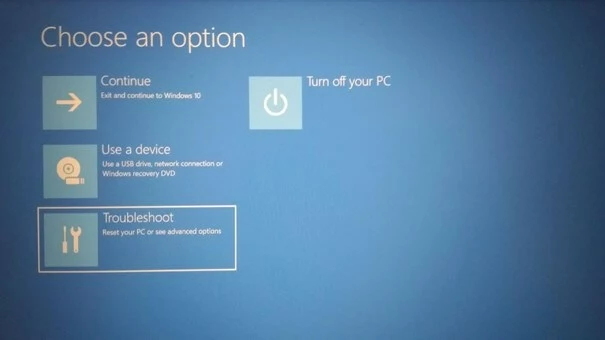
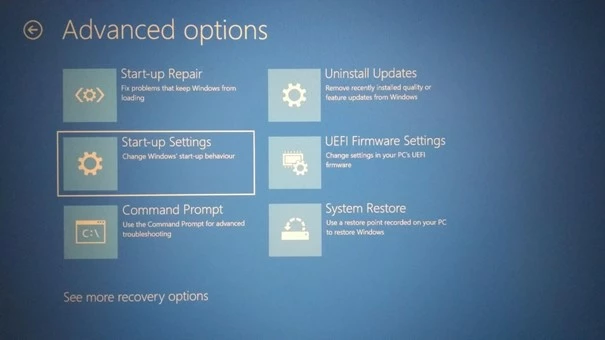
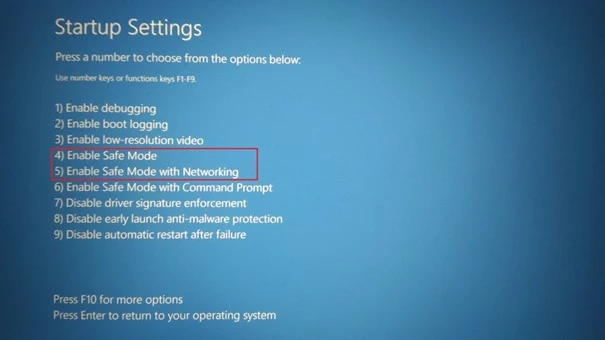
Windows shows a number of options for restarting in the following dialogue. Continue by clicking on ‘Restart’. You can now initiate the Safe Mode of Windows 11 either with the number keys or with the function keys. Press [4] or [F4] to start without or [5] or [F5] to start with network drivers. If you want to work with the command prompt after startup, press [6] or [F6].
Starting Windows 11 Safe Mode via msconfig – Instructions
The configuration tool msconfig creates the possibility to manage the Windows 11 autostart. You can use the application to adjust the startup settings of the system during operation and thus also to force a restart of Windows 11 in Safe Mode. Here’s how:
Step 1: The easiest way to start msconfig is via the ‘Run’ function. You can access this either via the search function or with the key combination [Windows] + [R]. Type ‘msconfig’ and confirm your entry by clicking ‘OK’.
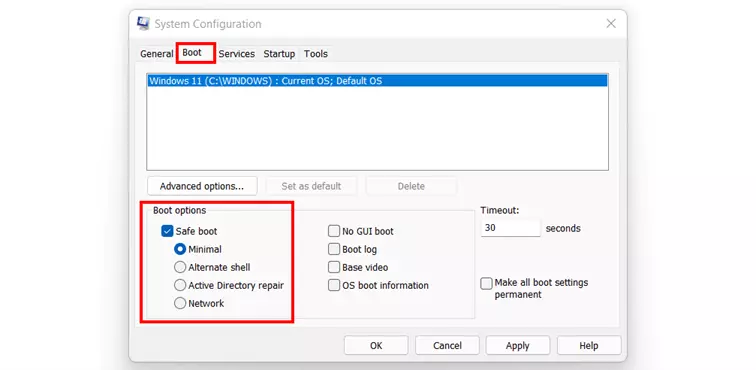
Step 2: Switch to the ‘Start’ tab. For Windows 11 to run in Safe Mode, place a tick next to ‘Safe boot’. Leave it at the default option ‘Minimal’ if you want to start the standard, minimalist Safe Mode. Alternatively, you can start with network drivers (‘Network’) and start with a command prompt (‘Alternative Shell’).
Step 3: Confirm the system startup settings by pressing ‘OK’. In the following dialog, select ‘Restart’ to start your device in Safe Mode.
How to exit Safe Mode in Windows 11
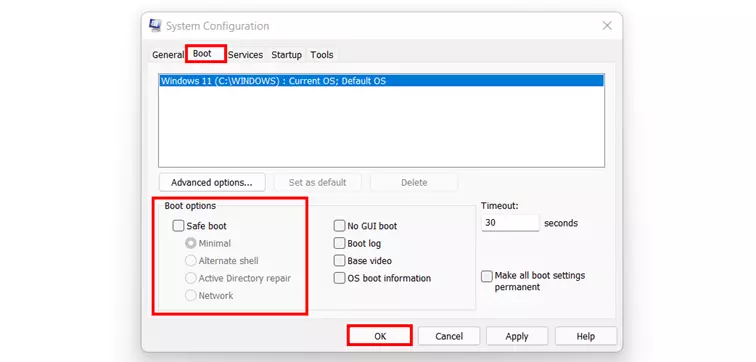
If you want to switch back to the normal mode of Windows 11, it is sufficient in most cases to restart the system. If the Safe Mode is still active after a reboot, you can switch it off with the msconfig tool like this:
- Open the ‘Run’ dialogue via the search function or with the key combination [Windows] + [R].
- Type ‘msconfig’ and confirm the command by clicking ‘OK’.
- Switch to the ‘Start’ tab.
- Remove the tick in the ‘Safe boot’ box.
- Press ‘OK’.
- Confirm the restart of Windows 11 to exit Safe Mode.


