How to speed up Windows 11
Device performance doesn’t just depend on age. The operating system in use also plays an important role when it comes to the speed of computer start-up or application execution. Regular maintenance can work wonders. We will show you what options you have to make Windows 11 faster.
- Free website protection with SSL Wildcard included
- Free private registration for greater privacy
- Free 2 GB email account
How to speed up Windows 11: maintaining good performance long-term
An operating system’s performance depends on numerous factors, though these may not be very obvious from a user’s point of view. If you regularly apply important settings to optimise the performance of Windows 11, you’re probably already speeding up Windows 11 or counteracting a decline in performance. Here are some tips to improve Windows 11 speed performance.
Tip 1: Manage autostart programs
When you start up the operating system, Windows 11 runs certain programs and services automatically. Windows 11 autostart proves to be a real boon for everyday applications. This way, you don't need to start communication tools like email clients or Discords each time you boot up your computer. However, the more programs are run automatically, the more system performance is affected.
Setting up your Discord server is quicker than you may think. Find out how to create your Discord server with our Digital Guide.
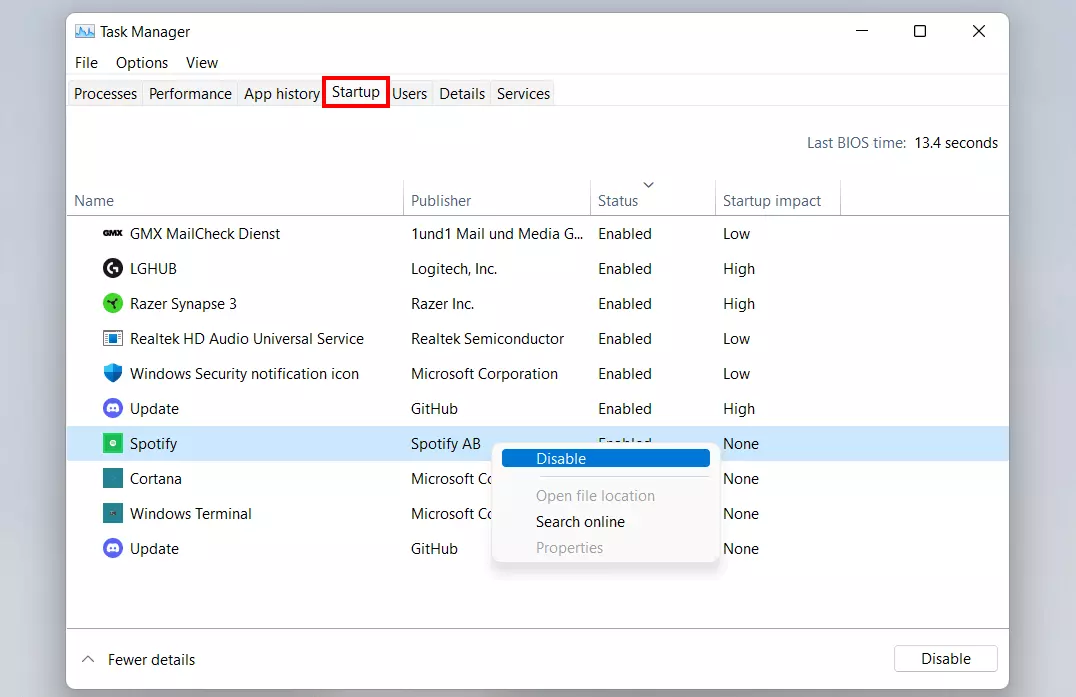
One option to speed up Windows 11 is to disable autostart for programs that do not need to be launched upon system start-up. To do so, follow these steps:
- Launch the Task Manager using the key combination [Ctrl] + [Shift] + [Esc].
- Switch to ‘Autostart’.
- Check the ‘Status’ column for programs listed as ‘activated’.
- Select the entry of the program you wish to deactivate and right-click on it.
- Click on ‘Disable’.
Tip 2: Clear memory via disk cleanup
The more a computer is used, the more its memory is used, among other things. In the case of older HDD hard disks, this could lead to performance loss in the long term, because a reduction in read and write speeds is to be expected once the storage capacity has been utilised to a certain extent. To speed up Windows 11, you should regularly free up storage space that is reserved for temporary files or files that are no longer used.
Regularly releasing storage space makes sense on SSD data carriers too, even though data processing is handled differently compared to HDDs and is not influenced by load in terms of performance. Find out what the difference between the two technologies is in our dedicated article ‘HDD vs. SSD’.
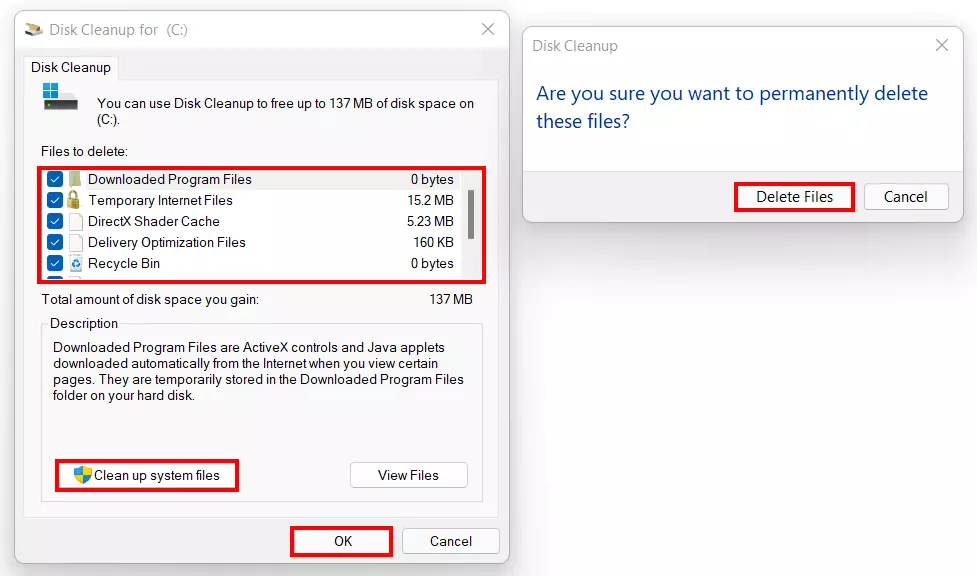
The simplest solution for freeing up disk space is Disk Cleanup.
- Press the key combination [Windows] key + [R].
- Type ‘cleanmgr’ and press Enter.
- Select the files you wish to remove from the system by placing a tick in the corresponding box.
- Press ‘OK’ and confirm deletion with ‘Delete Files’.
- The progress bar displays how far along the system is in the deletion process.
- If you want to boost capacity, select the ‘Clean up system files’ option to permanently delete obsolete Windows update and log files.
Tip 3: Uninstall obsolete programs
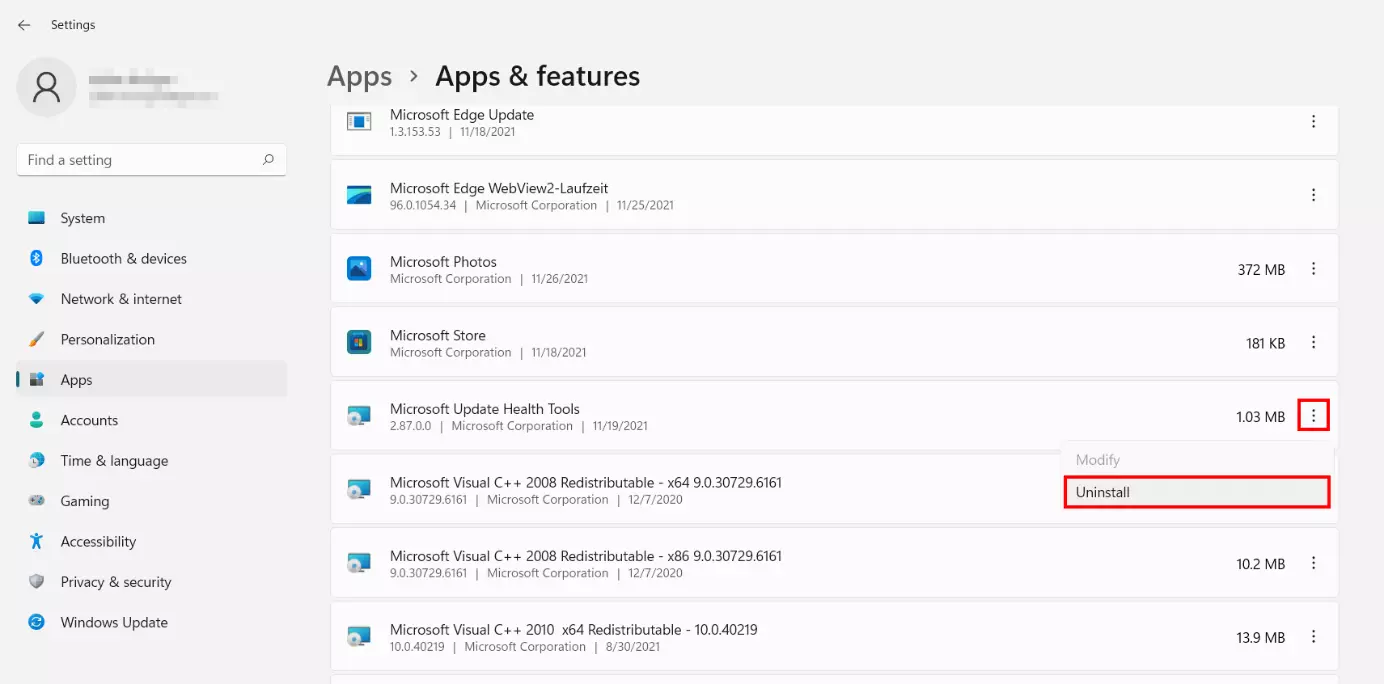
You can free up space by uninstalling programs that you no longer use. The easiest way to do this is via the ‘Apps & features’ menu in the settings. To access this feature, press the key combination [Windows] key + [X] and select the menu item of the same name. Then follow these steps:
- Scroll to the program you wish to uninstall.
- Press the three-dot icon.
- Select the ‘Uninstall’ option.
- Confirm deinstallation by pressing ‘Uninstall’ again in the following window.
Tip 4: Turn off visual effects
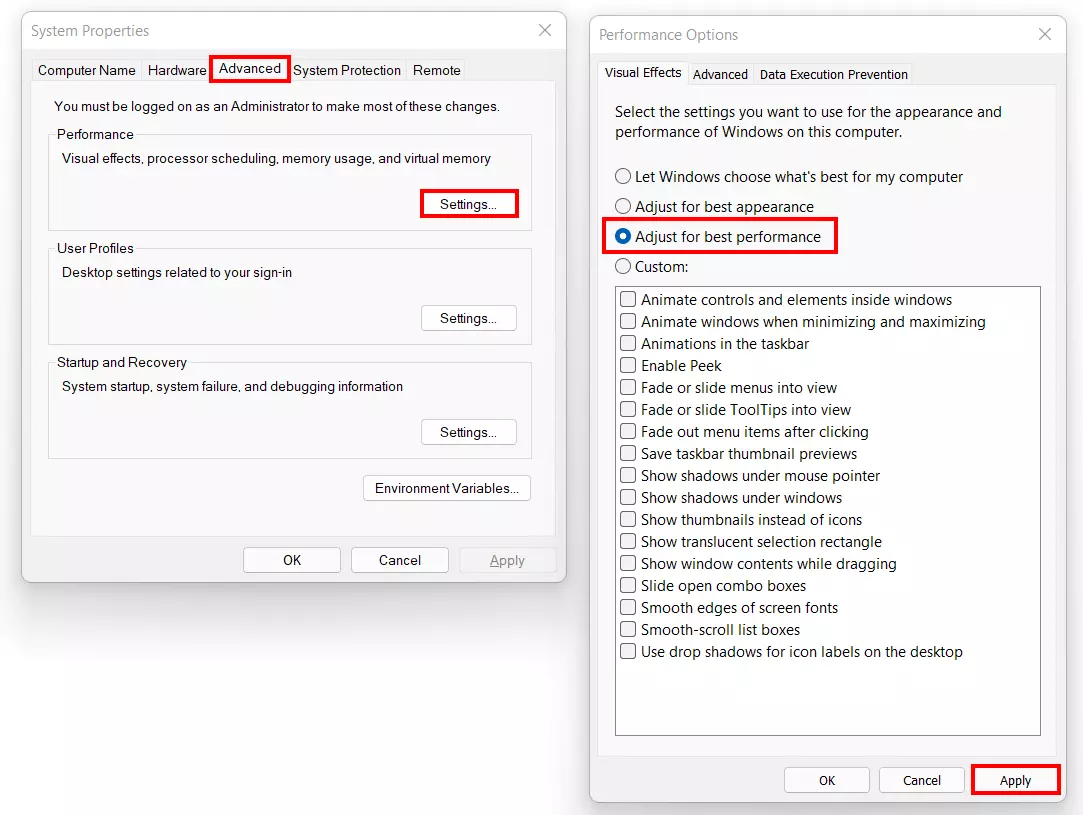
A frequent feature of new operating system versions is the qualitative upgrade of its design. With Windows aimed at private users, Microsoft strived for years to set new standards in terms of its design, but this naturally affects the performance of the device. If you wish to speed up Windows 11, you can deactivate some of the built-in visual effects:
- Use the key combination [Windows] key + [R] or open the ‘Run’ dialogue via the Start menu.
- Execute the input ‘sysdm.cpl’.
- Switch to the ‘Advanced’ tab.
- In the ‘Performance’ section, press ‘Settings’.
- Select the ‘Adjust for best performance’ option and confirm the change by clicking ‘Apply’ and ‘OK’ in succession.
Tip 5: Turn off background apps
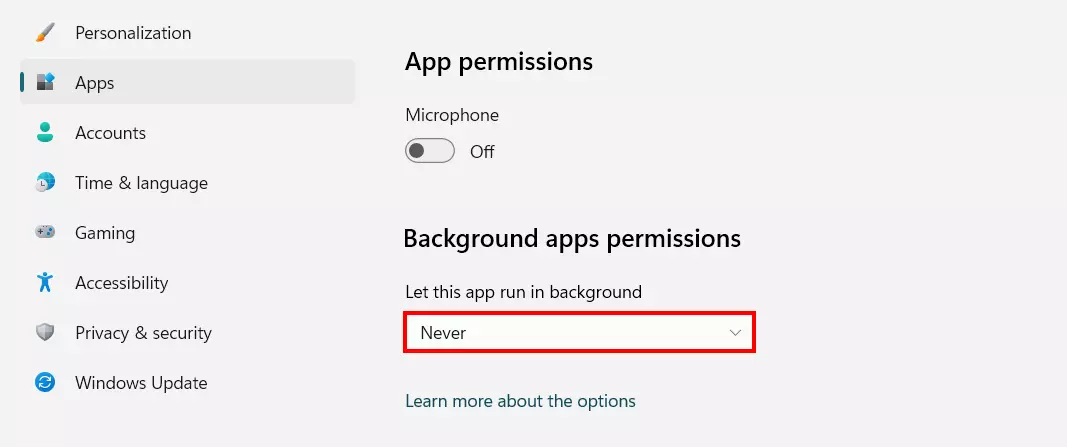
To send information and notifications, Windows 11 runs certain apps, such as email clients, permanently in the background. But this handy feature affects performance, especially memory. Consequently, if you exclude programs from running in the background, you can save resources and make Windows 11 faster. However, the system does not offer a general function for deactivation as Windows 10 does. Thus, you have to disable all background apps one by one by taking the following steps:
- Use the key combination [Windows] key + [X].
- Select the ‘Apps & features’ entry.
- Scroll to the entry of the background app you wish to adjust settings for.
- Click on the three-dot icon and then on ‘Advanced options’.
- In the ‘Background apps permissions’ section, select ‘Never’.
Tip 6: Turn off app notifications
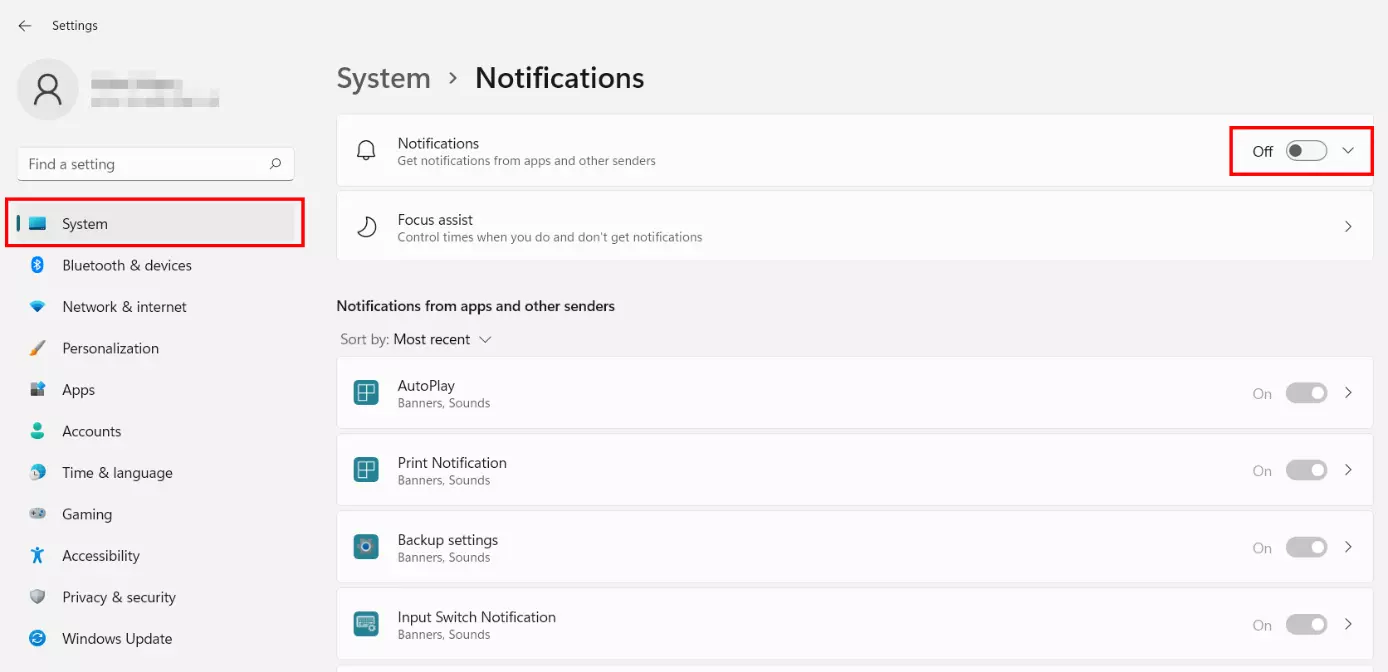
By default, Windows comes with notification features that take up system power but aren't necessarily required, for example, notifications on app startup, to confirm settings or printer notifications. To speed up Windows 11, you can disable these features altogether by doing the following:
- Access the start menu.
- Select ‘Settings’.
- Click on ‘System’ in the left-hand menu.
- Open ‘Notifications’ and move the slider to ‘Off’.
Tip 7: Update Windows
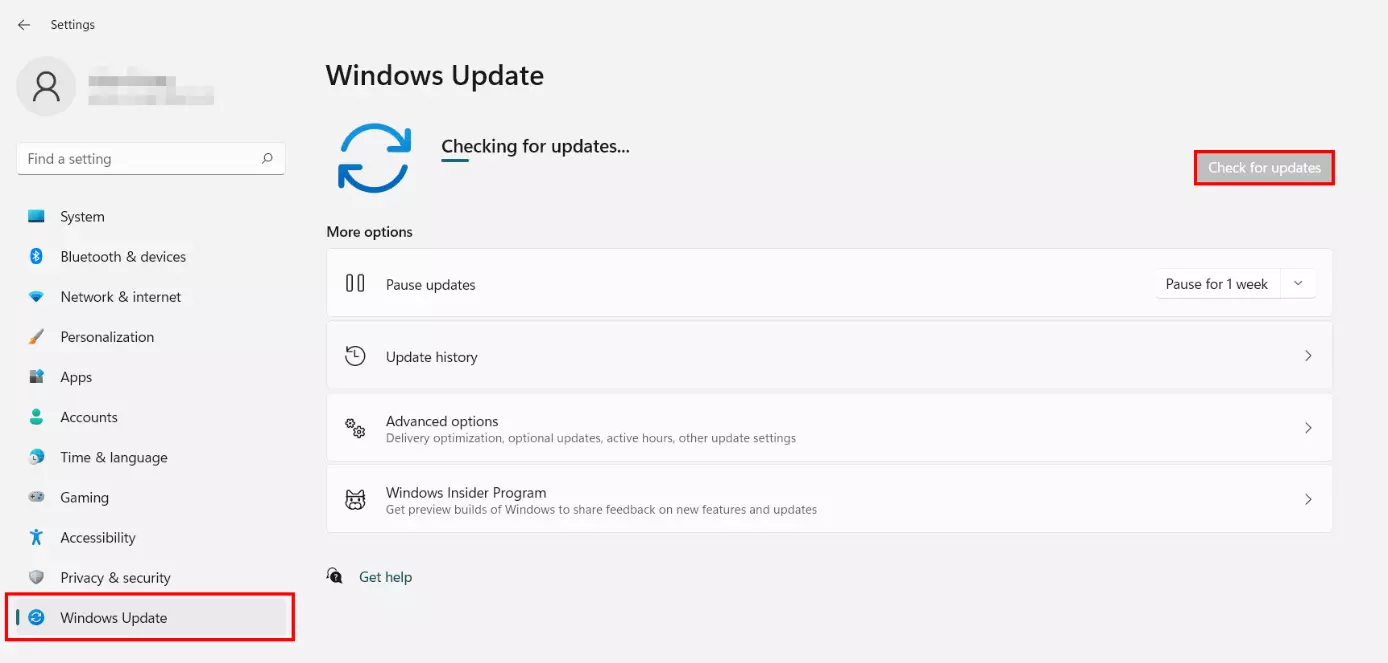
Updating Windows 11 regularly is recommended for various reasons. First, Microsoft regularly closes critical security gaps as part of its updates. On the other hand, the system is provided with bug fixes and optimised code, which automatically increases stability and performance. Even though the Update Center usually alerts to available system updates, it is worth checking them regularly:
- Launch the start menu.
- Launch Settings.
- In the left, click on ‘Windows Update’.
- Click on ‘Check for updates’.
Tip 8: Defragmentation
Another way to speed up Windows 11 is to defragment the hard disk. To increase the write speed on HDD hard disks, files are normally stored in a scattered manner (the physical disk rotates under the read and write head). During defragmentation, the data storage locations of files on the disk are rearranged so that they are as close to each other as possible. This process is highly recommended for HDDs, because when a lot of data is stored in fragmented form, this has a negative effect on access speeds.
Windows 11 automatically optimises SSDs. Manual defragmentation to optimise the performance or SSD lifetime is therefore generally not recommended.
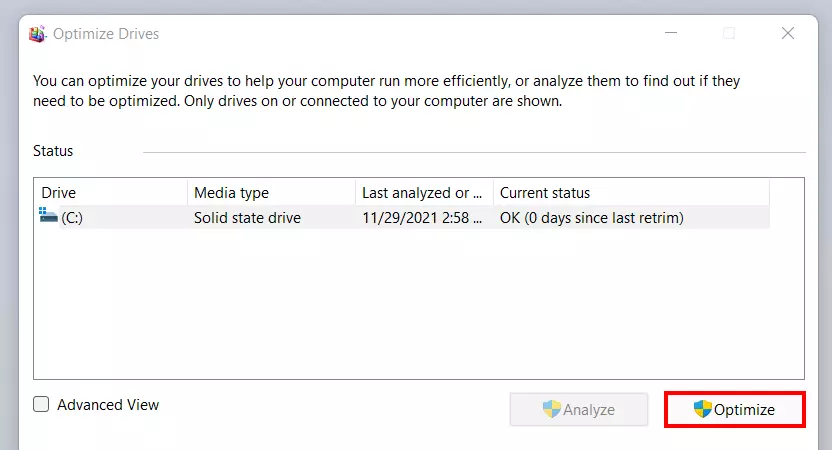
Follow these steps to begin defragmentation in Windows 11:
- Use the key combination [Windows] key + [R] or open the ‘Run’ dialogue via the Start menu.
- Type ‘dfrgui’ and confirm the command by pressing the Enter key.
- Select the desired hard disk and press ‘Optimize’.
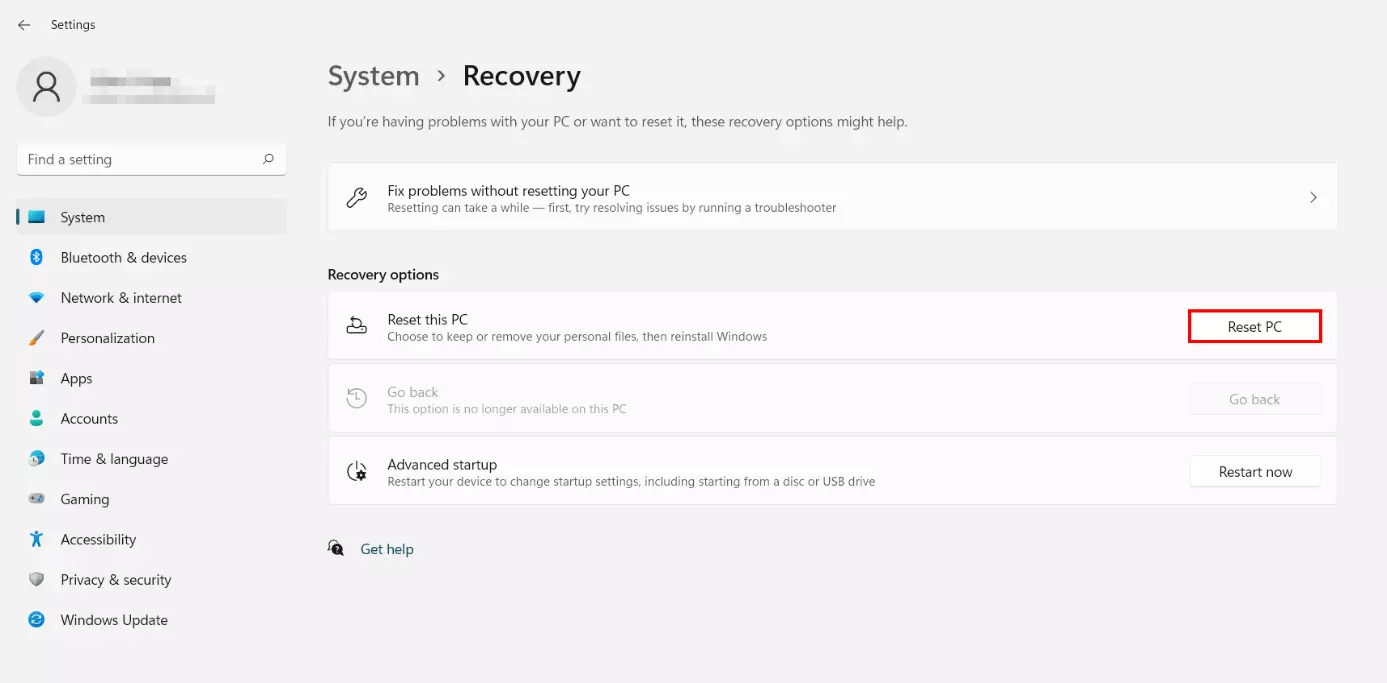
Tip 9: Reset Windows 11
If you are unable to fix your performance issues with the listed options, you can consider resetting the operating system. This option could help fix more serious issues in a system and thus make Windows 11 perform faster. However, before you decide to take such last-resort measures, you should do two things first:
- Create a system backup of your files, using the Windows 11 Backup function.
- Try to repair the system using the Troubleshooter (‘Settings’ > ‘System’ > ‘Troubleshooting’).
Once you backed up all files and have attempted to troubleshoot without success, follow these steps to reset Windows 11:
- Open Settings via the start menu or using the key combination [Windows] key + [i].
- Select ‘Recovery’.
- Press the ‘Reset PC’ button.
- Select whether you want to delete your personal files as part of the reinstallation or not.
- Specify whether you want Windows 11 to reinstall locally from the device or via cloud download.
- Click ‘Next’ and finally ‘Reset PC’.
- Regular virus scans
- Automatic backups and simple file recovery


