How to screen record in Windows 11
With Windows 10, Microsoft's operating system received a native screen recording feature update in the form of Xbox Game Bar. With the help of this handy tool, user can create video recordings of programs like Word and Excel or capture clips of games. However, recording from the Windows 11 desktop or the File Explorer is not possible. We will show you exactly how to do a screen recording in Windows 11.
- Up to 50 GB Exchange email account
- Outlook Web App and collaboration tools
- Expert support & setup service
Screen recording in Windows 11: quick tutorial
Xbox Game Bar is primarily designed for recording games. However, you can also use the tool to record a wide variety of other programs, such as Office applications to create screencasts, for example. The following instructions summarise the steps in brief:
- Launch the program or game you wish to record.
- Use the key combination [Windows] key + [G] to launch Xbox Game Bar.
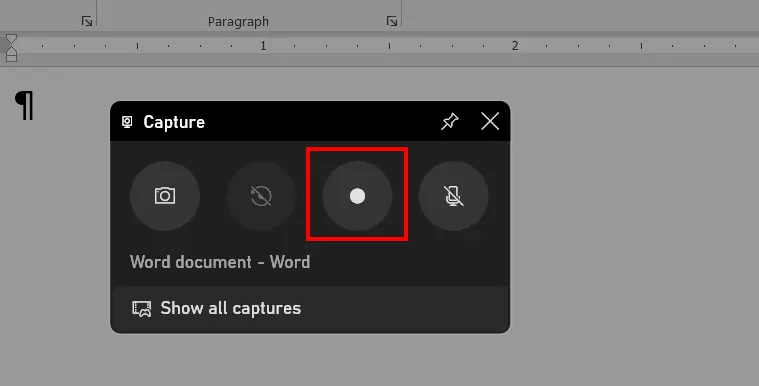
- Press the record button (‘Start recording’) or use the key combination [Windows] key + [Alt] + [R] to begin recording.
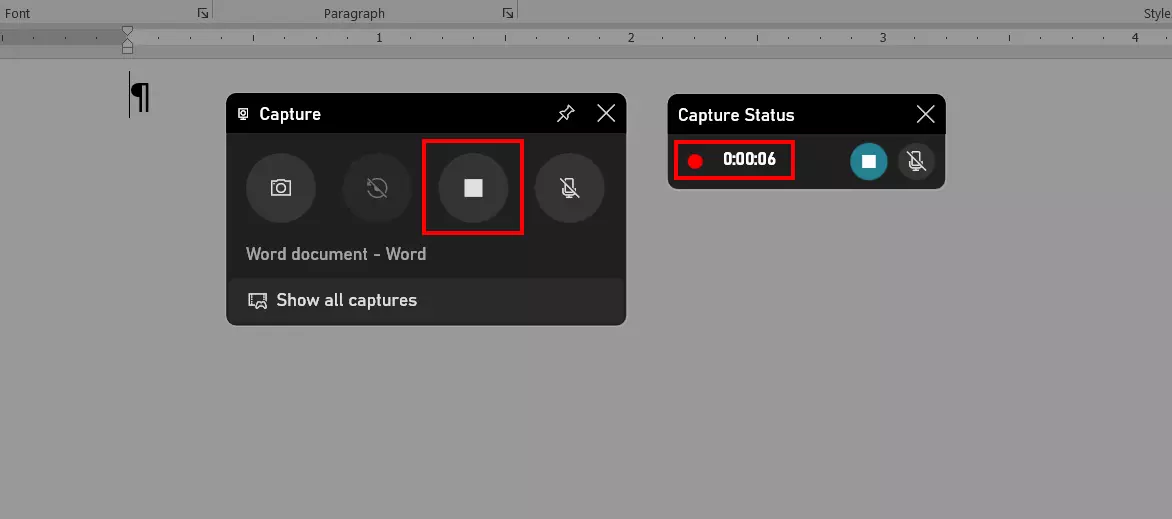
- Press the Stop button (‘Stop recording’) or use the key combination [Windows] key + [Alt] + [R] again to finish recording.
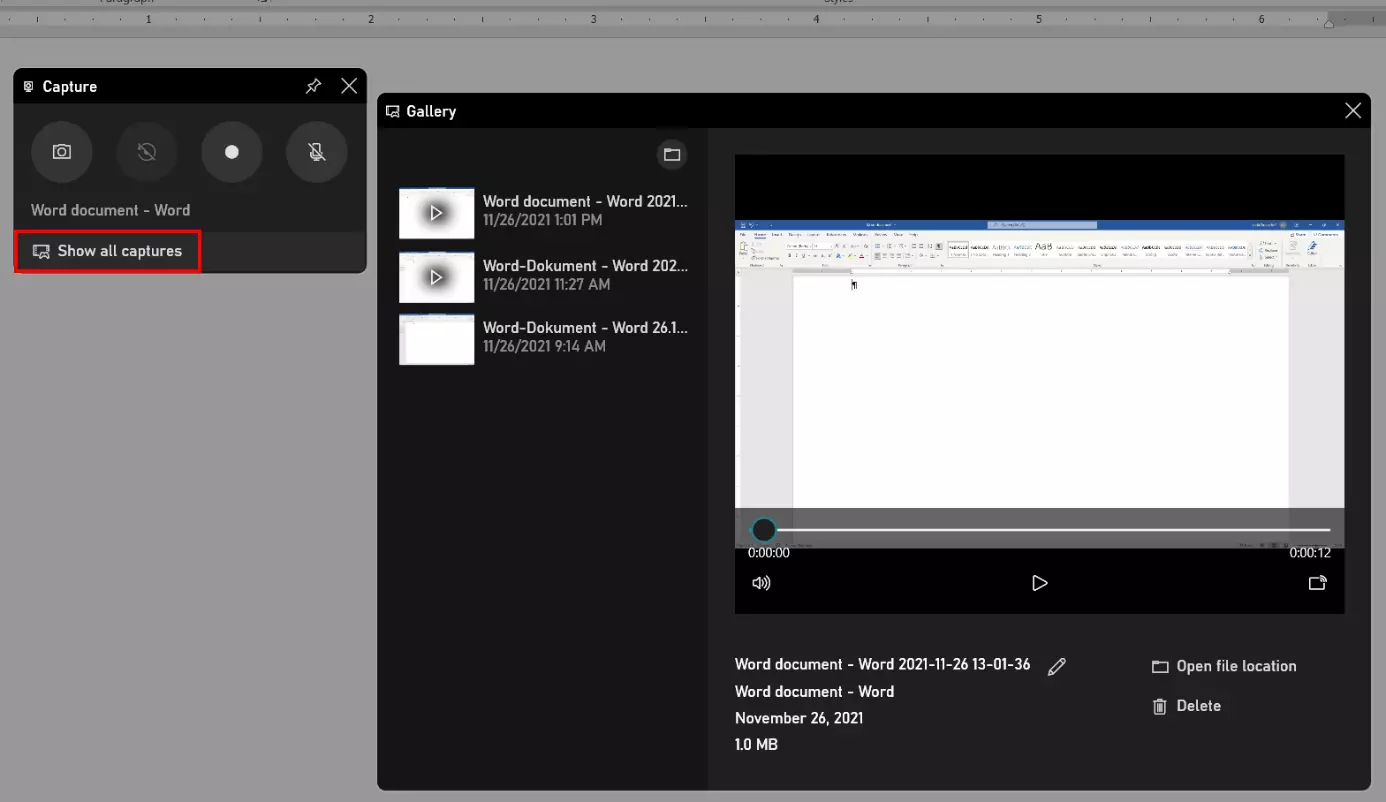
- You can find the recorded screen captures in your Windows 11 user directory ‘C:\Users\USERNAME\Videos\Captures’.
Recording programs in Windows 11: step-by-step tutorial
Contrary to what the name suggests, the Xbox Game Bar is not an exclusive feature of the popular Microsoft game console. The tool is rather a link between Xbox and PC gamers, because it allows users of Xbox, PC, and mobile devices to communicate, among other things. However, the most interesting feature for PC users is the option to take screen recordings.
The Xbox Game Bar was already able to do screen recordings in Windows 10. It enables users to make image, video, and audio recordings of almost all programs and games without having to install additional software. In the following sections we have summarised the most important steps for you.
Step 1: Adjust recording settings of the Xbox Game Bar
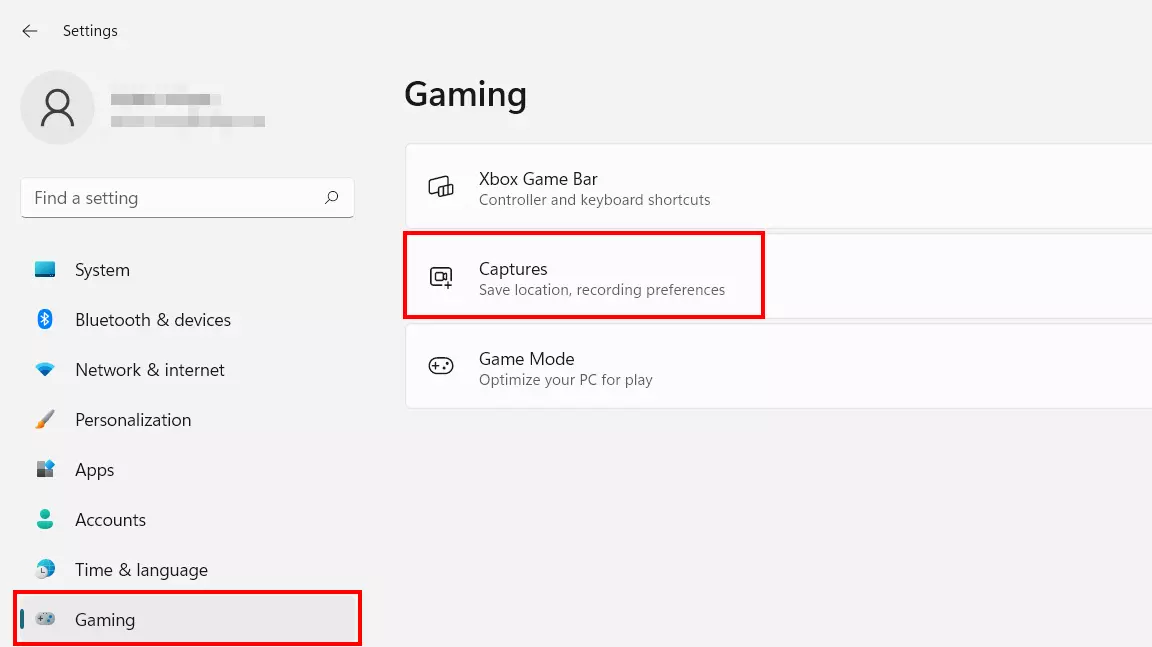
Before you start a screen capture in Windows 11, first check the current settings for recordings with the Xbox Game Bar and adjust them if necessary. You can access the corresponding menu as follows:
- Launch the start menu.
- Click on ‘Settings’.
- Select the ‘Gaming’ item in the left-hand menu.
- Click on the menu item ‘Captures’.
You can now define the storage location of the video clips and adjust the following recording settings:
- Record what happened: If you activate this function, the recording function of the Xbox Game Bar runs in the background without creating a clip. A recording of the last 30 seconds (optionally also up to 10 minutes) is only saved in the recording folder via a key combination.
- Max. recording length: Choose between 30 minutes and 4 hours for the maximum length of a screen recording in Windows 11.
- Capture audio when recording a game: If you want the sound of the game or program you are recording to be captured as well, you must enable this option. You can adjust the sound quality (96-192 KBit/s) and regulate the recording volume of the microphone and system sound.
- Video frame rate: Specify whether you want to record at up to 30 or up to 60 FPS (frames per second).
- Video quality: With the ‘Standard’ video quality of the Game Bar enabled, the tool adapts to the quality you have set in the game or program – up to 1080p (1920 x 1080 pixels). For higher resolutions, select the ‘High’ option at this point.
- Capture the mouse pointer when recording a game: If this option is enabled, the mouse pointer is also recorded during screen capture in Windows 11.
Step 2: Launch Xbox Game Bar
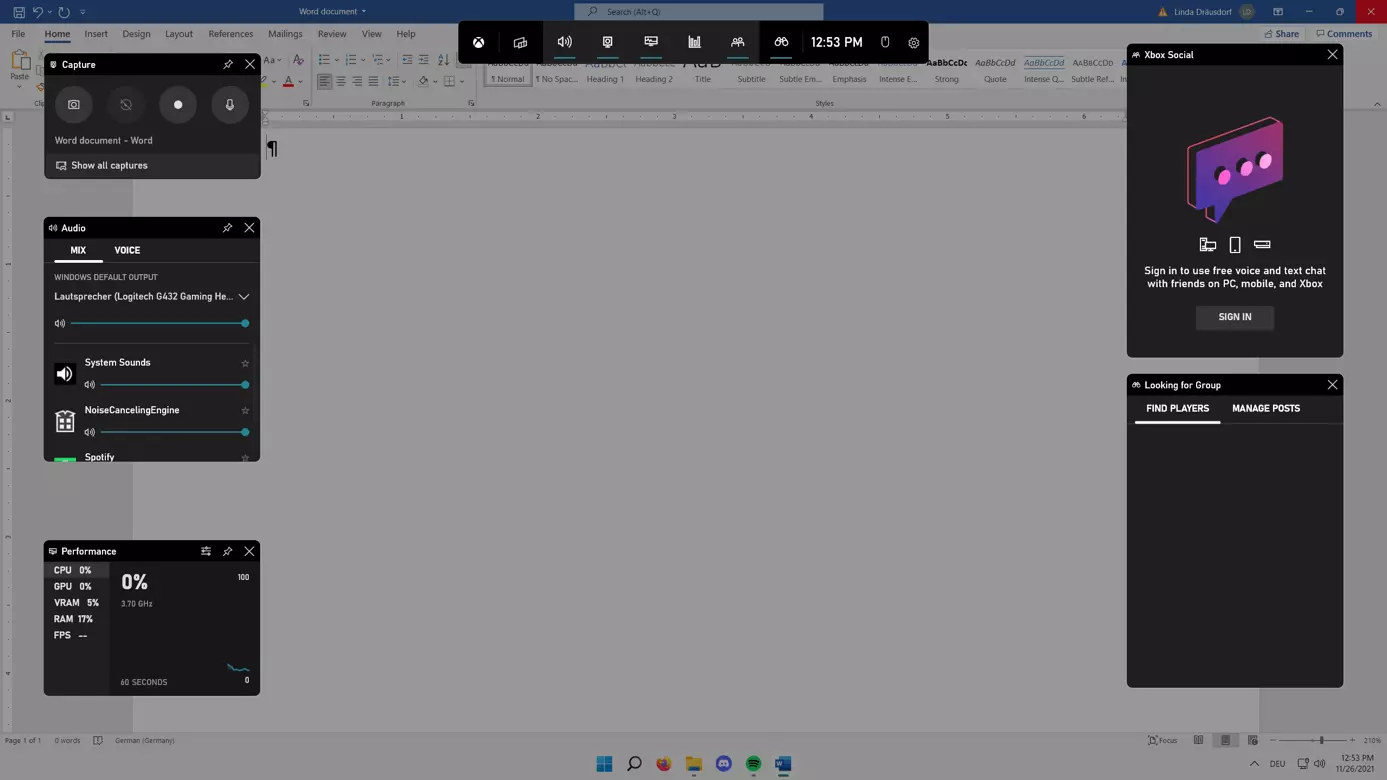
Launch the program or game you wish to record. Then open the Xbox Game Bar with the key combination [Windows] key + [G].
You can run the screen capture tool in Windows 11 via the search function (magnifying glass icon in the taskbar). To do this, simply enter the search term ‘Xbox Game Bar’. Note that no application is selected for recording.
In case of the Xbox Game Bar, the various functions and features are called widgets. By default, the tool shows the widgets ‘Performance’, ‘Audio’, ‘Looking for Group’, ‘Xbox Social’, and ‘Capture’. The latter is the crucial tool for a screen capture in Windows 11.
Step 3: Switch on microphone recording
Before you get started recording video with the Game Bar, you should check whether you want to record the sound of your microphone. By default, the microphone is disabled during recording, so you must turn it on to record sound.
Go to the next step if you want to keep the microphone muted.
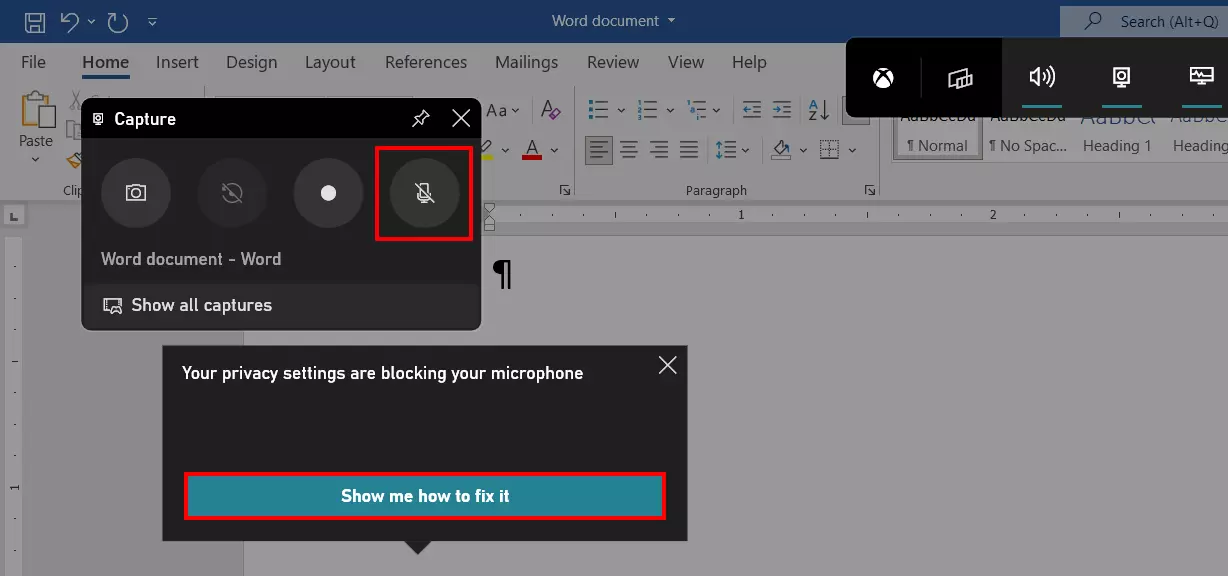
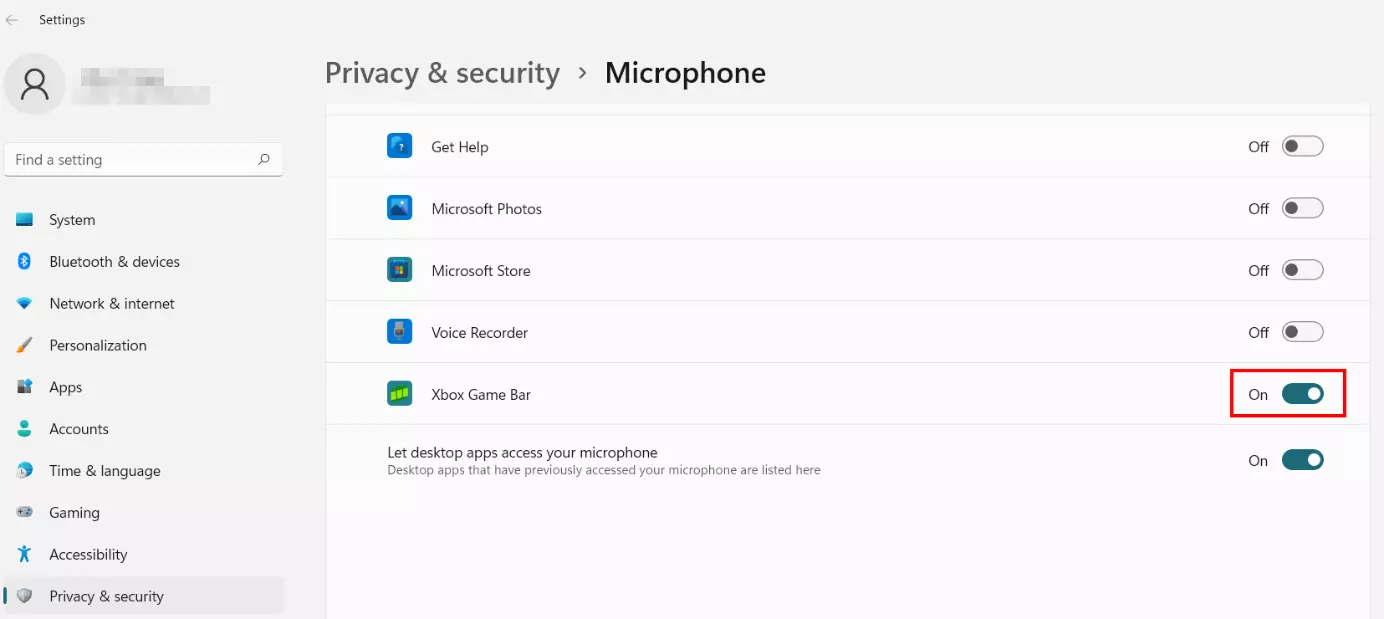
To enable microphone recording click on the icon with the crossed-out microphone in the ‘Capture’ widget or use the key combination [Windows] key + [Alt] + [M]. In the following dialogue, press the ‘Show me how to fix it’ button to enable the microphone for the Xbox Game Bar:
Turn microphone recording on or off in the Xbox Game Bar at any time using the aforementioned microphone icon or the key combination [Windows] key + [Alt] + [M].
Step 4: Begin Windows 11 screen capture
The Xbox Game Bar lets you take a screenshot of the selected application or active game. To do this, simply click on the camera icon in the ‘Record’ widget instead.
Step 5: Access recording(s)
In the gallery, you can playback recorded Windows 11 screen recordings just like you would with an ordinary video player. Moreover, you can rename or delete your recordings and open the location of the file(s).


