Raspberry Pi - Alexa Tutorial
Amazon Alexa, or simply Alexa, is the language assistant developed by Amazon, which is used in smart speakers like the Amazon Echo or the Echo Dot, for example. In these devices, Alexa serves as a central control unit that responds to voice commands from the user. For example, songs from Amazon Music or Spotify can be streamed, audio books from Audible can be played, and news and weather information can be retrieved. The software also helps to organise daily routines if required: shopping and to-do lists can be dictated and appointments can be booked in the desired calendar (including Apple, Google, and Outlook).
And because Amazon's speech software is compatible with thousands of smart home devices such as lamps, sockets, thermostats, and more, this also makes household automation possible.
Alexa is automatically updated via the cloud. In addition, Amazon regularly provides the language software with new features that are also known as Amazon Alexa Skills and can be added via the Alexa Skills store.
Thanks to the Alexa Voice Service, you can enjoy what Alexa has to offer without needing an Amazon device by integrating the language assistant into your own device. The popular Raspberry Pi has proven to be particularly suitable. Compared to Amazon Echo and others, it not only offers price advantages, but can also be adapted and individualised at will.
Setting up Alexa on Raspberry Pi: The requirements for AlexaPi
Raspberry Pi has been on the market since 2012. Since then, the manufacturers have been continuously working on the further development of the minicomputer and have released various successor versions such as Raspberry Pi 2 and 3 and Raspberry Pi Zero. However, not all versions of the single-board computer fulfil the necessary requirements for integrating Alexa: In order to be able to use the language assistant optimally, it is recommended to use at least one Raspberry Pi 2 (model B). Since Alexa requires an existing internet connection, you will also need a WLAN adapter if you do not want to permanently connect your minicomputer to the internet via a network cable.
You can also opt for a Raspberry Pi 3 as it has an integrated Wi-Fi adapter as standard.
You will also need the following accessories to use Alexa on your Raspberry Pi:
- MicroSD card with at least 8 GB (optimal: 16 GB or more)
- USB power supply with at least 2,000 mAh
- USB microphone
- USB or Bluetooth speakers (if Raspberry Pi 3)
For a better sound experience, you can optionally connect a USB sound card to the Raspberry. If you do not want to install and set up the operating system and Alexa entirely remotely from your PC (headless mode), you must also connect the screen, keyboard, and mouse to the minicomputer.
AlexaPi tutorial: How Raspberry Pi becomes the Alexa voice
Before you can set up the language wizard, you must first install an operating system on the Raspberry or on the selected SD card. We recommend Raspbian, officially supported by the Raspberry Pi Foundation, which you can download as an image file directly from the Foundation. Unpack the file onto the SD card and use it to boot your Raspberry Pi and install the operating system. The following video provides you with detailed instructions:
If you don't want to install an operating system, you can also buy a ready-to-use SD card – for example in “The Pi Hut” online store – on which Raspbian is already pre-installed.
How to get Alexa up and running after installing Raspbian is explained in the following step-by-step guide.
Step 1: Create an Amazon Developer account
To access Amazon Voice Service, you need an Amazon Developer account. You create one by visiting the Amazon Developer Services and Technologies website and clicking on “Sign In” and then on “Create your account”. You can also sign in via your regular Amazon account, if available.
You are then automatically logged in to the developer area. However, before you can use tools like Alexa Voice Service, you need to provide some additional information about yourself, which you can do by clicking on “Complete registration” in the upper menu bar.
Step 2: Register Raspberry Pi for Alexa Voice Service
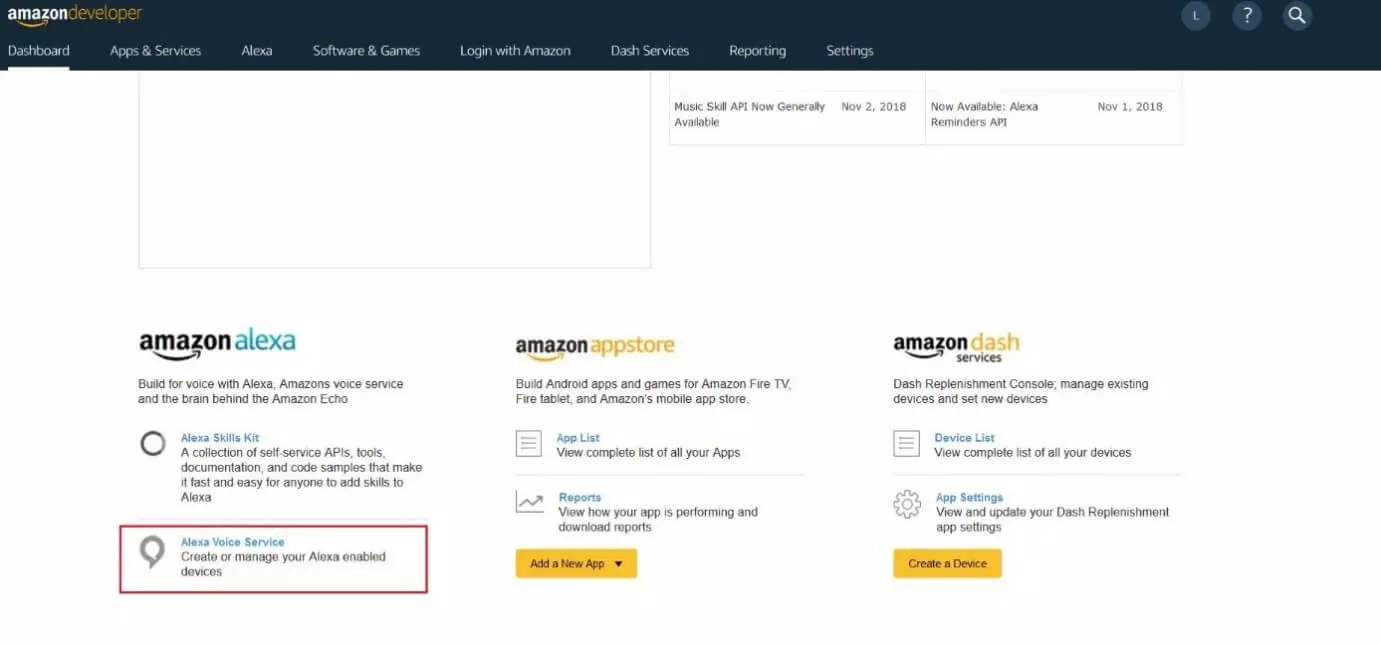
Once you have provided the necessary information and agreed to the terms of use and guidelines, you will have access to the Developer Dashboard, which allows you to view and manage your various Amazon projects. Under the heading “Amazon Alexa” you will find “Alexa Voice Service”, which starts the activation of your Raspberry for the language assistant:
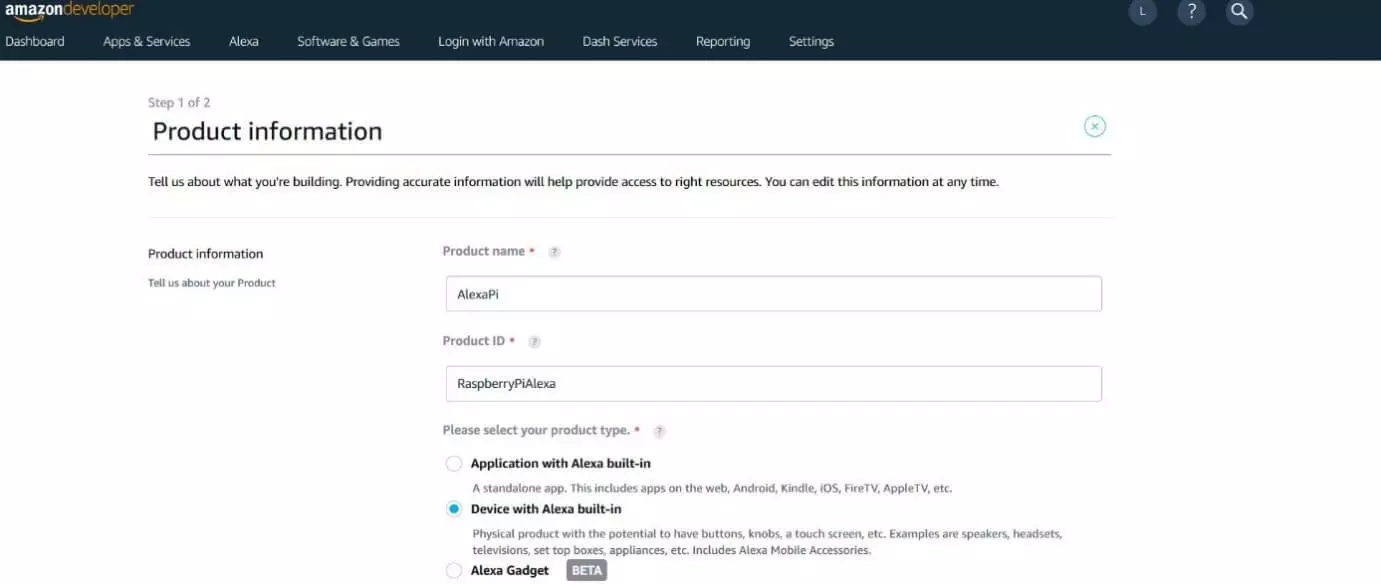
Under “Product name” and “Product ID,” you can enter “AlexaPi” or “RaspberryPiAlexa”, for example.
As "Product type" select the option "Device with Alexa built-in". Click no for the question about the use of a companion app.
For “Product category”, choose “Wireless speakers”. In the product description, you don't have to use big words, an entry like "Raspberry Pi Alexa Speaker" is sufficient.
Since you want to command your Raspberry Pi like the classic Alexa speaker; exclusively by voice command, check "Hands-free" (voice command from close range) and "Far-field" (voice command from a distance) as planned types of interaction.
The concluding questions about commercial use or use of the Raspberry for Alexa for Business and Alexa Mobile Accessory protocol should be answered with a “no”, as should the question of whether your project is specifically tailored for children.
Step 3: Create a LWA security profile
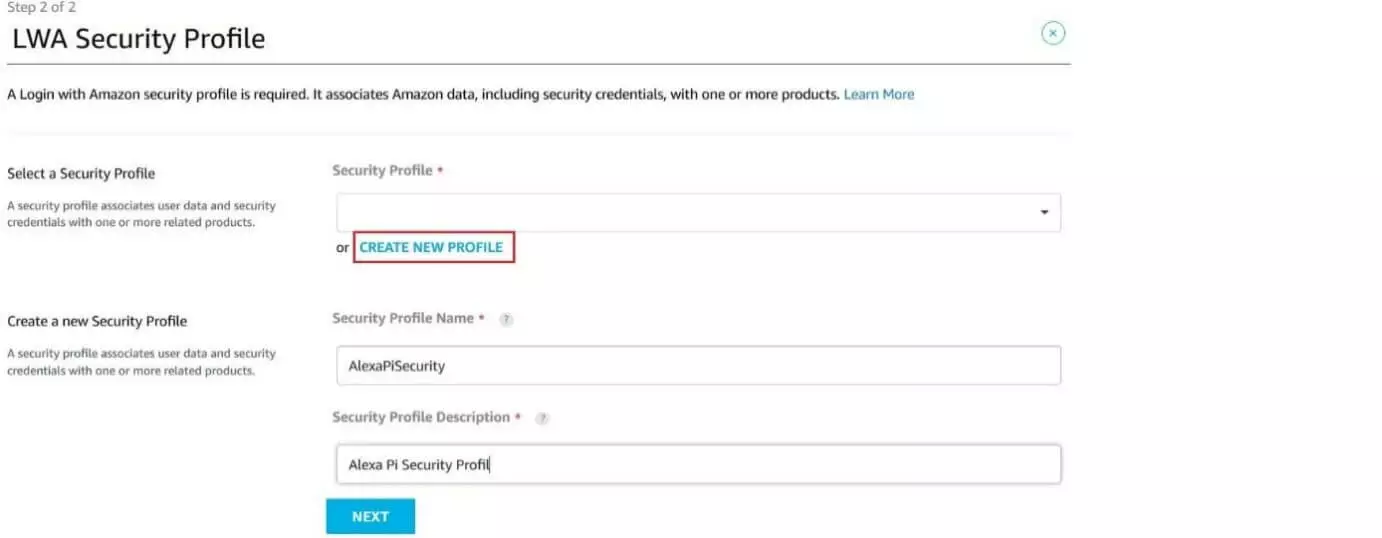
The next step is to create an LWA (Login With Amazon) security profile for the Raspberry Pi so that it can verify itself with Amazon. Since you do not yet have one, click on “CREATE NEW PROFILE” and then enter a suitable name and a short description of the profile:
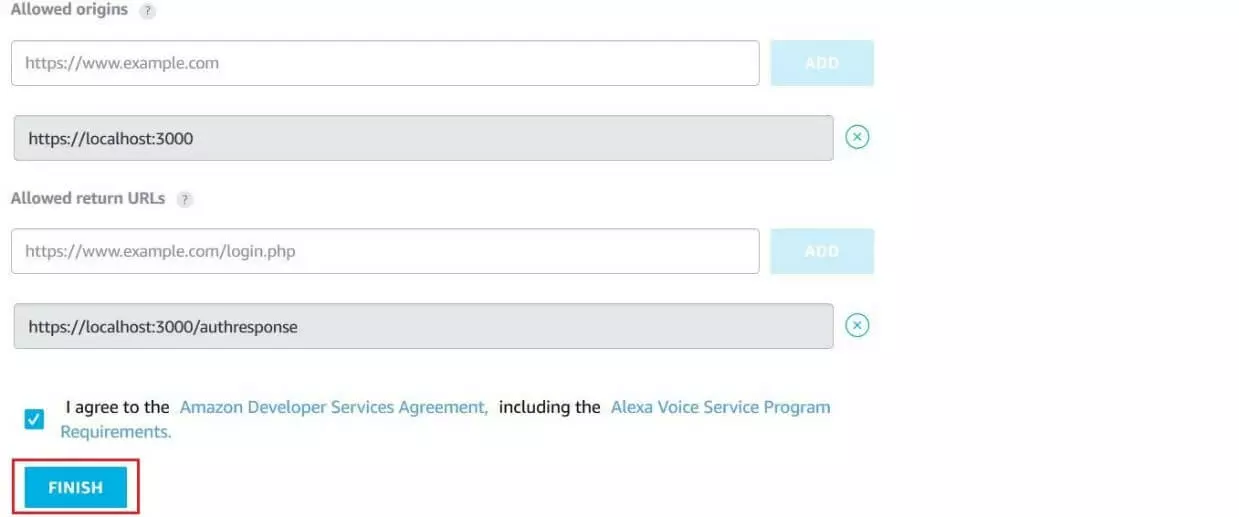
After clicking on “NEXT”, another menu appears in which you specify the URLs for the LWS authentication. Enter the following addresses here (and save them with “ADD”):
- Allowed origins: https://localhost:3000
- Allowed return URLs: https://localhost:3000/authresponse
Then check the box to give your consent to the Amazon and Alexa Voice service agreements and end the profiling process by clicking the “FINISH” button:
If the setup was successful, Amazon will send you a pop-up notification.
Step 4: Write down product and client information
The profile you have created for your AlexaPi is now available for selection at any time under “Products”. Before you start installing Alexa, however, you should already call up and note down the product and client information required for configuring the language assistant. To do this, click on the profile of the Raspberry in the product overview and note what’s written under “Client ID” and “Client secret”. The decisive product information is the “Product ID”, which is the same as the assigned product name (in this tutorial “AlexaPi”).
Step 5: Install Alexa on Raspberry Pi
The easiest way to install Alexa on your Raspberry Pi is via the developer platform GitHub. There you will find the Alexa AVS Sample App, which you can use to get the language software on your minicomputer. A Git client is required, which you can download after a quick system update if it is not installed by default. First, enter the following commands in the Raspbian terminal to update the system software:
sudo apt-get update
sudo apt-get upgrade -y
This is followed by the Git client check:
sudo apt-get install gitUsing the client, download the AVS Sample App or clone the GitHub Repository:
sudo git clone https://github.com/jbnunn/alexa-avs-sample-app.gitThe AVS Sample App is currently in maintenance mode, so it does not include the latest Alexa features. With AVS-Device-SDK an alternative solution is available, which also offers newer functions of the language assistant.
Save the changes and start the installation of Alexa on your Raspberry Pi with the following command:
. automated_install.shStep 6: First setup steps during installation
During the installation of the language software, you must carry out the first settings and answer questions. So when you agree to the terms and conditions and to the use of designated third-party applications (if required), it applies from the very beginning of the whole process. With the next question, you confirm that you already have an Amazon Developer account before you confirm the details for “Product ID,” “Client ID,” and “Client secret” in the third question. In all three cases, type “y” and then press the [Enter] key.
This is followed by one of the basic setting options – selecting the desired language whether it be English, Spanish, German, etc. During installation, you can also determine whether the sound output of your Raspberry Pi-Alexa speaker should be via the jack port (3.5 mm) or via the HDMI output. Finally, specify whether you want to keep the default activation word as “Alexa” or use another voice command to start the language wizard.
Step 7: Authenticating the Raspberry Pi Alexa speakers
To authenticate the Raspberry, you now need the Alexa companion service, which is a kind of interface or gateway for the connection between the minicomputer and the AVS servers. To use the service, go to the appropriate directory via the terminal and then start the application using the npm package service. To do this, enter the following commands one after the other:
cd ~/alexa-avs-sample-app/samples/companionService
npm start
If the start was successful, your terminal will display the message “Listening on Port 3000”. Minimise the terminal window and open a new instance of the command prompt.
It is important that you only minimise, not close, the terminal window in which you started the Alexa companion service. The service must run in the background so that your Raspberry Pi can communicate with the Alexa Voice servers.
In the next step, change to the directory of the companion client and access it. Since it is programmed in Java, you use the Java build manager Maven (mvn) for this:
cd ~/alexa-avs-sample-app/samples/javaclient
mvn exec:exec
A few moments after entering the command, a pop-up dialogue box opens asking you to access a specific URL in the browser to register the Raspberry. Follow the instructions by clicking on “OK”. The link will then be opened automatically in your default browser.
After clicking on “OK”, another dialogue window opens in the Java client, which you do not need to pay much attention to at the moment.
In the browser, you will now see either the Amazon sign-in page or, in some cases, a message saying that the website is unavailable. However, the latter is not a major problem: Simply click on “Advanced” in the bottom left corner and then on “Proceed to localhost” to get to the sign-in window. Sign in with your Amazon Developer account and confirm that your Raspberry Pi Alexa speaker is allowed to access your Amazon account.
The browser sends the message “device tokens ready” after successful authentication. Now you can click “OK” in the window in the Java client that you haven’t paid much attention to until now to finally complete the authentication.
Step 8: Enable activation word recognition
Alexa is now ready to use, so you can interact with the speech software at any time via the AVS client by clicking on the microphone icon and asking the question you want. In order for Alexa to become active when you say the selected activation word such as “Alexa”, you must now start the wake word agent. In a new terminal window, access the directory of the agent (KITT AI) to start it:
cd ~/alexa-avs-sample-app/samples/wakeWordAgent/src
./wakeWordAgent -e kitt_ai
If the terminal shows the message “Connected to AVS client”, you can operate Alexa in the usual way via voice control.
Step 9: Create autostart script for Raspberry Pi Alexa language wizard
To avoid having to start Alexa manually every time you start your Raspberry Pi, create a startup script that runs automatically when the minicomputer boots up. To do this, first create the script file with the following terminal command:
sudo nano alexa.shThen insert the following lines of code into the script:
#!/bin/bash
lxterminal -l -e "cd ~/alexa-avs-sample-app/samples/companionService && npm start;" &
sleep 10s
lxterminal -l -e "cd ~/alexa-avs-sample-app/samples/javaclient && mvn exec:exec;" &
sleep 30s
lxterminal -l -e "cd ~/alexa-avs-sample-app/samples/wakeWordAgent/src && ./wakeWordAgent -e kitt_ai;" &
The script automates the authentication process described in step 7 by first starting the Alexa companion service and then the Java client. This is followed by the delayed start of the wake word agent described in step 8.
Save the script and give the system the necessary access rights via chmod:
sudo chmod +x alexa.shNow create an autostart file for the script:
sudo nano /home/pi/.config/autostartFill this file with the following content so that the generated script will be executed automatically every time you start your Raspberry Pi-Alexa speaker:
[Desktop Entry]
Comment=Comment
Exec=/home/pi/alexa.sh
Name=alexa.sh
Path=/home/pi/alexa.sh
Type=Shell

