How to install Composer on Ubuntu 20.04
In just a few steps, you can install the PHP package manager Composer on Ubuntu 20.04. The installation can be performed on the Linux distribution through the terminal.
How to install Composer on Ubuntu 20.04 step by step
Installing Composer on Ubuntu 20.04 takes just a few minutes. All you need for the installation is the Linux Terminal.
If you are not using Ubuntu 20.04, you may find it helpful to check out one of the following articles on installing Composer:
Step 1: update the system
Before getting started with the Ubuntu installation of Composer, ensure that your system is up to date. To do this, open the terminal and run the following command:
sudo apt update
sudo apt upgradeYou’ll be prompted to enter your password because the above commands are executed with root computers.
Step 2: install required packages
Once you’ve successfully updated your system, you can install the packages required for Composer. These include the PHP Command Line Interface and the curl command line utility. If you’ve already installed the required packages on your system, you can skip this step. Otherwise, use this command to begin installation:
sudo apt install curl php-cli php-mbstring git unzipStep 3: download and install Composer
To install Composer on Ubuntu 20.04, all you need is a command line command. It’ll use the curl tool you just downloaded to install the required files for Composer from the official website. Composer will then be installed on your system.
curl -sS https://getcomposer.org/installer | sudo php -- --install-dir=/usr/local/bin --filename=composerAfter the installation of Composer is finished, a message will appear in your terminal indicating that the installation was successful:

Step 4: check installation
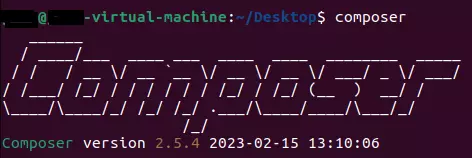
Next, you should manually verify the installation of Composer by entering the following command:
composerFinally, you should see a list in the terminal with the most important Composer commands and your current Composer version:

If running Composer causes any issues on your system, it may be because the folder where you installed Composer (usr/local/bin) is not included in your $PATH environment variable.
Did you know that you can use Composer with IONOS web hosting packages? Web hosting from IONOS offers built-in DDoS protection and support for current PHP versions such as PHP 8.
How to add and update dependencies in Composer
Once you’ve successfully installed the package manager, you can start using the tool and adding dependencies to your projects.
Create composer.json file
The composer.json file is where you describe the dependencies of your PHP project. You can create the file manually or have it set up automatically when you create your first dependency. For more detailed settings in the composer.json file, it’s best to create it manually using the Composer command:
composer initAdd dependencies
The main purpose of Composer is to create and manage dependencies in your project. You can add dependencies with a single command:
composer require monolog/monologIn the example above, the logging library Monolog has been added as a dependency.
Update dependencies
Using Composer, you can also update your project’s dependencies with the following command:
composer update
