How to shut down Windows 11
There are different ways to shut down a Windows 11 operating system. You can do it via the Start menu, with the Windows shortcut [Alt] + [F4], or with the shortcut [Windows] + [X] + [R]. Additionally, you can automate it via the command prompt, power options or the Windows search bar.
How to shut down Windows 11 step by step
While activating Windows 11 hibernate mode is a good idea if you don’t plan on using Windows 11 for a longer period of time, shutting down your system is even better. Completely shutting down your system reduces your PC’s power consumption and protects it from unauthorised access. Below we’ll explain how to shut down Windows 11 both manually and automatically.
How to shut down Windows 11 manually
Method 1: via the Start menu
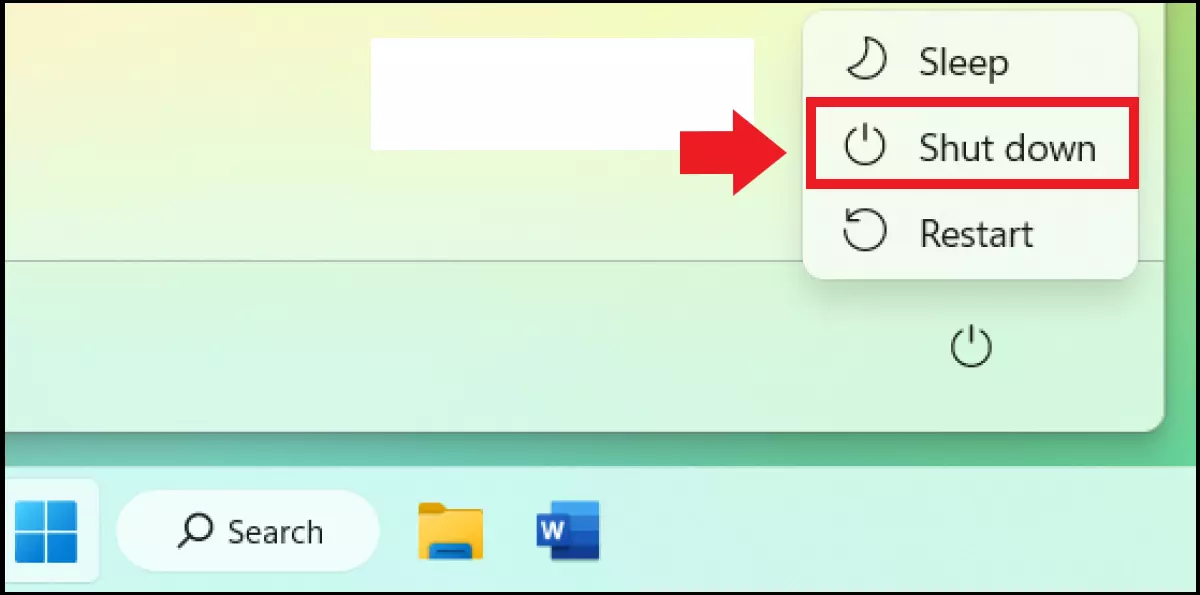
Step 1: open the Start menu by clicking on the Windows icon in the bottom taskbar.
Step 2: go to the power button and click on Shut down. The system will immediately shut down. If you select Update and shut down instead, Windows 11 will first install any pending updates.

Method 2: using the shortcut [Alt] + [F4]
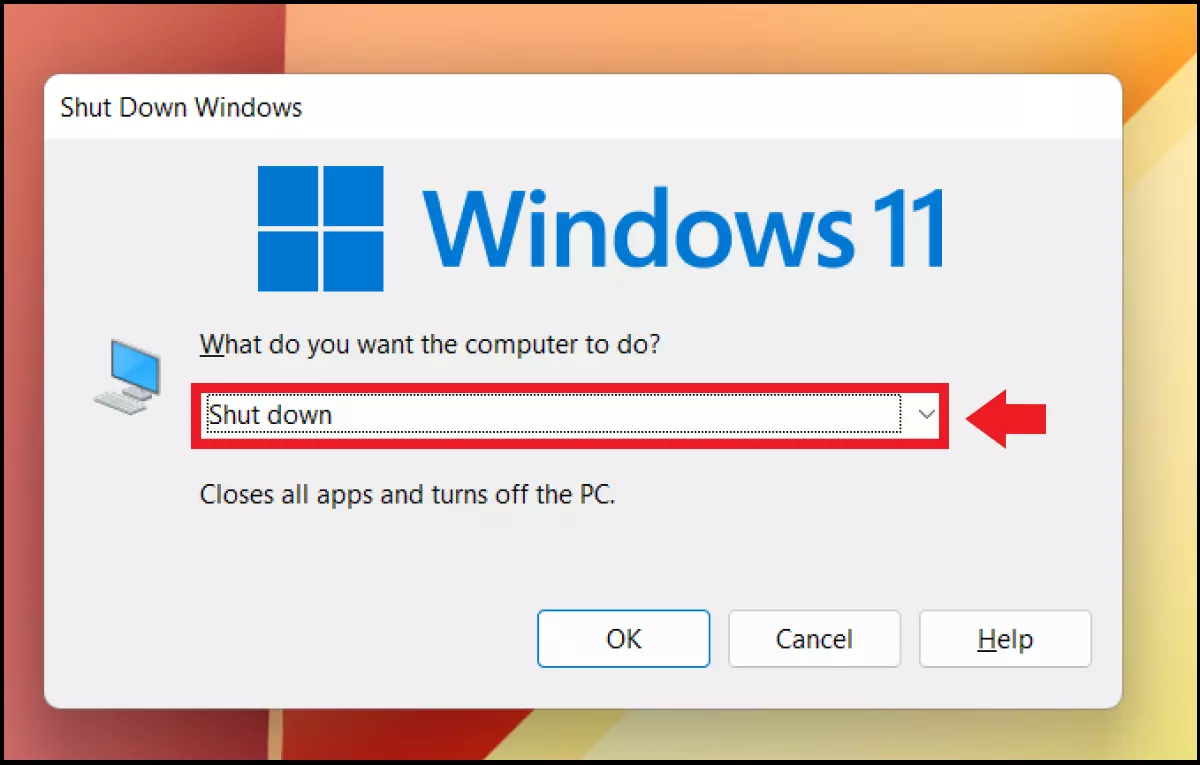
Step 1: alternatively, you can use the Windows shortcut [Alt] + [F4]. Note that each time you press the key combination it will first close any windows you have open before opening the Shut Down Windows menu. Only when all windows are closed will the shutdown menu appear.
Step 2: once the Shut Down Windows menu opens, select the Shut down option and click OK.

Method 3: using the shortcut [Windows] + [X] + [R]
Probably the fastest way to shut down Windows 11 is to use the shortcut [Windows] + [X] together with the [R] key. Press the [Windows] key together with [X] and then the [R] key twice in succession. Windows 11 will shut down immediately even with programs open.
How to shut down Windows 11 automatically after a period of inactivity
You can also change your settings so that Windows 11 shuts down automatically after a set amount of time. Here’s a quick overview:
Method 1: run dialog
- Open the run dialog box as an administrator: [Windows] + [R] > enter ‘cmd’ > [Ctrl] + [Shift] + [Enter].
- Enter the CMD command ‘shutdown -s -t XXXX -f’ and replace XXXX with the desired time in seconds (for example 7200 = 2 hours)
Method 2: Windows search bar
- Enter the command ‘shutdown -s -f -t (Time)’ in the Windows search bar.
- Enter the Time in seconds (for example 7200 = 2 hours).
Method 3: power options
- Enter ‘Power saver plan’ in the Windows search bar and click …edit.
- Open Change advanced power settings.
- Enter the amount of time under Turn off hard disk after.
If you shut down Windows 11 completely, restarting the system may take slightly longer than waking it from sleep mode. If you still want Windows 11 to boot up as quickly as possible, try changing your Windows 11 startup programs. Windows prioritises certain programs during startup, but you don’t need all of them. Removing unnecessary programs can help make Windows 11 faster.

