How to install Composer on Ubuntu 22.04
In Ubuntu 22.04, you can install the PHP package manager Composer in just a few steps. With the command-line tool curl, installation is quick and simple.
Ubuntu 22.04: install Composer step by step
To install Composer, you first need to ensure that PHP is already installed on your system and you have access to PHP via the terminal. You can check both by entering the following command in the terminal:
phpIf there’s an error message, you can install the command line tool for PHP 8 with the following command:
sudo apt install php8.1.cli
Once you’ve verified that you can use PHP on your system, you can begin installing PHP Composer.
You can use Composer in IONOS web hosting packages. In addition to PHP support, web hosting packages from IONOS offer many other benefits such as built-in DDoS protection.
Step 1: update the system
First, you’ll want to make sure your Linux system is in good shape by running available updates. You may need to confirm execution of the upgrades by choosing y (yes). You can use the following terminal commands for this:
sudo apt update
sudo apt upgradeUpdating your system may take a few moments. How long it takes will depend on how many updates you need to install.
Step 2: install required packages
For the Ubuntu installation of Composer to work, you need to install a few packages that Composer requires for installation. This includes, for example, the command line tool curl or the version control Git.
The packages can also be downloaded directly in the terminal using the following commands:
sudo apt install curl php-mbstring git unzipStep 3: install Composer
Now you can get started with the actual installation of PHP Composer on Ubuntu 22.04. You do this by using the downloaded curl tool and typing the following command into terminal:
curl -sS https://getcomposer.org/installer | sudo php -- --install-dir=/usr/local/bin --filename=composer
Step 4: check if installation was successful
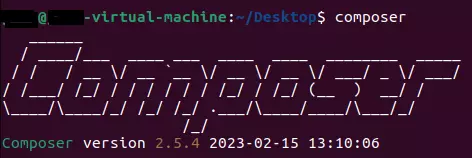
As a final step, manually check if the Composer installation was successful by accessing the package manager. If this doesn’t work, your $PATH environment variable may not be configured correctly. The command below invokes the current version of Composer:
ComposerIf the installation of Composer on Ubuntu 22.04 went smoothly, terminal will show the following:

If you’re using an operating system other than Ubuntu 22.04, you can still use Composer. Just take a look at our other installation guides:
First steps when using Composer
The package manager is used in PHP projects to manage and update dependencies. To help you get started with Composer and avoid common errors, we’ve compiled the most important Composer commands.
Step 1: create composer.json file
The main task of Composer is to manage the dependencies of your PHP project. The central place to specify these dependencies is the composer.json file. This can be created manually. Alternatively, you can specify to have the JSON file be set up automatically when you create your first dependency. The Composer command to manually create a composer.json file is as follows:
composer initStep 2: add dependencies to your project
You can also use a Composer command to insert a dependency into your project. This ensures that the composer.json file is updated to the appropriate state. In the example code, the popular logging library Monolog is inserted as a dependency in a PHP project.
composer require monolog/monologStep 3: update dependencies
Every now and then it’s necessary to update the dependencies of a PHP project. A Composer command can be used for this. It updates all dependencies you’ve added to your project in a single step:
composer update
