How to clone a hard drive [Windows]
Cloning hard drives is a good solution when it comes to organising an efficient move to a new data medium. During the cloning, special tools create an exact 1:1 copy of the hard drive – you can also include hidden and currently used files in this process. We’ll explain how to clone a hard drive with trusted software and what preparations you need to make before a migration.
Cloning hard drives: when and why is it useful?
People usually clone hard drives when they need to switch from a hard drive (Hard Disk Drive /HDD) to a larger or a significantly faster SSD (Solid State Drive). As well as extensive quantities of data, you can also transfer an entire operating system. After a successful migration, a computer with a bootable hard drive including Windows can be booted up and used in its original state immediately. Important user data and tools for everyday work, like email programs and painstakingly built bookmark lists, are available straight away. In addition, not only programs, but also individual user-specific settings and adjustments of programs are automatically adopted.
Some users also clone hard drives to back up data because they want to be able to quickly fall back on a ready-to-use complete solution with a functioning operating system in the event of a virus attack, for example. It’s a good idea to create a cloned replacement data medium for emergencies at longer intervals. For daily backups, it’s better to back up your drive using an image file. It stores the data in a compressed form and can also be integrated into backup strategies, such as incremental and differential backups, and it saves storage space.
What do I need to watch out for when cloning a hard drive?
When cloning a hard drive, there are certain technical requirements that must be met. The new hard drive should have as much, or more, memory than the old medium. If a notebook hard drive is being transferred to a new SSD, you will need an external hard drive enclosure or an SATA-to-USB cable. There are also affordable docking stations that you can plug an SSD into and then connect it to the computer by USB. If the target SSD is already built into a stationary PC, external connections are not required.
A simple hard drive clone with user data can be created quickly and there usually no problems if suitable software is used. If a system is to be cloned, it’s a little more complicated. After the transfer, you must make sure that the new data medium is bootable and recognised when booting. With the most recent storage hardware, for example, Windows may require corresponding drivers in order to initialise and integrate them when booting. Suitable drivers for manual installation are usually available on the hard drive manufacturer’s website.
In addition, certain settings may need to be configured in the BIOS for the booting process with the new hardware. For example, the new hard drive may need to be defined as the primary boot medium. If you’re moving an operating system, you should also have a recovery medium (e.g. Windows CD-ROM) ready to carry out any necessary repairs.
When migrating an operating system, you can take the opportunity to clean it up and streamline it at the same time. Windows systems that have been in use for a long time and not cleaned regularly often have superfluous data sets – e.g. in temporary installation directories or in the browser cache. Old network links then stop working because they can no longer find their destination. Bookmark lists contain links which are no longer of use.
After the migration and cleaning up, you’ll have an optimised system that performs better and more clearly. Of course, the cloning process goes a lot quicker if you’re working with smaller quantities of data. A time-saving migration of the operating system is only worth it if the Windows system that is currently in use is running cleanly and without any issues. Otherwise, it’s better to install a new operating system and not bother cloning the system that’s causing problems.
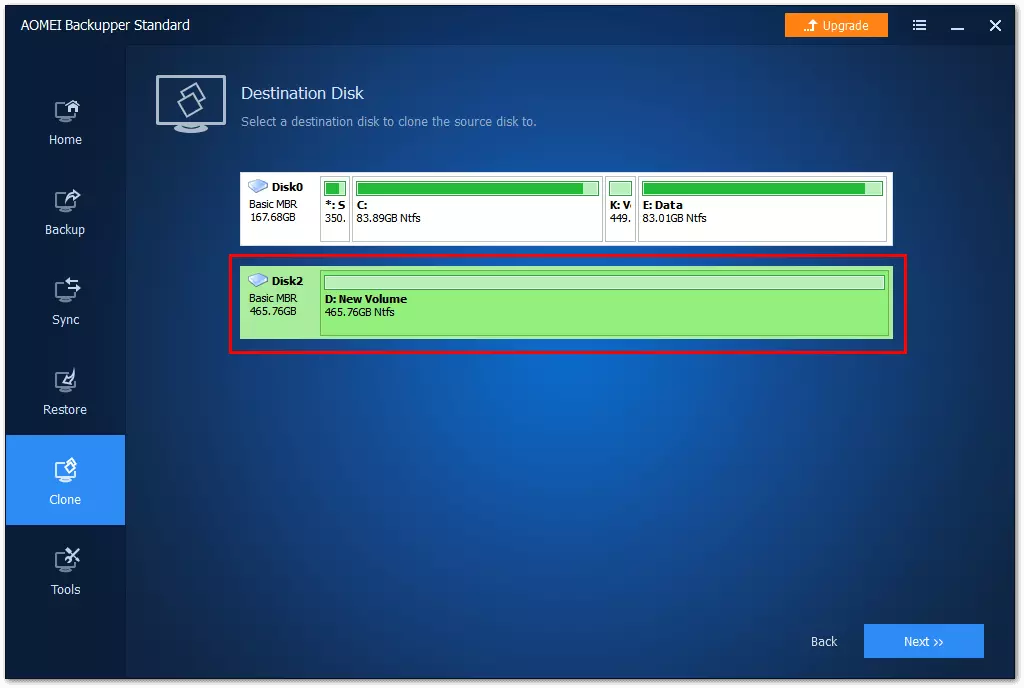
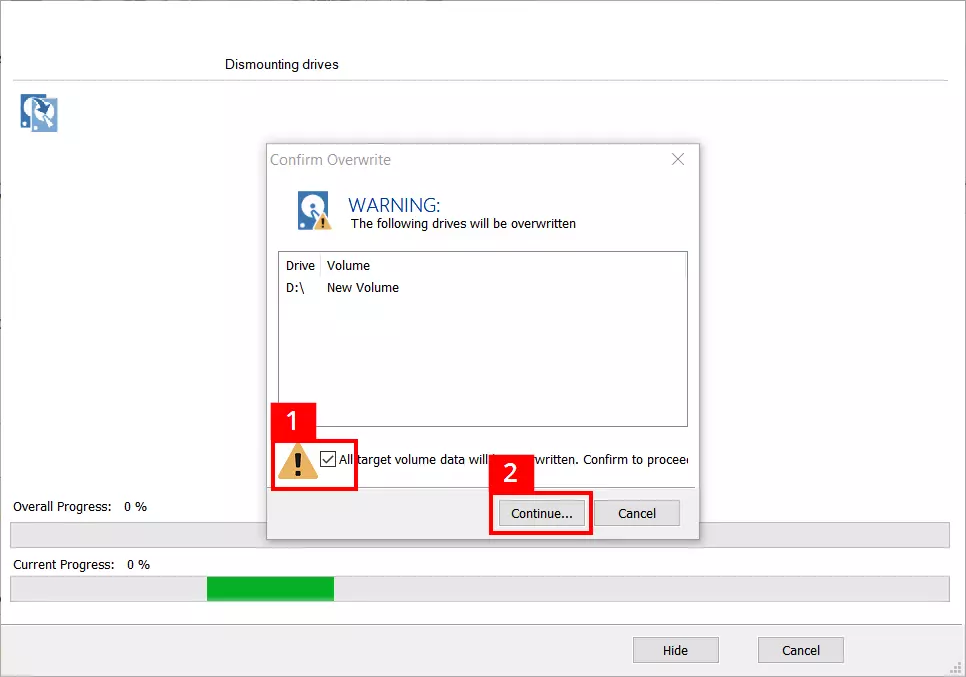
Before starting up the software for the cloning, you should remove any unneeded mediums from the system. Otherwise, in a worst-case scenario, the incorrect destination drive may accidentally be selected and irreversibly overwritten. In addition, the fewer data mediums involved in the process, the easier it will be for inexperienced users.
Before a planned migration, you should take preventative steps to protect yourself against data loss. It’s recommended that you back up all or at least the most important data to a suitable backup medium that isn’t involved in the cloning, as any losses, e.g. overwritten or damaged data, are usually impossible to restore. If you want to use a used hard drive, you should check its data content carefully beforehand and back up any old data. Having a backup copy also allows you to quickly restore the original state.
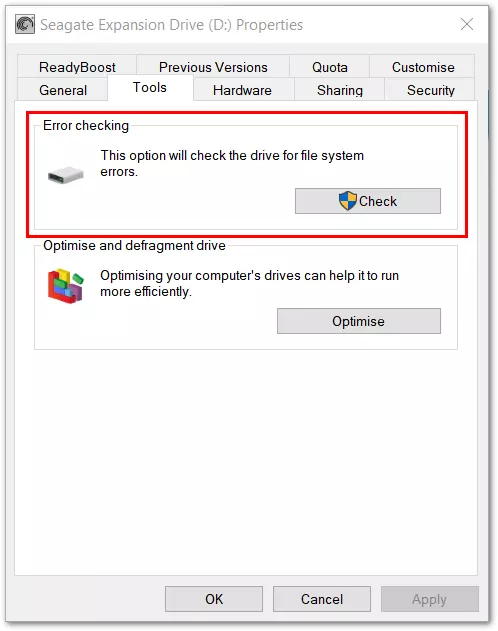
If you want to ensure that the clone will run flawlessly and that everything will work smoothly in an emergency, it’s sensible to take another preparatory measure: Windows 10 can search for drive errors with its tools and fix any errors found.
Drive icon in Explorer (e.g. Drive: ‘Data’, Letter: ‘I:’) > right-click > Properties > Tab ‘Tools’ > Error checking > Click on ‘Check’
Windows 10 doesn’t have a built-in feature for cloning hard drives. The process can be done in a secure and user-friendly way with trusted software solutions. Below you will find out how to clone hard drives with AOMEI Backupper Standard, Macrium Reflect, and Acronis True Image 2020. The examples only involve two data mediums. If multiple data mediums are connected, they will also be shown by the programs. This is why you must take particular care to not select the incorrect destination hard drive when testing!
If the hard drive cloning fails, it may be because there are encrypted partitions on the data medium.
Hard drive cloning with AOMEI Backupper Standard
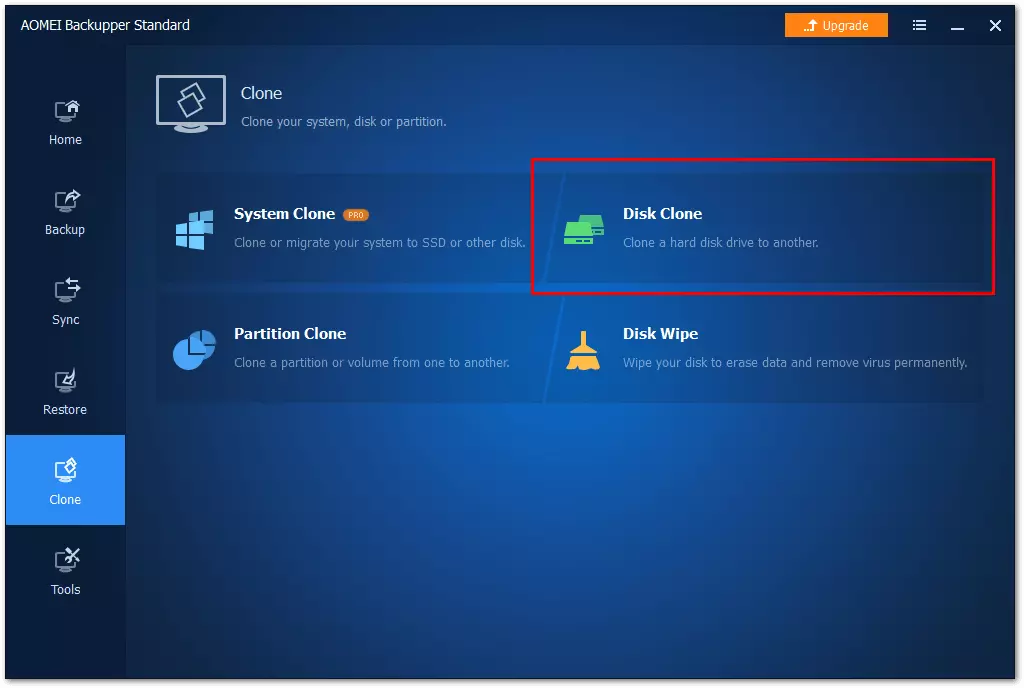
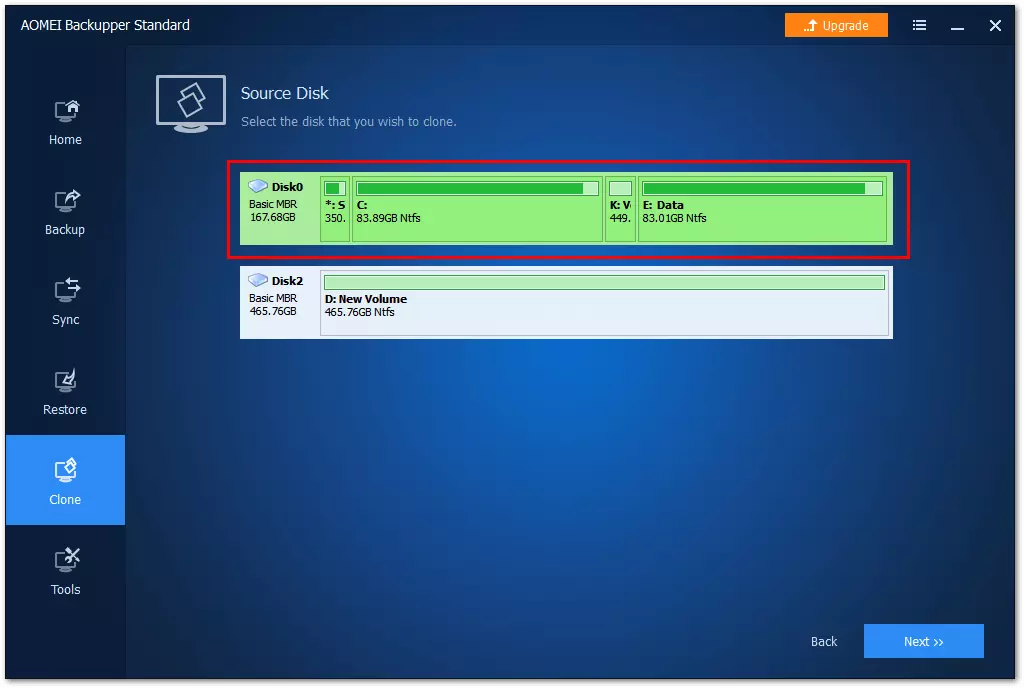
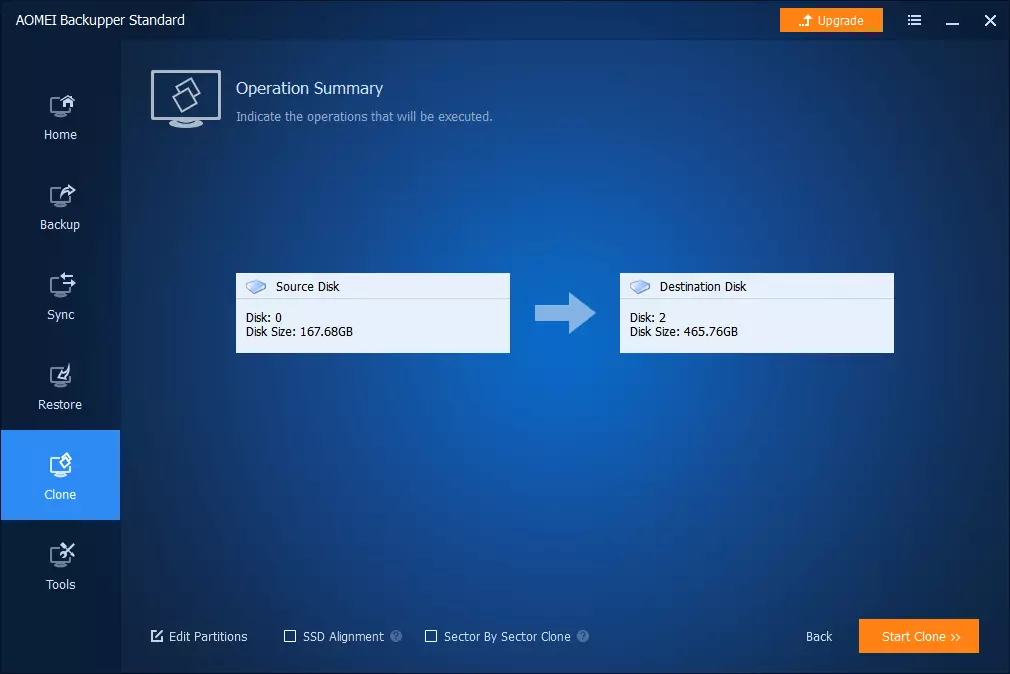
After the program opens, AOMEI Backupper Standard opens a start screen with various different functions. After clicking on the ‘Clone’ tile, you’ll be presented with further options. If you select the ‘System Clone’ option, a bootable copy including the operating system will be created. You can also clone partitions or hard drives. The following section will give you a step-by-step guide on how to create a hard drive clone:
You can define additional operations at the bottom of the program window:
- Edit Partitions (Partition size settings, Allocation of storage capacities)
- SSD Alignment (this setting is recommended to increase the performance of an SSD)
- Sector By Sector Clone (exact 1:1 copy of the hard drive without any exceptions, also copies sectors that are currently in use, empty or faulty)
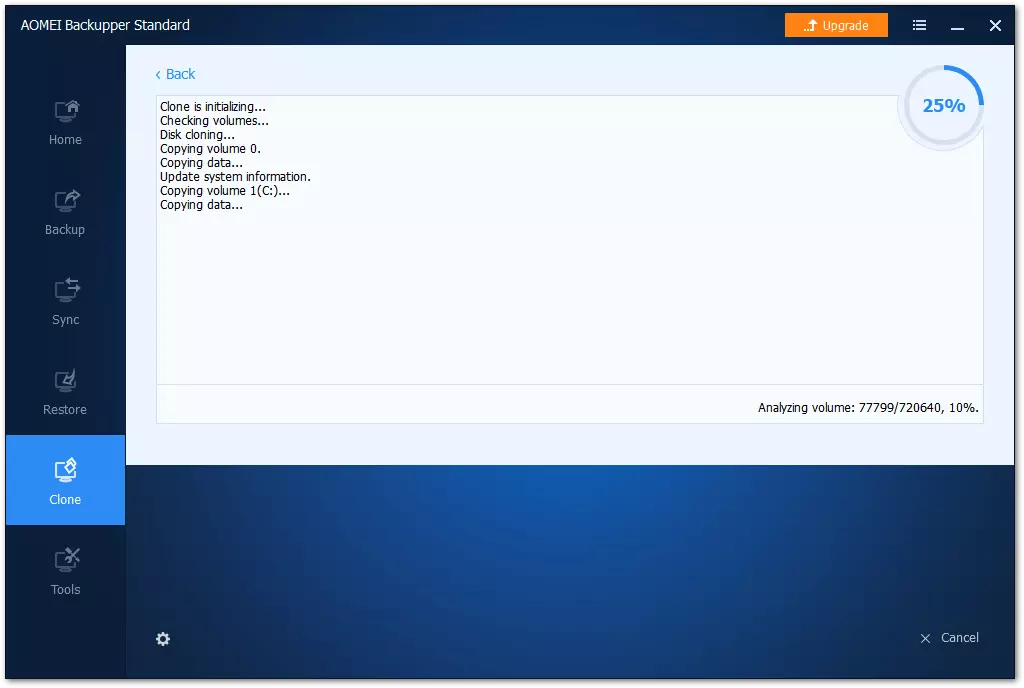
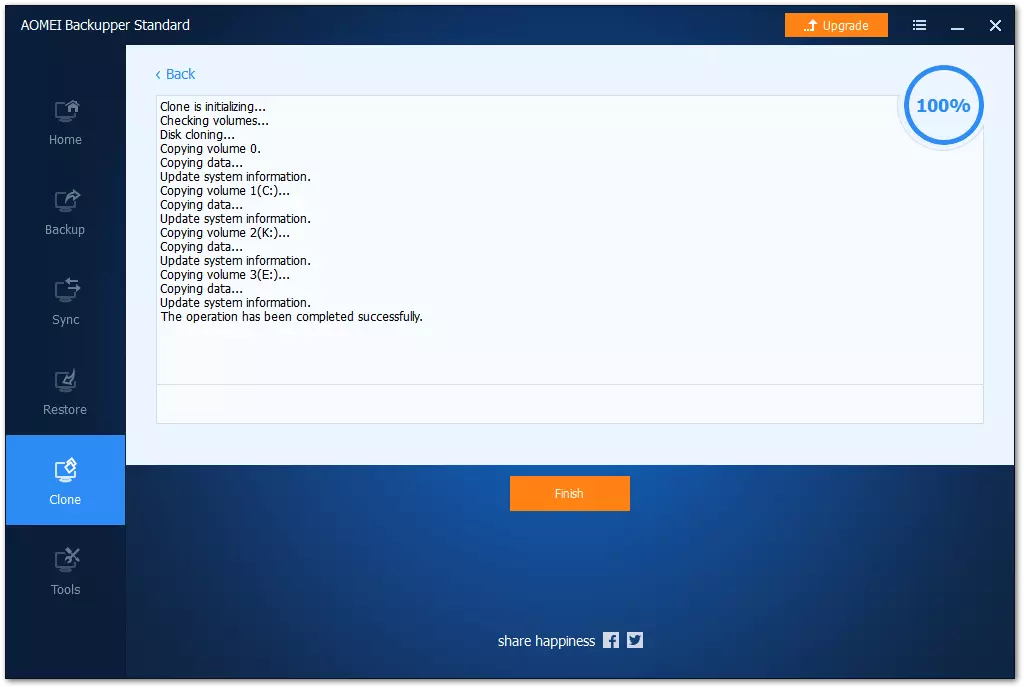
You can choose to display the details during the copying process and therefore closely follow the process:
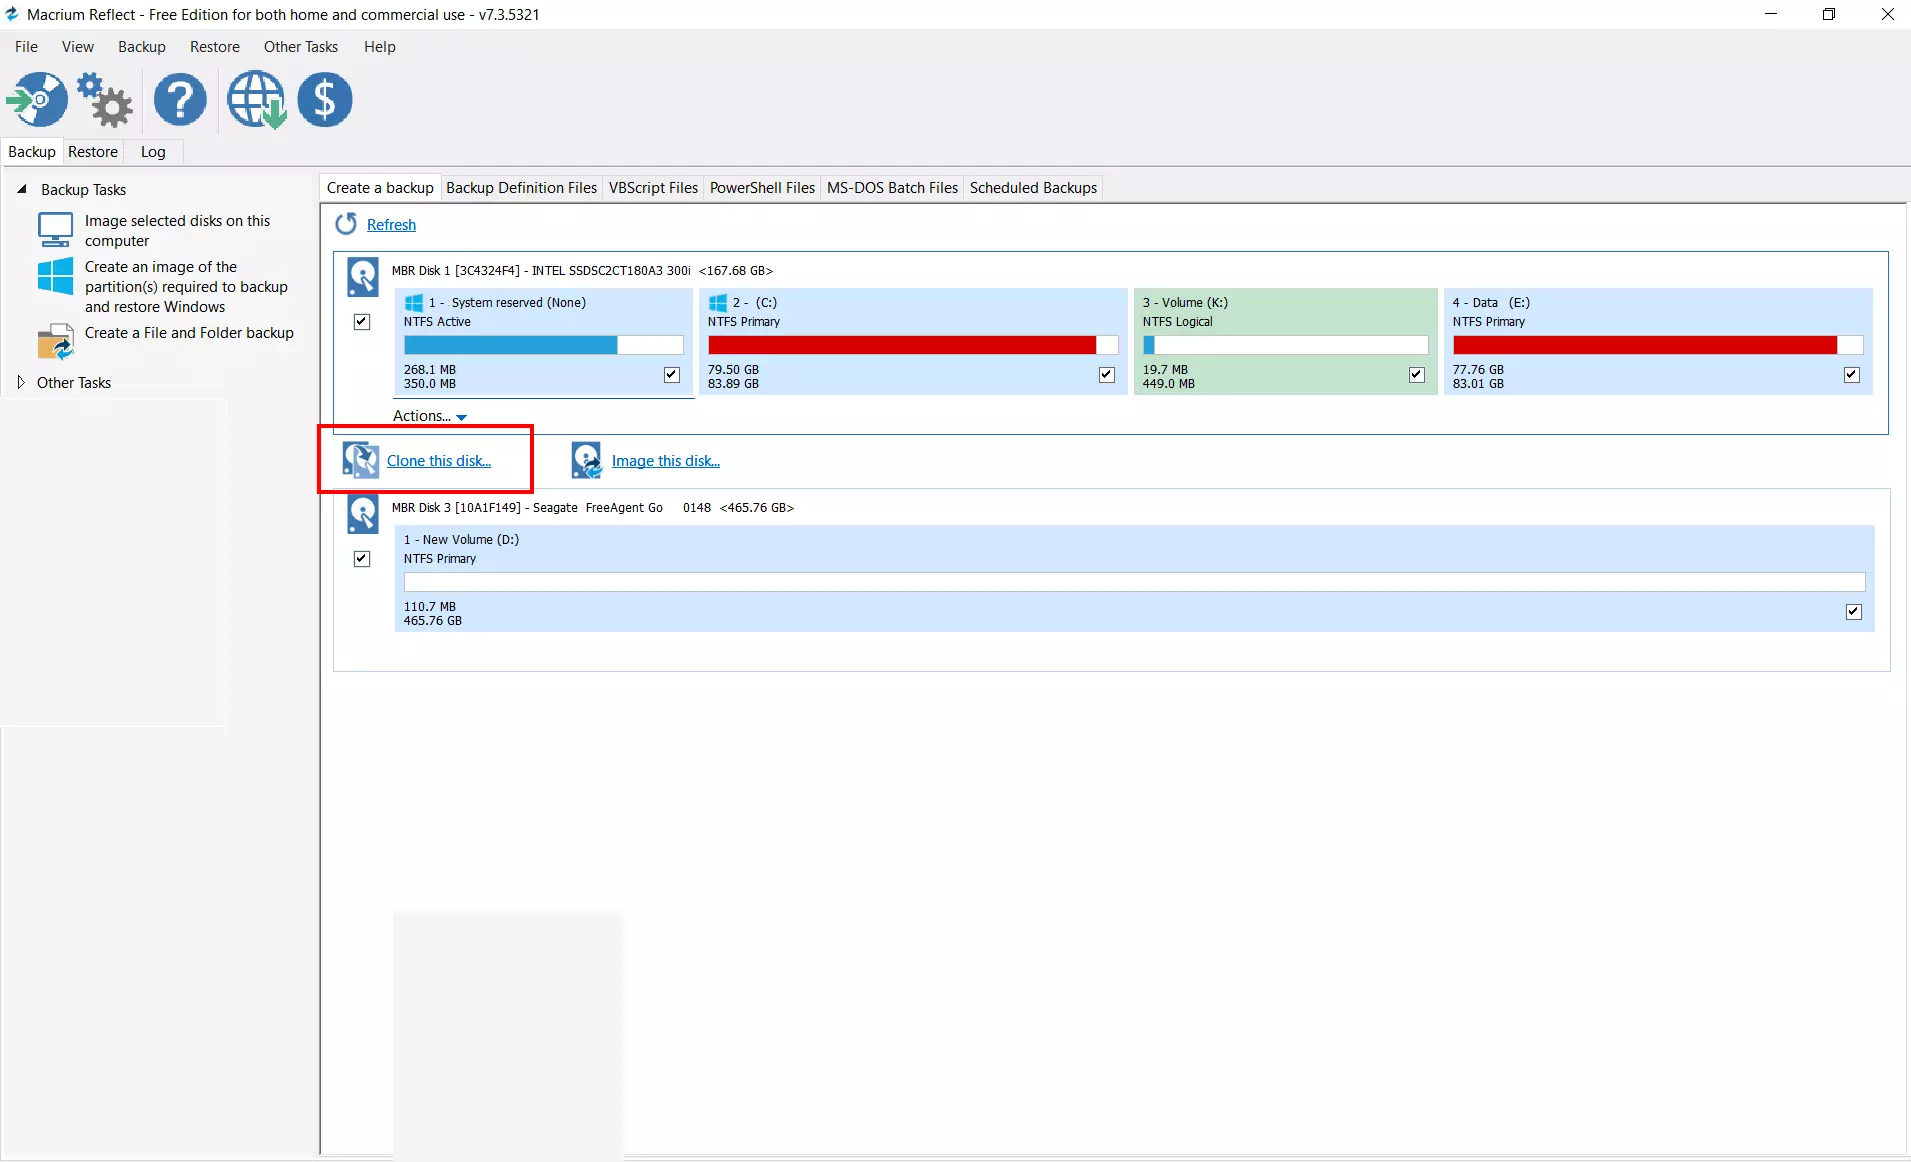
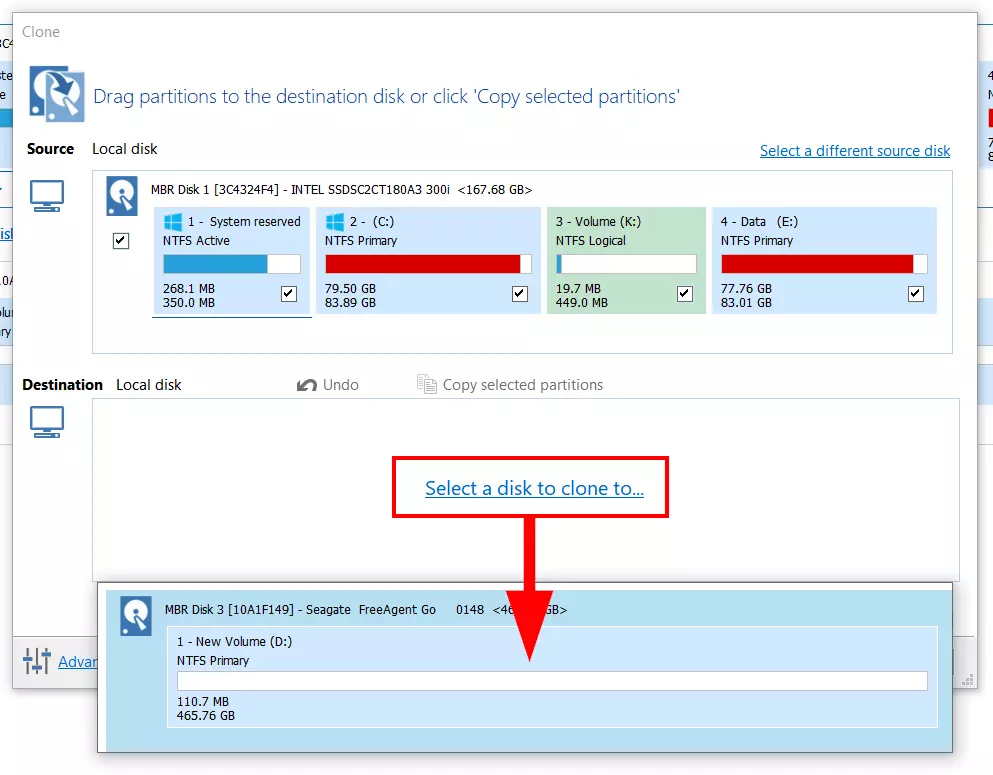
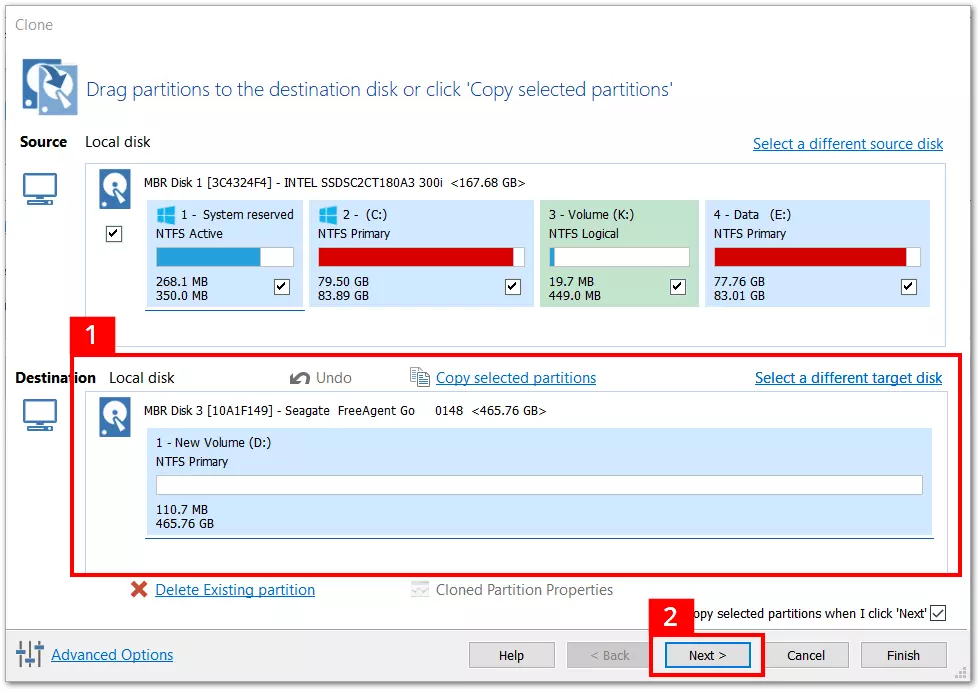
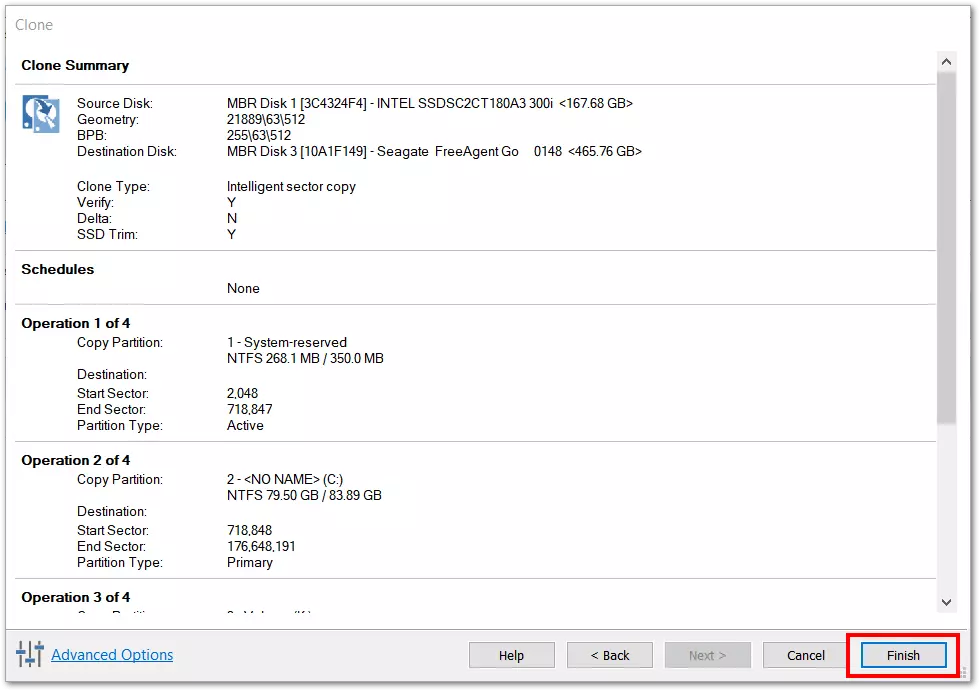
Hard drive cloning with Macrium Reflect
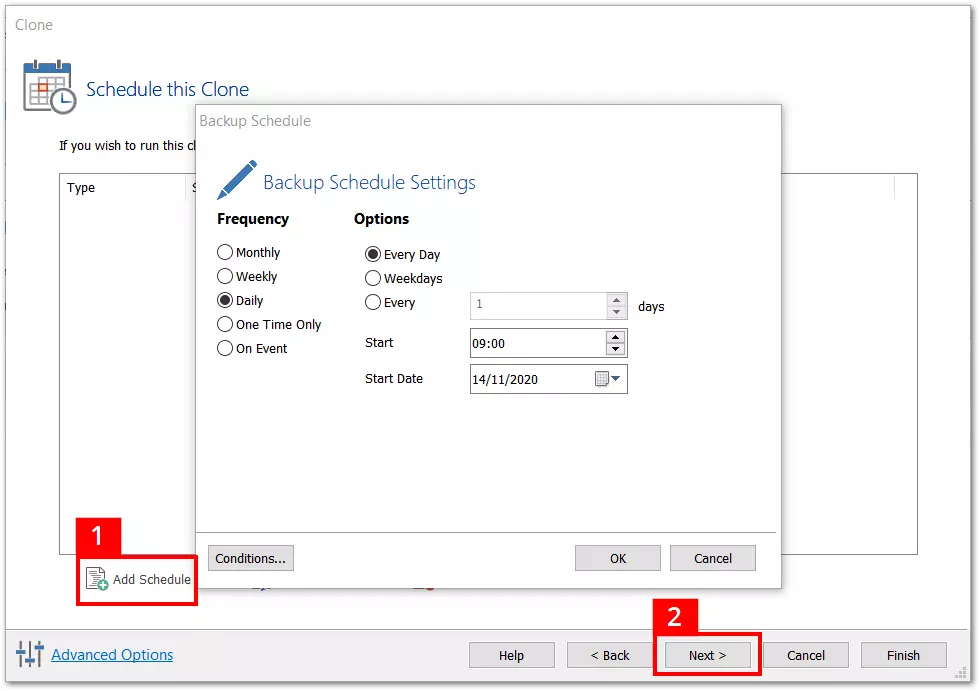
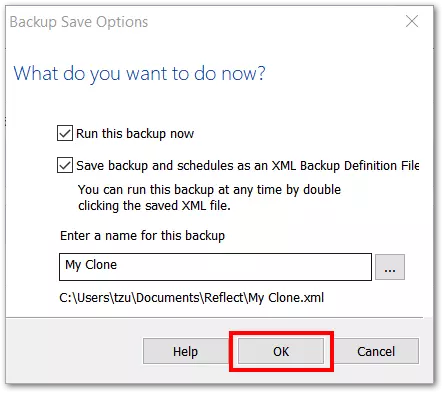
After clicking on ‘Next’ (2), in the following step, you can decide whether further copying processes with the same hard drive should be planned and saved. Clicking on ‘Add schedule’ (1) opens a planning wizard for the automation of regular backups:
Hard drive cloning with Acronis True Image 2020
To create a hard drive clone with Acronis True Image 2020, you must follow these steps:
After opening the program, select ‘Extras’ from the sidebar and then click on ‘Clone disk’. You will then be asked to select the ‘Clone mode’ – you can choose between ‘Automatic’ and ‘Manual’. Automatic cloning is usually sufficient for normal use cases. If you need more flexibility during the data transfer, you can change and apply additional settings in manual mode. In the next step, you must choose the source disk. After clicking on ‘Next’, you then must choose the destination hard drive that you want the clone to be saved onto. After the final check of the configured settings, click on ‘Proceed’.
It’s not possible to clone dynamic disks with Acronis. In Windows operating systems, dynamic disks are used to allow for the use of complex storage and data management architectures (e.g. for creating spanned volumes). In addition, the manufacturer points out that a Windows system can be transferred to an external hard drive via a USB port, but the PC cannot then boot from the external drive. Instead, they recommend cloning a system drive via SATA cable and then connecting an SSD or HHD drive to it. With certain desktop PC’s, SATA connections can be accessed from outside, if not they can be found directly on the mainboard. You can find instructions on cloning laptop hard drives here.
After the hard drive cloning: formatting free storage space as volume
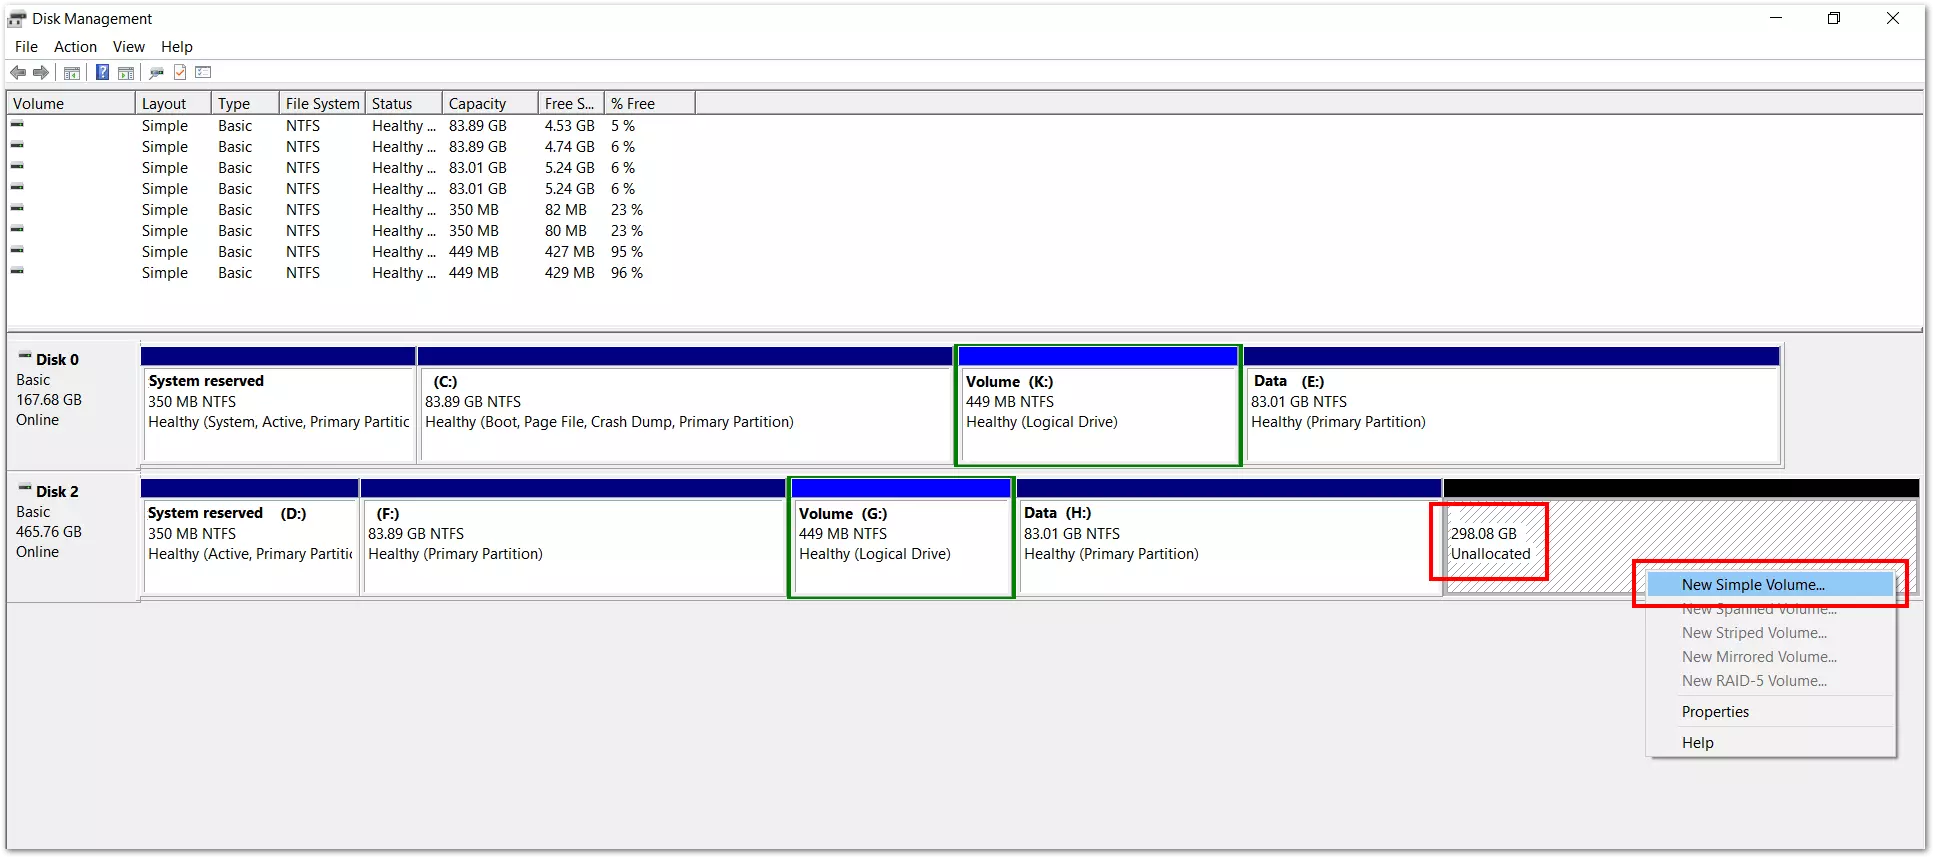
If you transfer a clone to a larger hard drive using this program, any unallocated storage space on the destination drive remains free. With Windows Disk Management, you can format the space as volume and then use the entire storage capacity of the data medium.
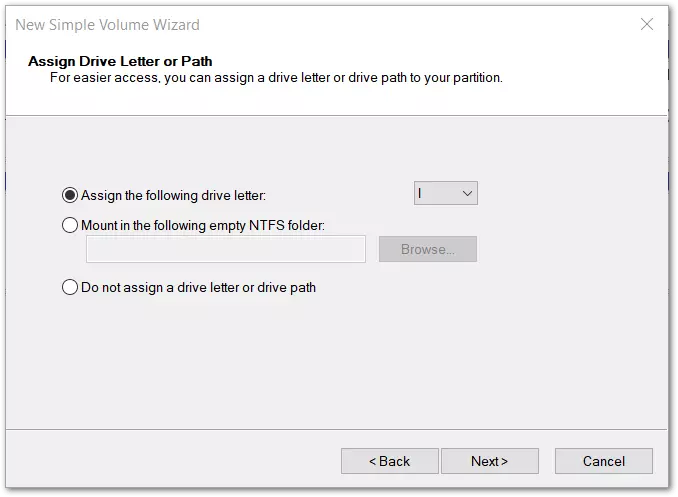
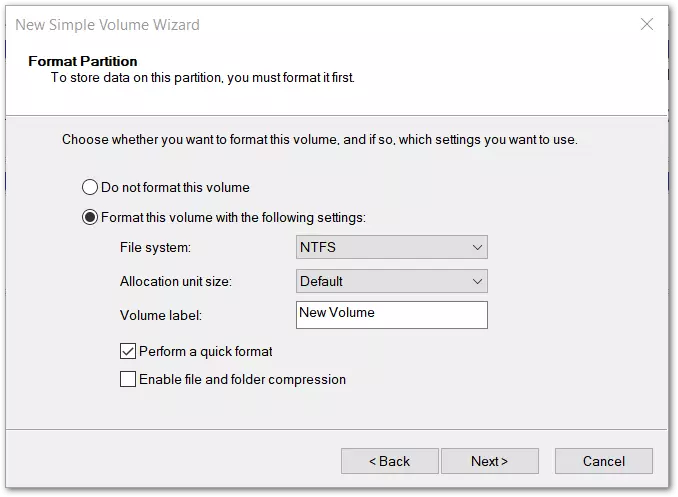
You can access the Disk Management by right-clicking on the Windows icon on the left-hand side of the taskbar and selecting ‘Disk Management’ from the menu that opens. The unallocated storage space is displayed below the list of the drives. Right-click to open the menu. Then click on ‘New Simple Volume’ and a Windows wizard will open:
The wizard guides you through several steps in which various settings can be made. You can assign the volume an individual drive letter or path. At the end of the procedure, the volume will be displayed in Windows Explorer and you will be able to use it to store data:


