How to format USB drives on Windows
To store files on removable media like USB sticks you need a file system. If this system is missing or damaged, the solution is to manually configure it by formatting the USB drive. When performing this formatting process, it’s important to bear in mind that the chosen file system also needs to be readable for the operating system of the computer you wish to connect the stick to. It may be the case that the stick also contains a file system which needs to be replaced by another. Read this tutorial to find out which systems are available and how to format a USB drive on Windows.
Formatting USB drives: Which file system is suitable?
Before you start formatting your USB drive, you should first consider which file system you actually want on the external storage medium. The key criteria to bear in mind when choosing the system include the storage volume of the stick, the size of the files to be saved, as well as the operating systems that are to be connected with the stick. Microsoft Windows offers the following four formats as standard:
- FAT16 (File Allocation Table – 16 bit): The FAT file system has been among Microsoft’s operating systems since 1977, and it is also supported by other systems like macOS or Linux. One of the first versions was FAT16, which was released during the heyday of diskettes. In Windows editions since NT, FAT16 enables a data size of up to two gigabytes and a disk size of up to four gigabytes, which is why the format is also suitable for smaller sticks.
- FAT32 (File Allocation Table – 32 bit): FAT32 is the successor to FAT16 and differs from its predecessor in particular due to its increased capacities: the maximum size for files amounts to four gigabytes and the disk size is up to 2 terabytes. FAT32 is also supported by other operating systems like macOS and Linux.
- NTFS (New Technology File System): NTFS is another file system developed by Microsoft; it was introduced as an additional option at the beginning of the Windows NT series. NTFS permits any disk and file sizes (the theoretical limitations are unattainable in common computer usage). However, the format is only partially supported – if at all – by many other systems as standard (for example, NTFS is read-only on macOS).
- exFAT (Extensible File Allocation Table): exFAT is the modern Microsoft file system that matches NTFS in terms of storage capacity. On Windows, it has been supported since XP. It is also compatible with newer macOS (from 10.6.5) and Linux systems. It is specially optimised for flash storage media and is generally unsuited for use as a file system for internal hard disks.
If you’d like to format your USB drive and only work with Windows devices, the NTFS format is a suitable choice as you’ll not have to think about the size of the stick or the files you want to save. But if the stick will also be used for copying data to a Mac computer, one of the two older FAT systems (ideally FAT32) is recommended. Otherwise, you will have to depend on additional software in order to use the full functionality of the USB stick. You should only use exFAT if you work with devices that are running on the most up-to-date operating systems.
Tutorial: How to format your USB drive
You can format a USB stick with Windows at any time. However, this process erases all files saved on the storage medium. With a new device, this isn’t an issue. If you want to format a stick for a file system change that already contains files, you’ll need to store them locally first.
If your reason for formatting is one last attempt to repair a USB stick that’s no longer functional, your only option is typically to consult a service provider if you want to recover the saved files.
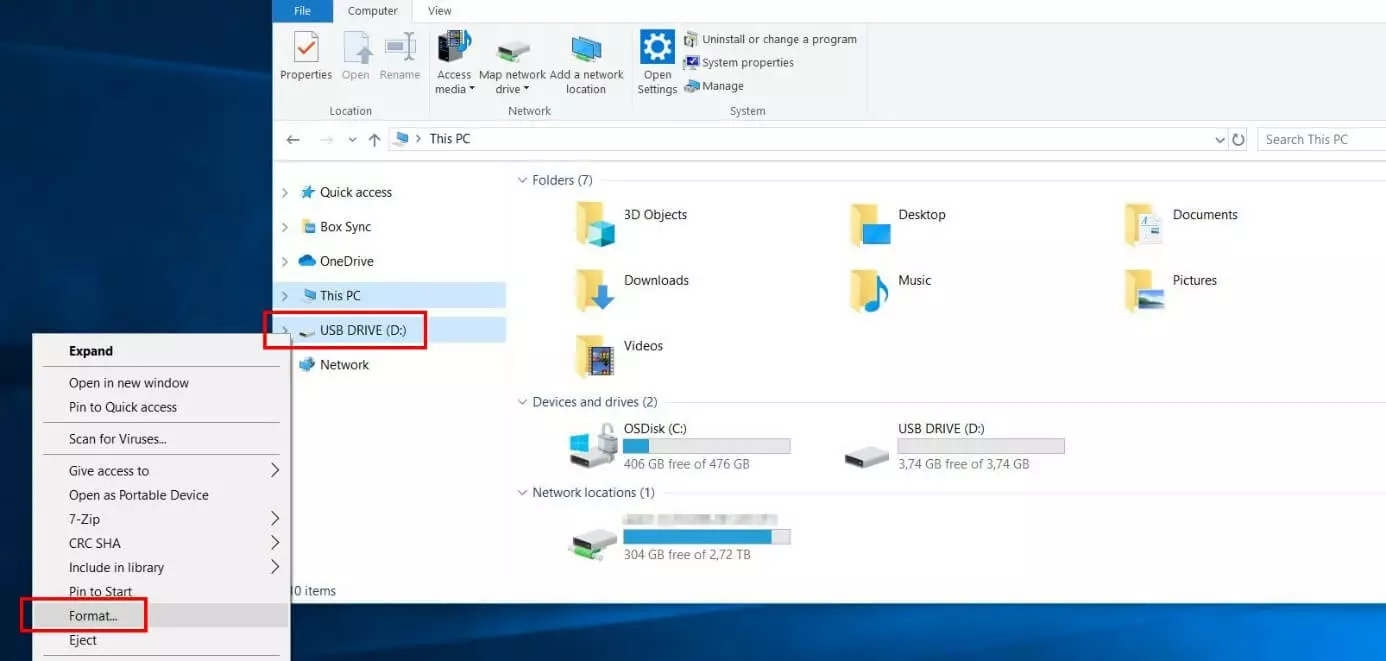
As soon as you have chosen a file system and – where necessary – backed up your files, you can start the formatting process by connecting the USB stick to your computer. Next, open Windows Explorer using the desktop shortcut or the key combination [Windows] + [E].
Look for the USB stick in the side menu on the left of the file manager, select it with a right click, and click on the menu item “Format.”
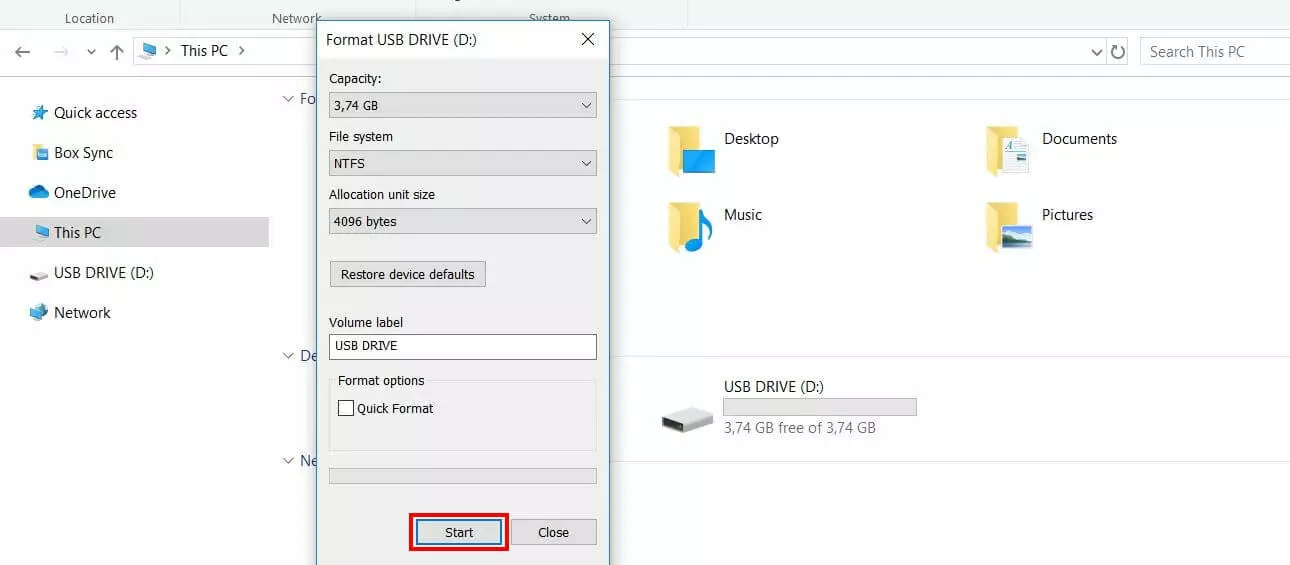
Windows will then open the formatting dialogue. In the first row, this shows you the storage capacity of the stick – which obviously cannot be changed. In the second row, you can define the file system for the USB stick. Here, the four formats mentioned above are available: FAT16, FAT32, exFAT, and NTFS.
The cluster size of the stored data can be defined under “Allocation unit size”; you can leave this at the value set as standard. If you’re unsure about which settings you should choose, simply click on “Restore device defaults” and Windows will automatically use the standard configuration for the USB stick you are formatting.
Moreover, you can choose a new name for the flash drive under “Volume label” (or accept the old name) and decide whether Windows should format the USB stick fast (files can be recovered with certain tools) or especially thoroughly (data recovery is then impossible or extremely difficult). For this last option, you should remove the checkmark for “Quick Format.” Lastly, click on “Start” to begin formatting the USB drive.
As soon as you’ve pressed the “Start” button, Windows will show you a warning that the data will be erased when formatting the stick. To continue the process as planned anyway, click on “OK”:
The formatting process will then start for your USB stick after this final step.


