How to format USB drives on Mac
USB sticks and other removable media are an excellent solution for storing certain files separately from the computer system in use. They enable you to create a backup copy of the data or to copy it to another device. The prerequisite is that the storage medium features its own file system supported by the operating system (both by the origin and target platform in the case of copying).
If this system has not yet been defined – on a new storage device, for example – or is heavily corrupted, you’ll first need to do this manually by formatting the USB stick. The “Disk Utility” program is available for this purpose on Mac computers. The following sections explain how USB formatting with this Mac tool works and which file system is suitable for your USB stick.
Formatting USBs (Mac): Choosing the right file system
When you format your USB drive on a Mac computer, you should first consider which device you wish to connect the data storage device to and which operating systems are running on these devices. This is important, since the various types of system software – such as Windows, Linux, or macOS – may or may not support different file systems. What’s more, the memory size of the USB stick and the size of the files to be stored also play a key role when choosing the right file system. That’s because depending on the chosen format there are different limits, as clearly shown by the list of available file systems for USB formatting on Macs below:
| File system | Description | Supported by | Size |
| HFS+ or Mac OS Extended (journaled) | A file system developed by Apple that is particularly suited to data media with large memory capacity. Windows/Linux devices are only able to read but not write on USB sticks in this format. | macOS | Data storage: 2 TB Files: 2 TB |
| HFS+ or Mac OS Extended (case-sensitive and journaled) | Mac OS Extended (Journaled) with the addition that the file system can differentiate between upper and lower case (e.g. image.jpg vs. Image.jpg). It is not supported by many applications. | macOS | Data storage: 2 TB Files: 2 TB |
| FAT or FAT32 | FAT is a file system developed by Microsoft that is also supported by Linux and macOS. The maximum data size is limited to 4 GB in the latest version FAT32. In theory, data capacity of up to 2 TB is possible, but Microsoft has limited the partition size in newer systems to 32 GB in order to promote the modern NFTS format. | macOS, Windows, Linux | Data storage: 32 GB (theoretically 2 TB) Files: 4 GB |
| ExFAT | ExFAT is a further development of FAT that in principle offers unattainable storage and data capacity. However, the file system is not supported by many older systems. | macOS, Windows, Linux | Data storage: 128 PB Files: 16 EB |
If you’re planning to use your USB stick exclusively on Apple computers, the native format Mac OS Extended (officially called HFS+ since Mac edition 8.1) is definitely a suitable choice. And if there’s no special reason why the system should be case-sensitive, it’s generally advisable to go without this option. However, if the flash drive formatted on a Mac needs to also be readable and writable for all Windows and Linux devices, FAT is the better choice – or rather ExFAT if you have to work with large files with over 4 gigabytes and a data capacity of more than 32 gigabytes.
Tutorial: How to format a flash drive on a Mac – step by step
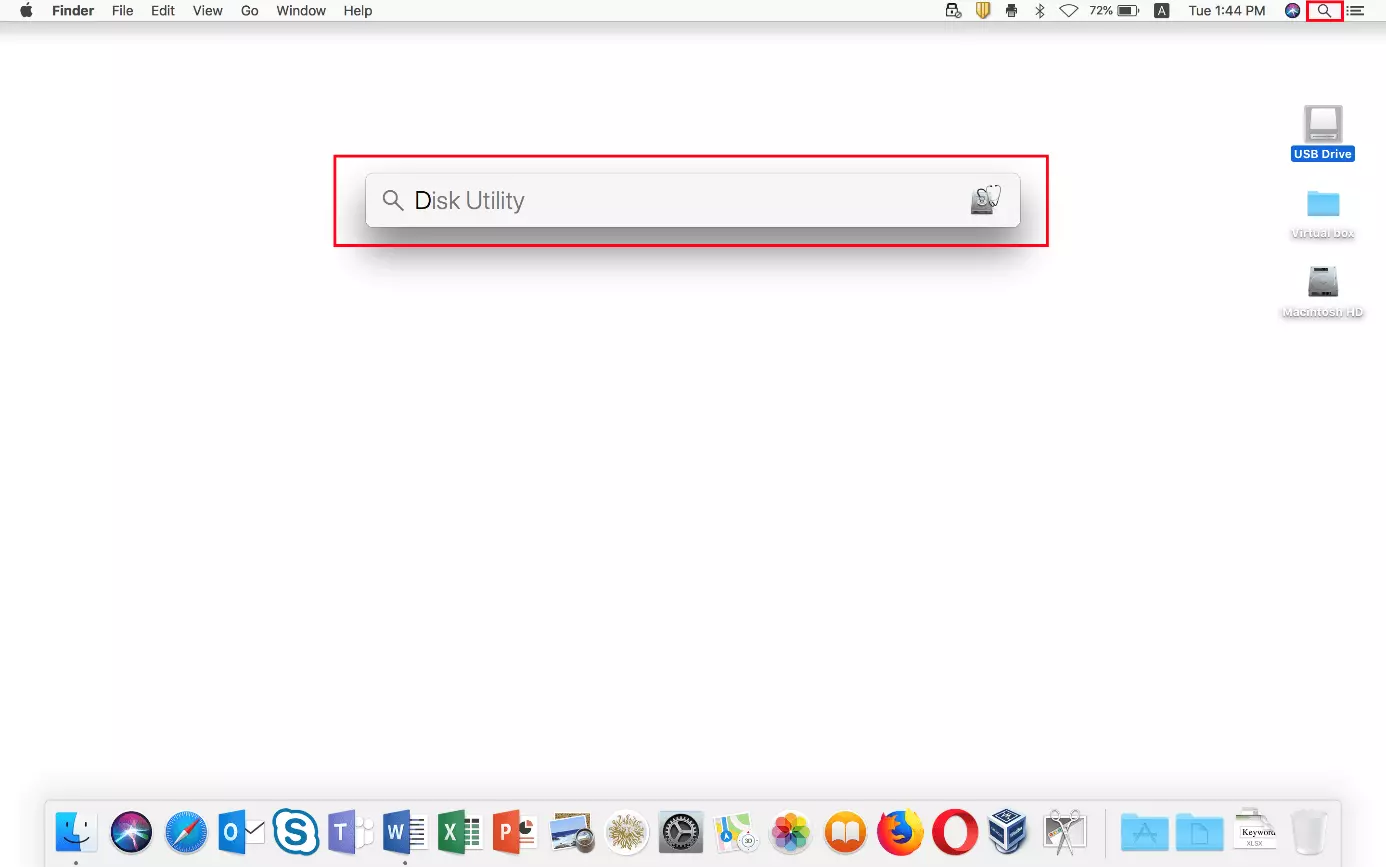
macOS provides its own tool for managing external storage media like USB sticks: the Disk Utility program. You can open it at any time by accessing the spotlight search via the small magnifying glass icon in the top right of the menu bar and entering the search term “Disk Utility.” Next, confirm your entry by using the “Enter” key:
Formatting a USB stick on a Mac is the same on all systems: If there are still files on the flash drive, they will be deleted during the formatting process. You should therefore save any files you may need somewhere else first.
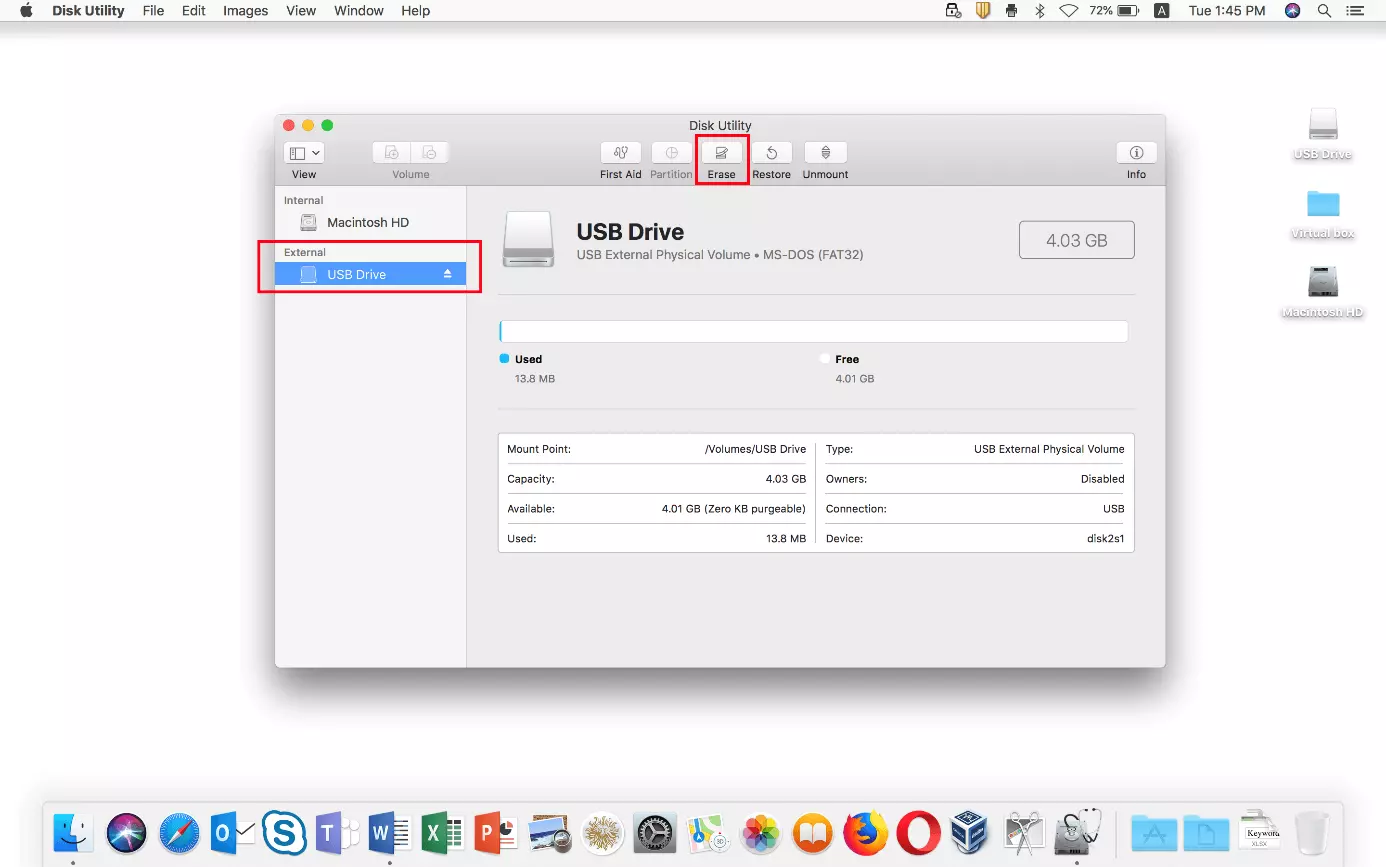
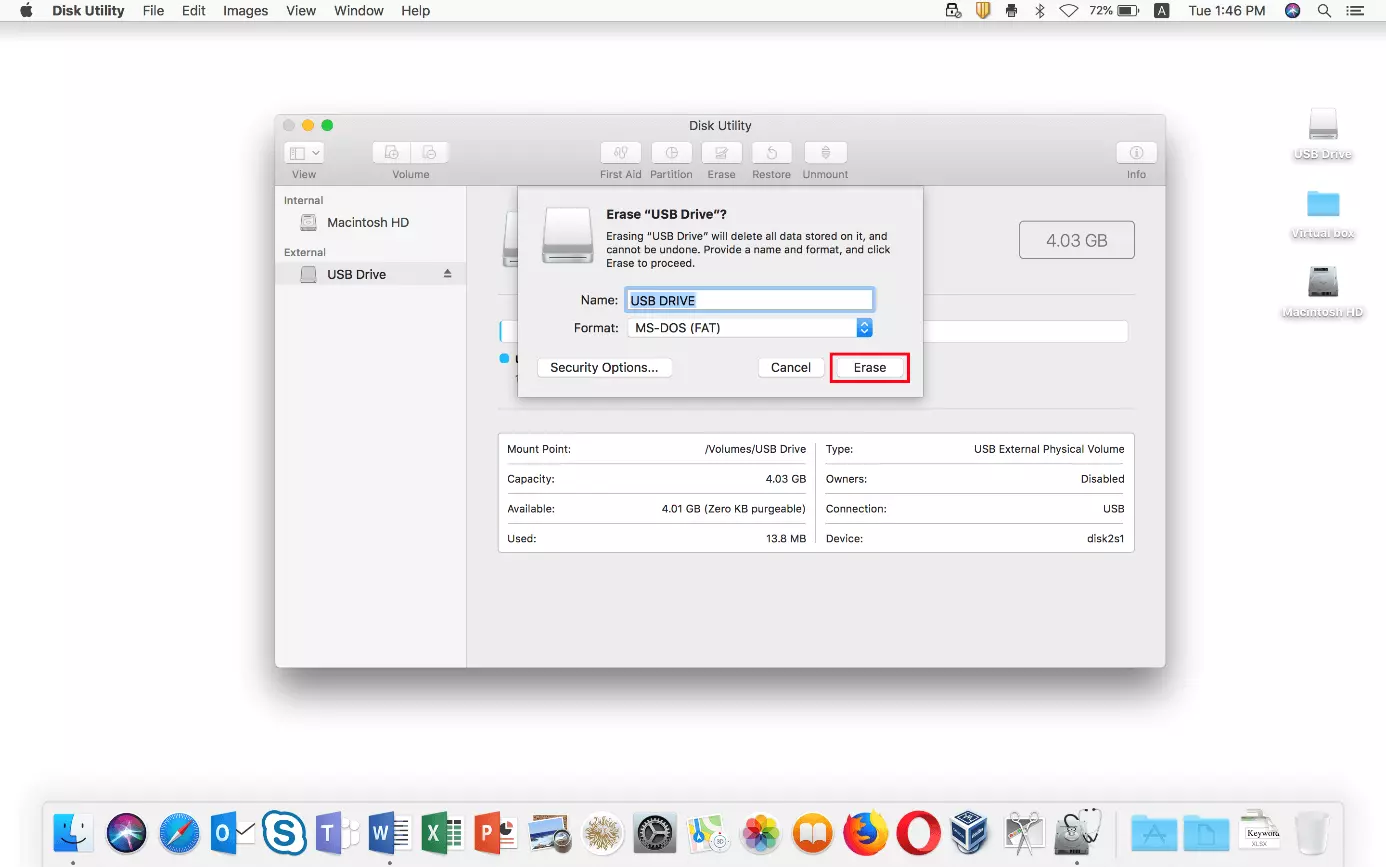
A list of your internal and external data media will now appear in the Disk Utility program. Under the “External” column, left-click on the USB stick you wish to format on your Mac PC and then click on the “Erase” button:
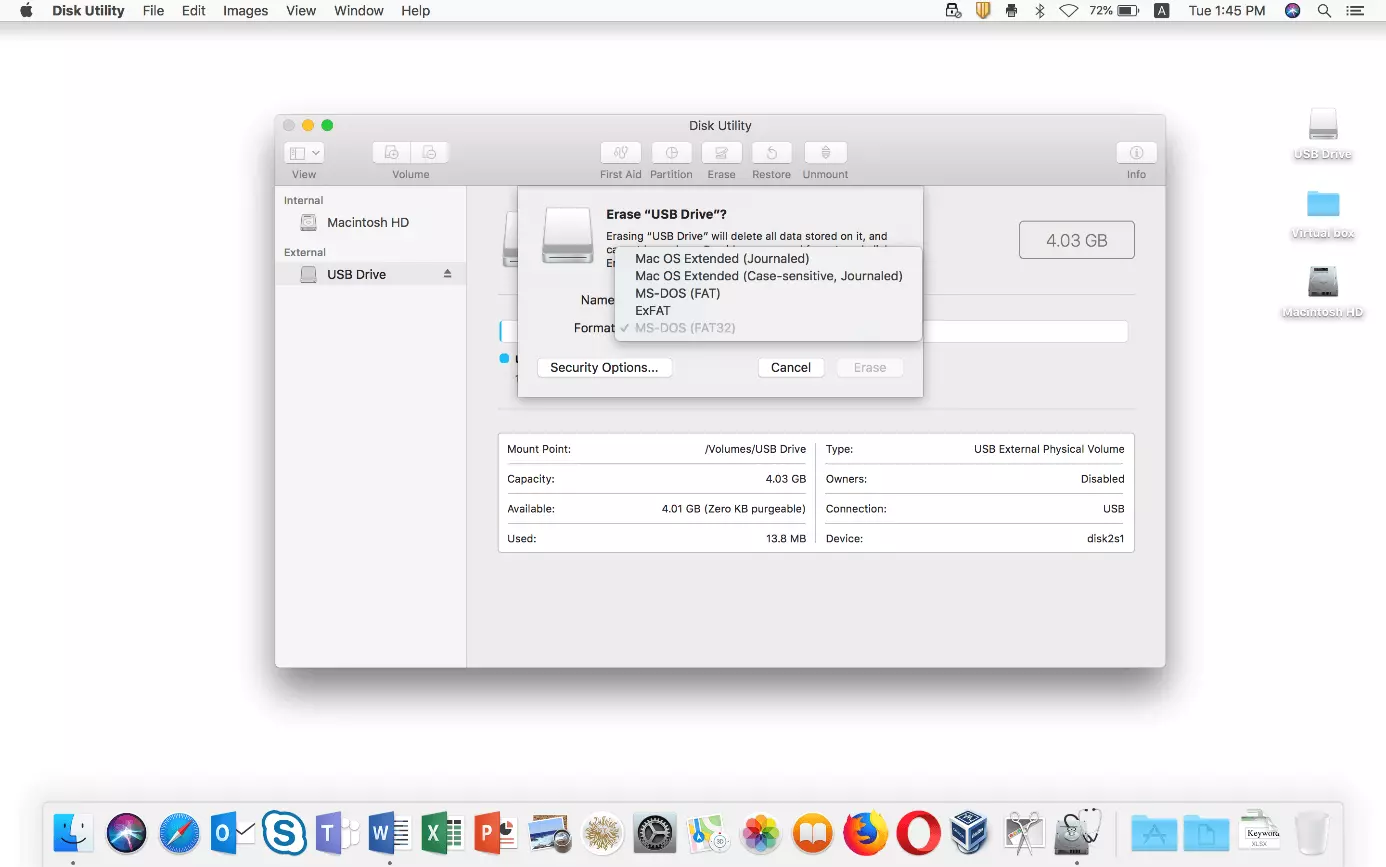
The Disk Utility program will open another window, where you can enter the name of the USB stick and also define the preferred file system. You can configure the file system by clicking on the small arrow in the “Format” row and then pressing on the entry for the respective system format:
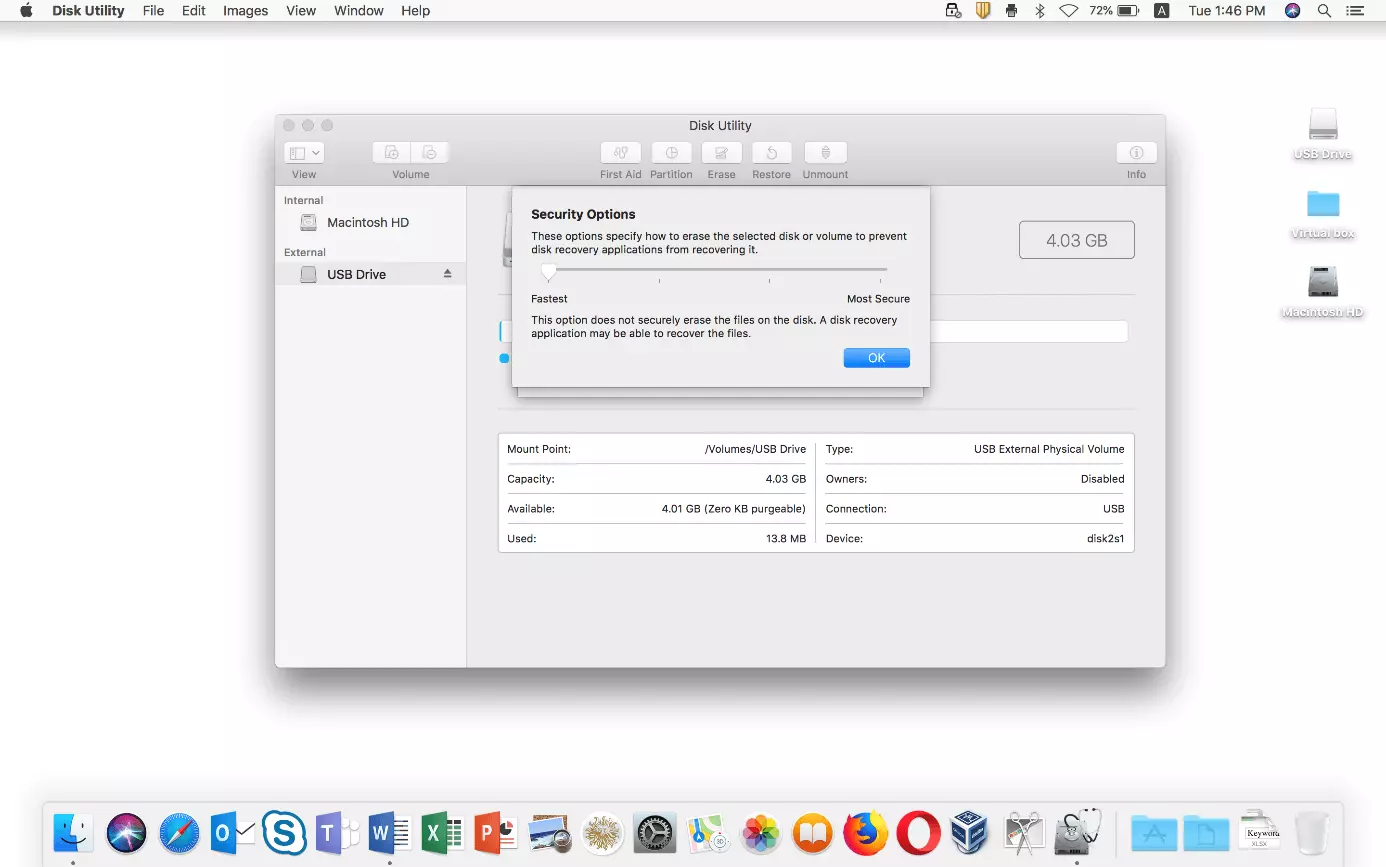
After you’ve made your choice, you can define in “Security Options” whether the USB stick should be formatted by your Mac especially quickly (slider toward the left) or if the focus should be on deleting the stored files as thoroughly as possible (slider toward the right). The latter option is particularly recommended if you don’t want the data to be recoverable in any way. If you don’t need this security or the USB stick is new, you can simply opt for a faster formatting process:


