How to change languages in Windows 10
When you install the American version of Windows 10, English will automatically be set as the display language. In the settings of the Microsoft operating system, however, you can choose from over 100 different languages, in case you’d rather use Windows in Spanish, Italian or German, for example. Of course, you can change the Windows 10 system language back to English or another language at any time. Keep reading to find out how to change the display language in Windows 10.
Windows 10 language settings: Step-by-step instructions for changing the display language
Unlike in other operating systems and versions of Windows, in Windows 10 you don’t need to open up a separate website in order to download and install a new language pack. That’s because the current Microsoft system has its own, integrated language feature in the settings.
You can find a list of available language packs for Windows 10, 8.1 and 7 in the official Windows support forum. But note that you won’t find downloadable packages for Windows 10, as this feature is integrated directly into the system.
What follows is a step-by-step guide on how to change the display language in Windows 10. We’ll also show you what the so-called language features are all about.
Step 1: Open language settings in Windows 10
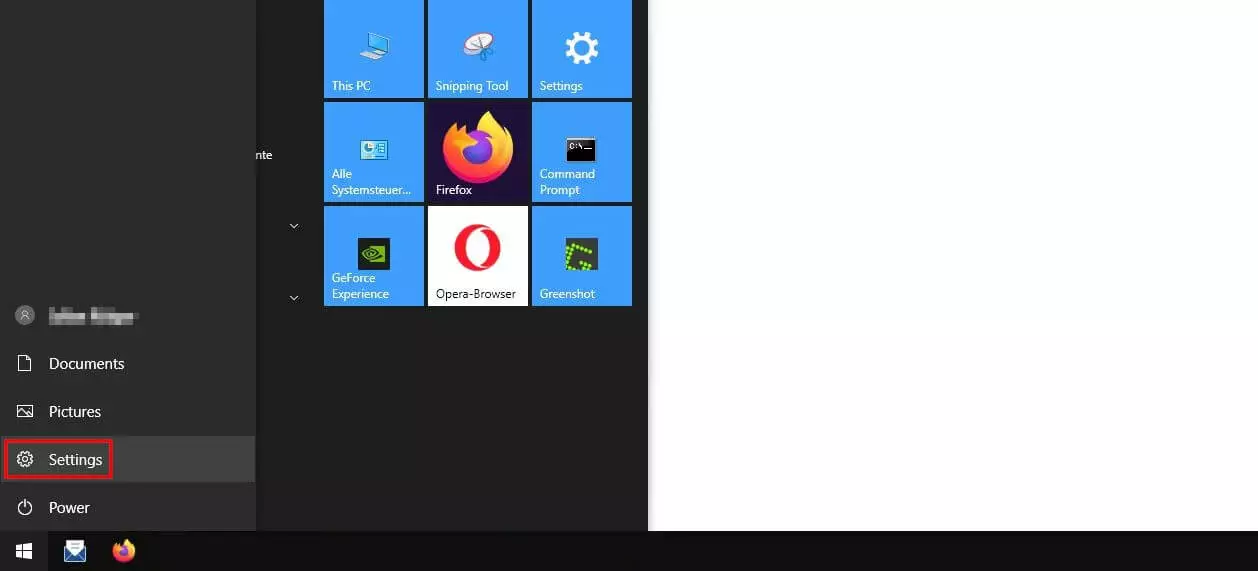
As a first step, open up the “Language” menu which is hidden in the Settings in Windows 10. To do this, first open the start menu by clicking on the Windows symbol, and then click on the “Settings” button (cog icon).
Step 2: Choose a language pack
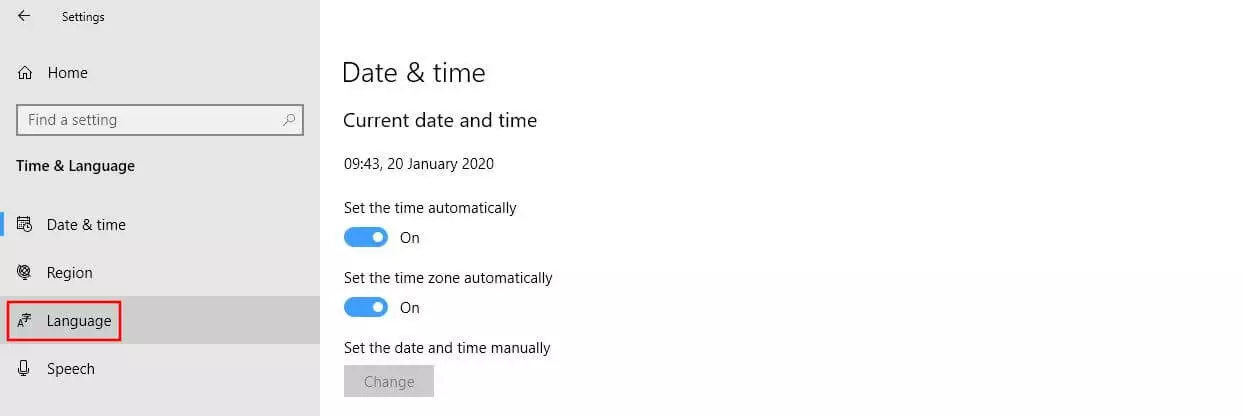
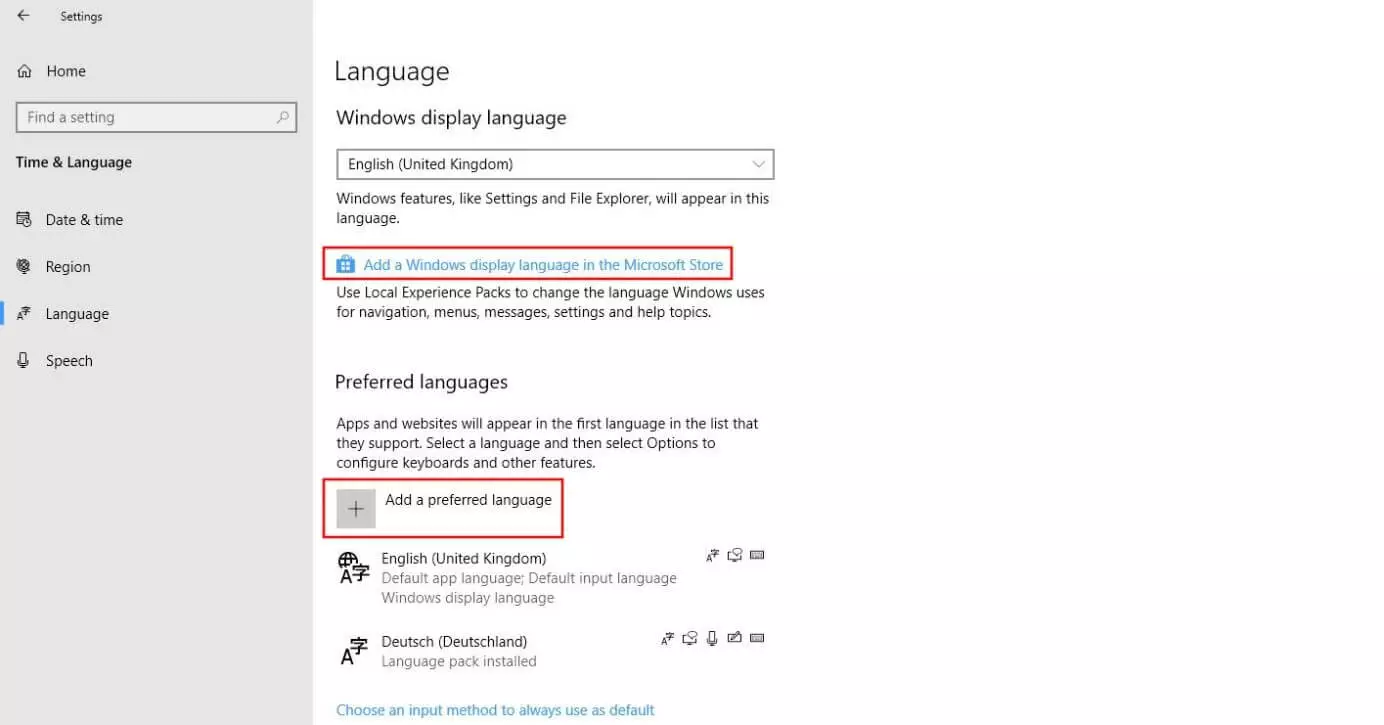
Once you’re in the “Language” menu, you can choose the language pack you need, in order to add your chosen language to Windows 10 and set it as the display language.
To do this, click on the link “Add a Windows display language in the Microsoft Store” or on the button “Add a preferred language”:
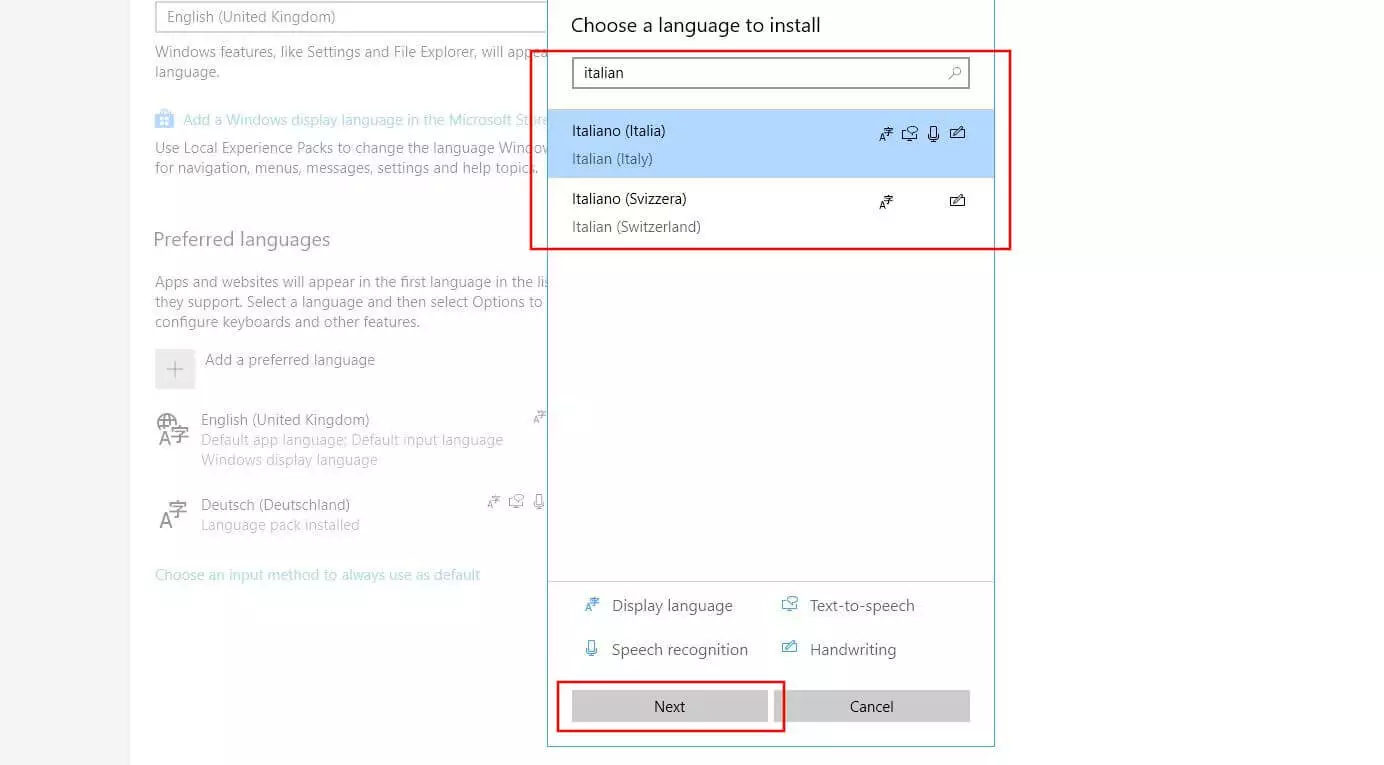
If you opted to use the “Add a preferred language” button instead, scroll through the list that appeared until you find the language you’re looking for. You can also type the name of the language into the search field. Left-click on the language that you want to add to Windows 10 and click “Next”:
Step 3: Download and install language pack and language features
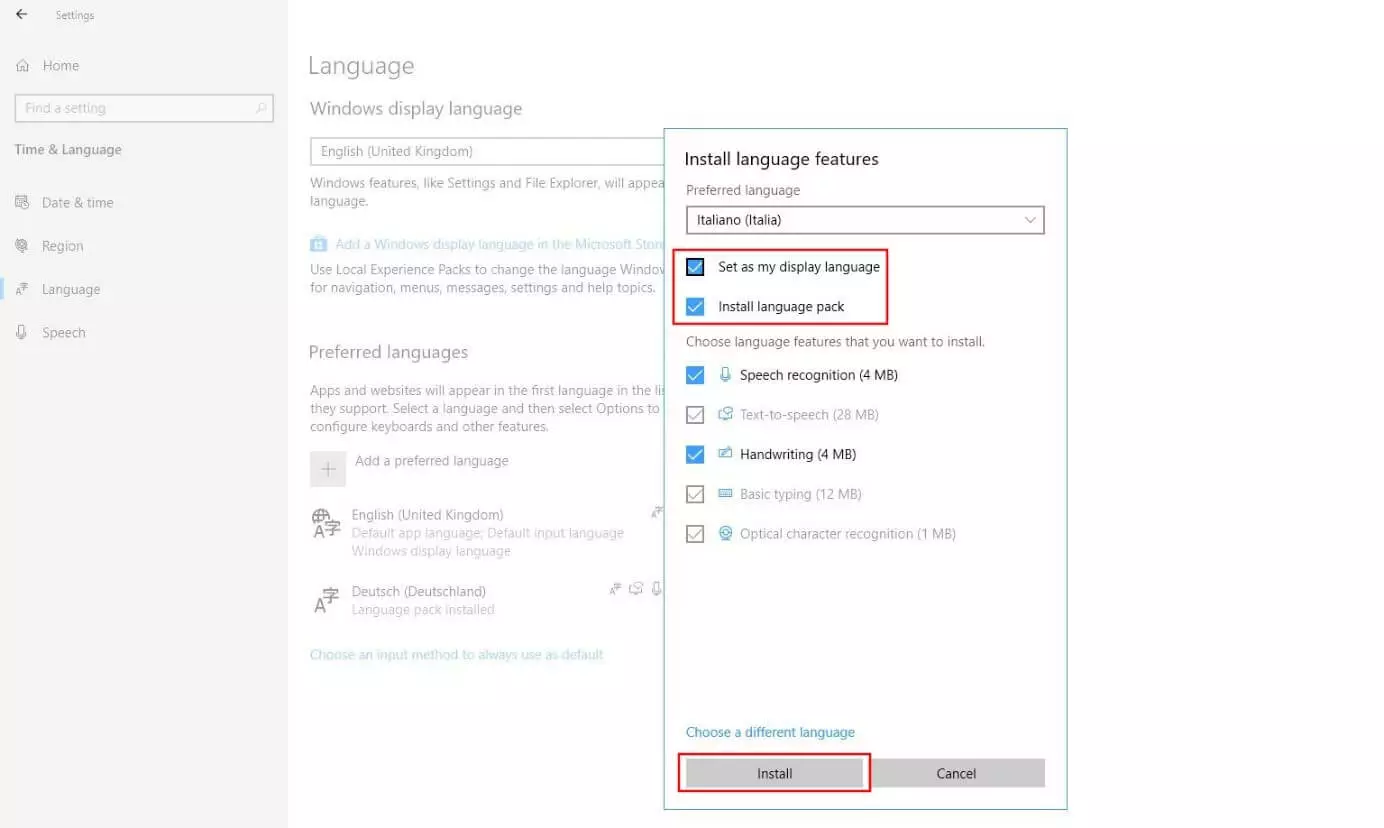
Regardless of which path you chose in the last step, the Microsoft system will automatically take you to the configuration tool “Install language features.” Check the boxes next to “Set as my display language” and “Install language pack,” and then click on “Install” to change the language for Windows 10:
Depending on your level of authorisation (administrator rights), your preferred language, and the Windows version you’re using, you might be able to choose certain optional language features. They are displayed in the screenshot above and include:
- Speech recognition
- Handwriting
- Text-to-speech
- Basic typing
- Optical character recognition.
If you don’t need these features, simply remove them from the installation by un-checking the relevant boxes.
Changing the system language in Windows 10 doesn’t have an effect on the interface in Microsoft Office programs. In order to change the language in Word, Excel, PowerPoint, and other Office programs, you’ll need to download and install a separate language accessory pack for your version of Office from the official Microsoft page.
- Up to 50 GB Exchange email account
- Outlook Web App and collaboration tools
- Expert support & setup service
Step 4: Sign out and sign in again
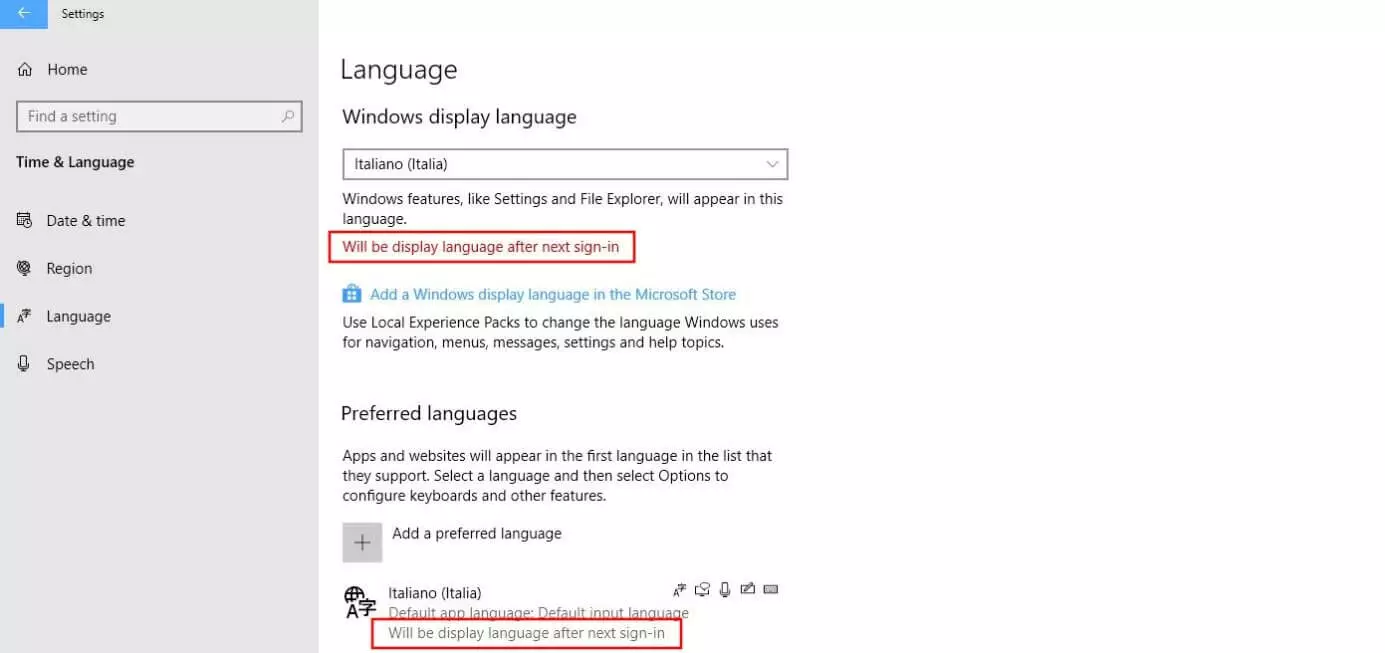
Windows 10 will then download and install your chosen language pack with the features you selected. After this process, which takes just a few seconds, the Windows system states: “Will be display language after next sign-in”:
Windows 10: Undoing changes to the display language
If you’ve changed the display language in Windows 10 and now want to go back to a different language, you don’t necessarily need to delete the new language pack. In Windows, you can swap between languages you installed without having to uninstall and re-install them.
Don’t forget that buttons and other fields might be labelled very differently in your new display language. So think twice before changing the language in Windows 10 on a whim or without a solid knowledge of the new language.
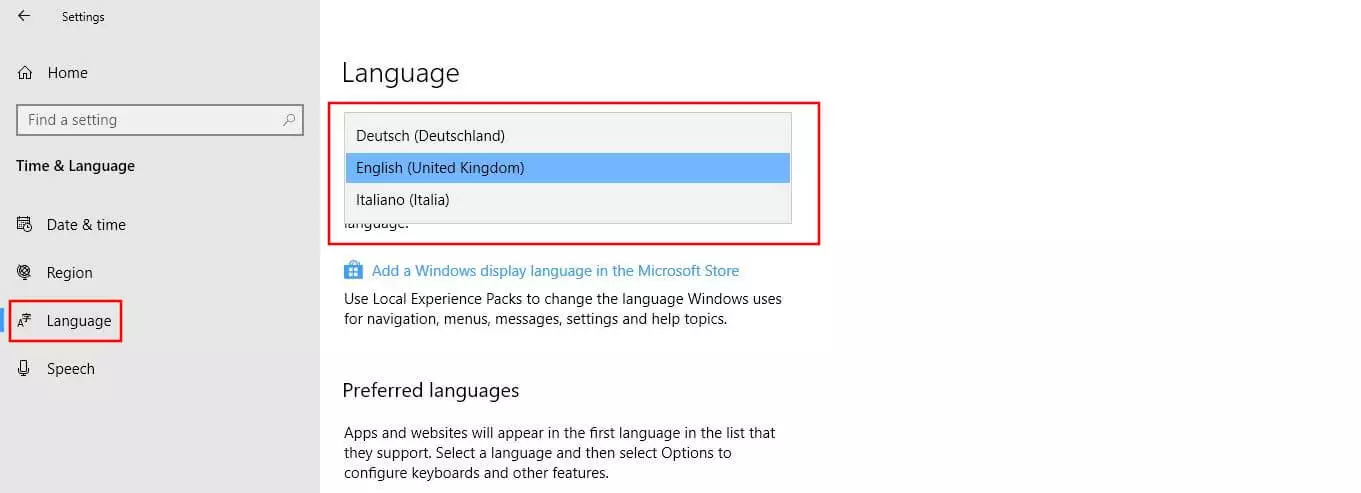
To undo a change to the display language or to otherwise change between two language packs that you’ve already installed, take the following steps:
- Open the start menu using the Windows icon or the [Windows] key Shortcut.
- Click on the menu item “Settings” (cog icon).
- Choose the heading “Time and language”.
- Click on the category “Language” in the left side bar.
- Choose your preferred language from the list under “Language.”
- Sign out of the system and sign back in or restart your computer.
If changing the display language leads to sizeable complications, the best solution in some cases can be to do a factory reset. Find out how in this article on factory resetting Windows.


