How to link a ARK: Survival Ascended server to a domain
The popular game ARK: Survival Evolved is even more enjoyable when played with friends in multiplayer mode. To make it simpler for others to join your server, you can connect it to a domain. This way, you can use a web address instead of a server IP to connect.
Requirements
To link your server to your own domain, all you really need is your ARK: Survival Evolved server and a domain. If you haven’t set up a server for your game yet, that’s the first step you should take.
Find out more about creating an ARK: Survival Ascended server in our dedicated guide and learn how to set up your own dedicated ARK: Survival Ascended server under Windows in just a few steps.
To link your server to a domain, you’ll first need a suitable domain. At IONOS, you can register a custom domain name in just a few steps. But first, you need to consider the choice of your top-level domain. Some domain extensions are suitable for gaming servers:
- .gg
- .io
- .world
- .fans
- .club
- .games
- .pro
- .community
There’s also a variety of new TLDs that might be a good fit for your server. Pick one of these options and then use the IONOS Domain Check to verify if the TLD you’ve selected is still available when combined with your preferred name.
How to connect your ARK: Survival Ascended server domain step by step
Now that you’re in possession of the server and domain, you just need to establish a connection between these two components. If you’ve previously used your domain for other projects, such as websites, that’s not an issue.
In our step-by-step guide, we’ll demonstrate how to connect your ARK: Survival Evolved server and domain using an IONOS account as an example. If you’re using a different provider, the steps in this guide may vary slightly in some places.
Step 1: Find server data
The initial step is to gather the necessary information for connecting to your ARK: Survival Evolved server. This includes the server’s IP address of your server and the shared ports. If you’re using IONOS, you can easily access this information by logging into your customer account. Navigate to ‘Server & Cloud’ and then click on your ARK: Survival Ascended server. All data, including the IP address, will now be displayed.

Make a note of this information, as you’ll need it for the remaining steps of the server and domain connection process.
If you encounter any difficulties with domain forwarding, you can refer to our article on forwarding a domain in the IONOS Help Centre for assistance.
Step 2: Call up DNS options
To link your domain to a server, you’ll need to access the DNS settings for your domain and create DNS records.
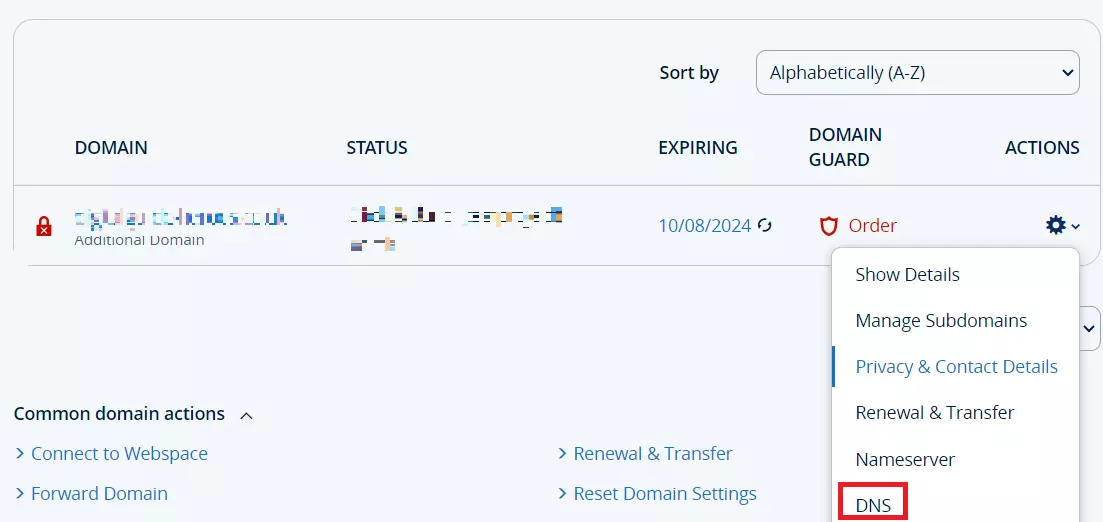
To do this, navigate to the menu for domains in your customer account. If you’re using IONOS, choose the domain you’ve assigned to your ARK server from the list. Now click on the gear icon and access the DNS options.

Step 3: Create DNS record
The next step is to create a new DNS record for your domain to establish the connection with your ARK: Survival Evolved server. DNS records are essentially used to define which server or servers a domain is associated with.
Create A-Record
To enable access to your server through your domain, you require an A-Record. The ‘A’ in A-Record represents ‘address’, and its purpose is straightforward. It associates the domain name with the IP address of your ARK: Survival Evolved server.
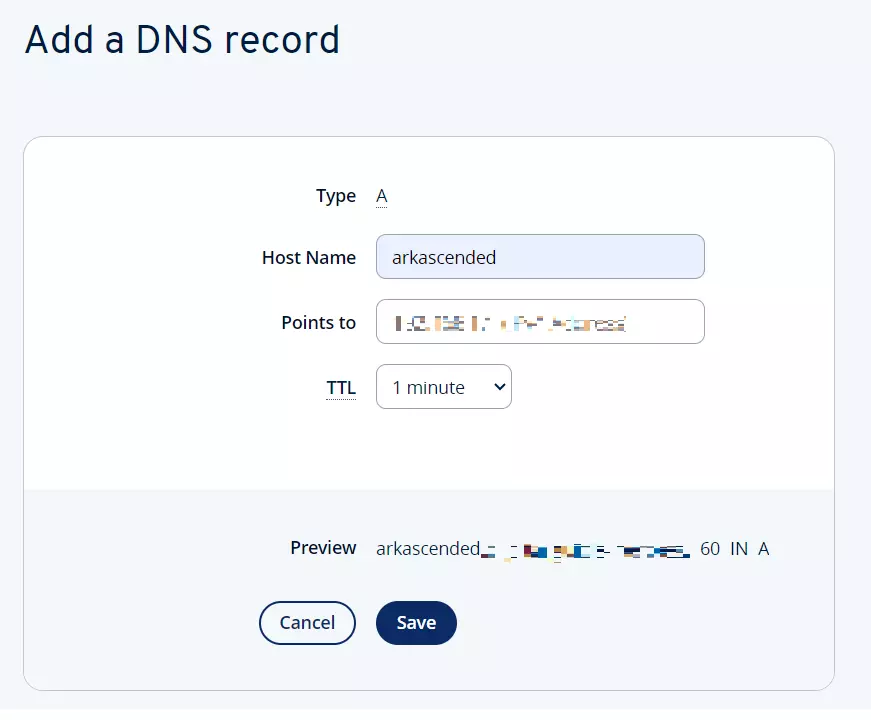
To add an A-record to IONOS, click on the ‘Add record’ button and then select the A-record from the options that open. You must complete the following three fields:
- Hostname: The hostname allows you to establish a subdomain for your server. For instance, if you enter ‘ark’ you’ll create the domain
ark.example.org. If you’re using the domain exclusively for your ARK server, you can also use a placeholder (@). This ensures that your ARK: Survival Ascended server can be accessed directly atexample.org. - Points to: Enter the IP address of your ARK: Survival Ascended server that you’ve just noted here.
- TTL: TTL stands for Time To Live. The value you set in this field determines how frequently the Domain Name System checks and updates entries. To ensure that your changes take effect as quickly as possible, select the shortest available time period.

Step 4: Connect to the server
To connect to your server now, you can simply enter your domain. This means that you and your fellow players no longer need to remember a complex IP address.

