URL tracking using UTM parameters: a simple explanation
With Google Analytics, you can determine where the clicks to a certain website or webpage come from. However, this analysis isn’t the most precise method. For example, you can only find out whether traffic came from a specific source such as Twitter, but not whether the tweets from your own company were responsible for this linkage. In other words, you won’t be able to tell exactly which version of your call-to-action generated more clicks if both versions linked to the same URL. But there’s a solution: using UTM parameters.
What are UTM parameters?
The predecessor of Google Analytics was called Urchin Tracking Monitor - hence the letter abbreviation UTM. The UTM parameters - also called UTM codes - are used in Google Analytics to identify the origin of each click. This information can answer question such as: How many came from your last Facebook post, how many from search advertising, and what proportion is accounted for by organic Google searches? These questions and more can be explained via UTM parameters.
Technically speaking, UTM parameters are nothing more than URL parameters (query strings) that are appended to the URL. Here is an example with UTM parameters highlighted in bold:
https://ionos.com/digitalguide/example?utm_campaign=alfa&utm_medium=social&utm_source=twitter&utm_content=cta1Our dedicated article on HTTP requests explains the concept of URL parameters.
How do UTM parameters work?
The various UTM parameters are each marked with a prefixed utm_. They consist of a pair of values separated by an equal sign:
Parameter=ValueThe values are generally freely selectable. It is best to use common terms such as “display”, “facebook”, “newsletter”, “internal” etc.
Individual parameters are strung together – much like any other query string – after an introductory question mark using “&”. In addition to the UTM parameters, a query string may contain further URL parameters. Thanks to the prefix utm_, Google “knows” which parameters are intended for URL tracking and picks them from the query string.
UTM parameter : a detailed look
There are a total of five UTM parameters, two of which are optional.
The three obligatory parameters
If you are specifying UTM parameters, you must use utm_source, utm_medium, and utm_campaign. For example, you shouldn’t use utm_campaign on its own.
The two optional parameters
utm_term and utm_content are optional parameters that can be added or omitted individually.
The five UTM parameters are described in more detail below.
utm_source: referring to a website or platform
With utm_source, you’ll enter the website or platform through which the URL was accessed. This can be the name of a social media platform (such as Facebook), the name of a mail distributor (such as Mailchimp), or a website (such as the name of a blog).
It is not advisable to specify your own domain name as utm_source, as this would cause confusion in the analysis. Instead, a term such as “internal” or something similar should be used.
utm_campaign: all the links of a campaign
With this utm parameter, you can track all the links that belong to a certain campaign. This allows you to evaluate your campaign in Google Analytics across all channels and advertising media. Assign a chosen campaign name that is understandable to your entire team.
utm_medium: the advertising or marketing medium
This UTM parameter can be used to encode advertising or marketing mediums, including adverts, newsletters or blog posts. Google recommends coding the medium more generally: “email”, “cpc”, “display”, “social” etc.
utm_content: keeping contents apart
For example, if you have two ads in the same campaign, the utm_campaign and utm_medium parameters won’t be enough to compare the performance of the two ads. This is where utm_content comes in. Assign different content names to the two ads, e.g. utm_content=slogan1 and utm_content=slogan2.
utm_term
With utm_term, you specify the paid keyword that is linked in your campaign. With Google Ads, utm_term is not required because Google registers this information on its own. However, it is useful for search engine advertising outside of the Google network – e.g. on Bing – to be able to distinguish paid traffic from organic traffic.
UTM parameter: setting up
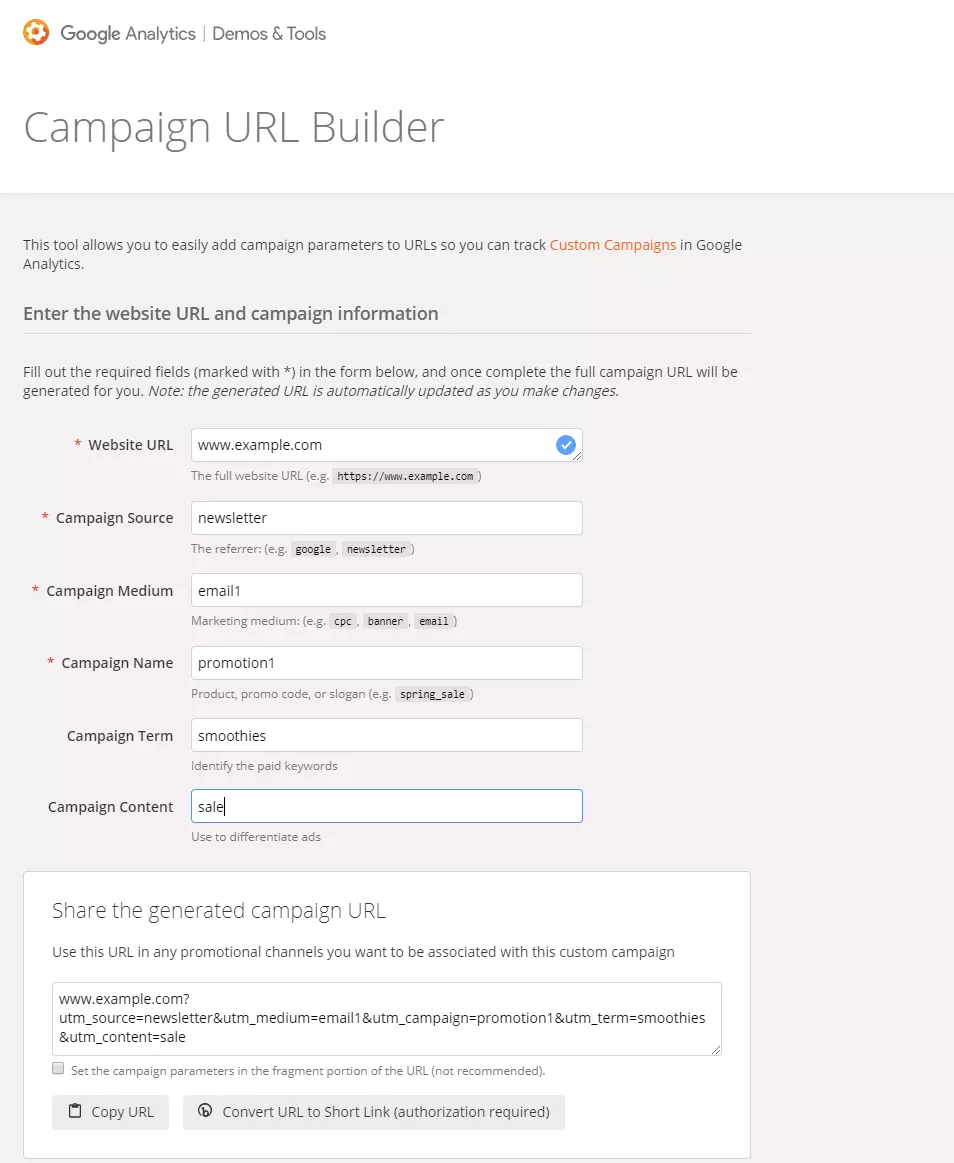
The easiest way to set up the UTM parameters is to use the Campaign URL Builder by Google.
The URL generated by the tool, which is technically a URL with an attached query string, can be copied and pasted. In this example, the URL would be used as a call-to-action link in a promotional e-mail. To prevent the URL from overwhelming the user with too much detailed information, it can be shortened with an optional tool (button at the bottom right of the screenshot). The button leads to Bitly.
Alternatively, you can open the bitly tool manually and shorten your URL yourself. The shortened URL in our example would then read like this: https://bit.ly/2v8coHW
Evaluating UTM parameters
In Google Analytics you will find the values of the UTM parameters you have set up under “Acquisition” > “Campaigns” > “All Campaigns”. You can then evaluate the previously recorded parameters as primary or secondary analyses: “Campaign”, “Source”, “Medium”, and “Source/Medium”.
You can find more detailed explanations about Google Analytics in our Google Analytics overview article.


