Word table: Creating a table in Microsoft Word
Microsoft Word is probably the most popular software there is for word processing. The program makes it possible for users to write texts very quickly and in a way that is (in most situations) straightforward. However, with the software you can also integrate additional elements into your document, including images and tables. If you would like to quickly create a well-arranged table, no need for Excel: Word itself has a feature for this.
Creating a Table: Easy to Do in Word
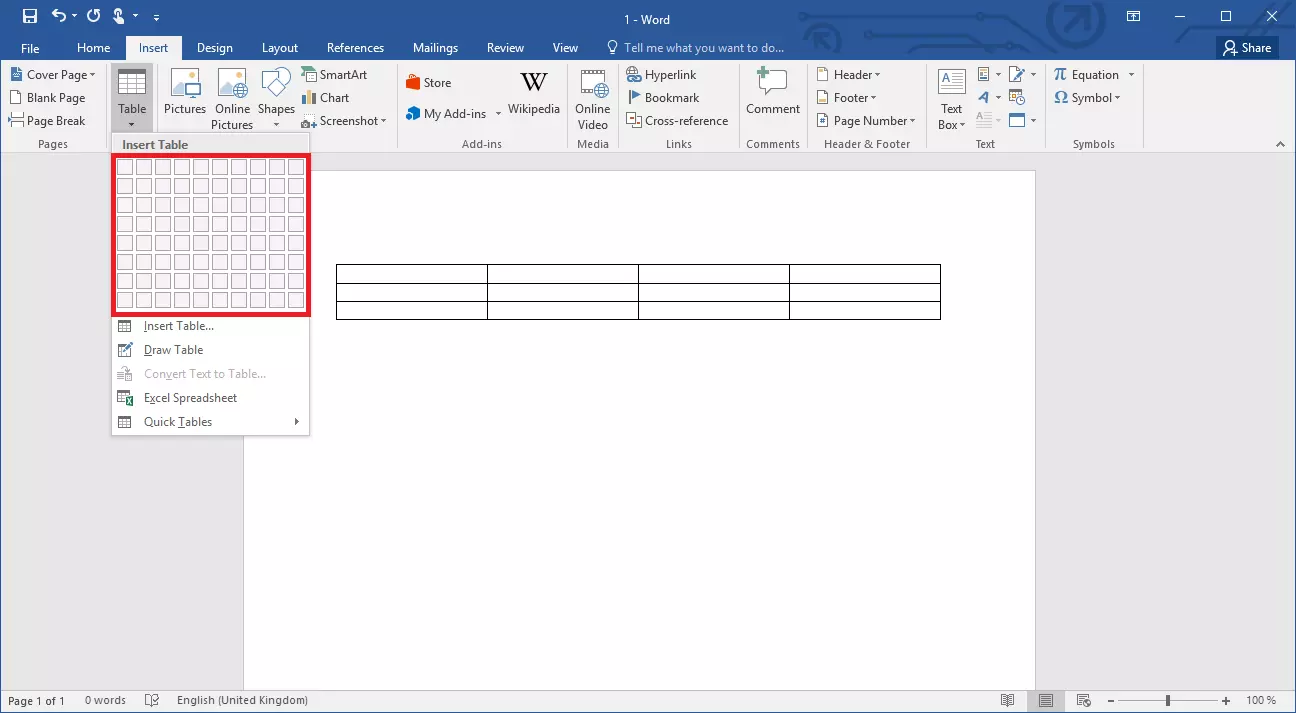
Word has a special feature with which you can quite easily create a table. To make use of it, click in your open Word document on the “Insert” tab and then select the “Table” item. Here Word already offers you a very easy-to-use tool: just click with the mouse pointer to select how many rows and columns your table should have. With one click, the program then inserts the selected matrix into the document.
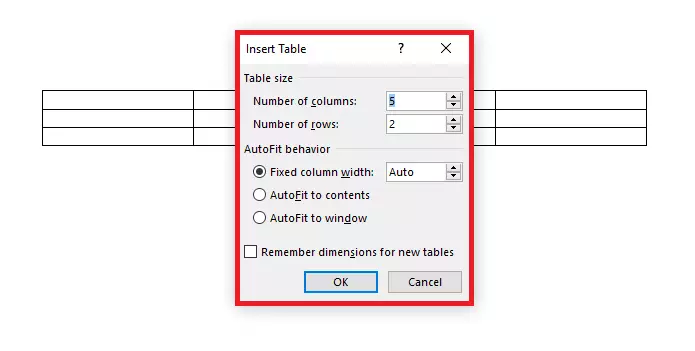
However, there are other options for creating tables in Word. Directly beneath the selection chart you’ll find the menu item “Insert Table…”. If you click on it, a menu will open with several options for customising the table according to your preferences before it is created. For this as well, you must first determine the number of columns and rows but can then also specify the column width. You can determine if the column should be set to a specific width or you can leave the adjustment to Word. The program then configures the column width according to the content or window size.
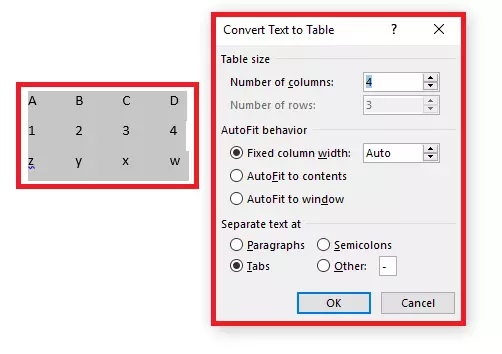
If you already have the table content in your document but would just like to format it as a table, there is another feature that will let you do this. First, however, your individual cell entries must be pre-formatted. Arrange the words or numbers in different cells and separate the entries from each other using tabulators. In this way, Word can determine how the content must be distributed among the rows and columns. Therefore, select the section and click beneath “Table” on the menu item “Convert Text to Table…”. In the window that opens, check if Word correctly understood the distribution, then create the table.
You can also use other symbols in order to separate the entries from each other. In the menu of the appropriate feature, you can specify these so that Word correctly apportions the columns and rows.
Customising Tables
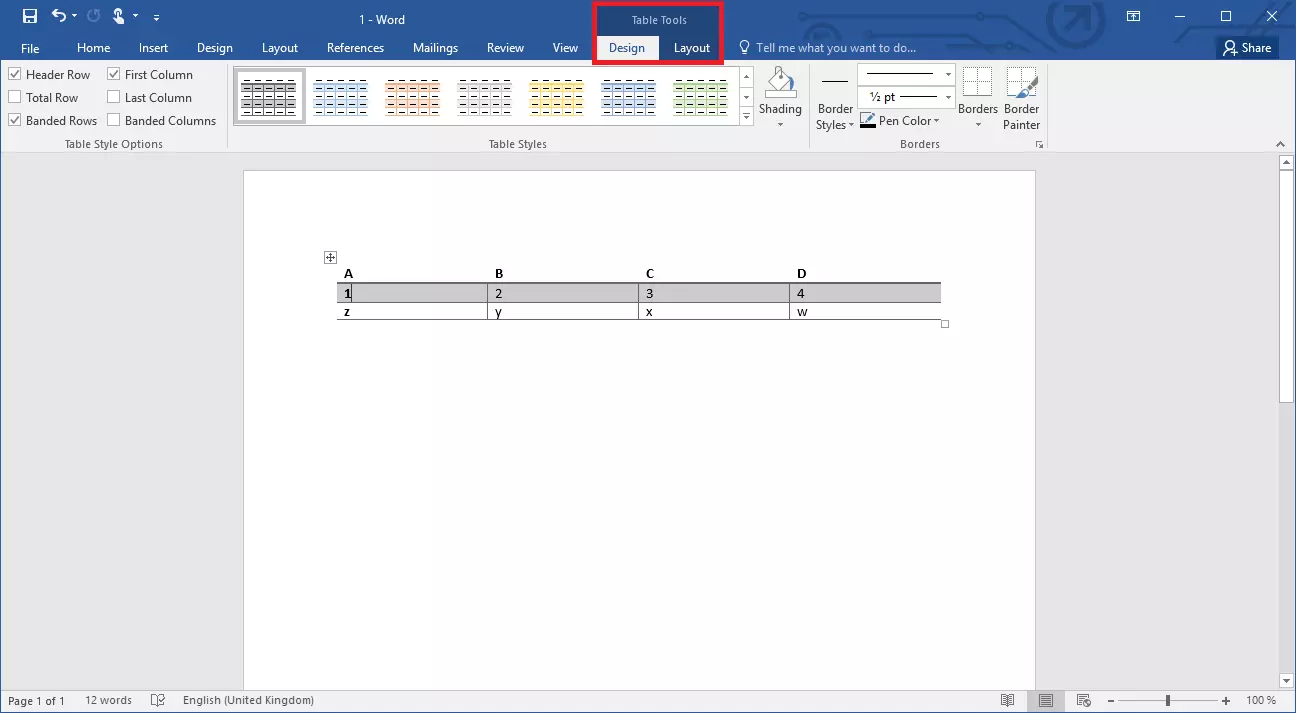
If you have created your table in Word, it is usually not very visually appealing. However, you do have the option of customising the layout. After you’ve created the table, the Table Tools open with two new tabs in the menu ribbon. Among other options, you can choose from different templates under “Design,” and in this way give your table a more professional design. If you find that the selection is insufficient, you have additional options for customisation, such as adjusting the lines or coloring specific sections. Above the “Layout” tab you can also adjust the distribution of cells, rows and columns.
In addition, you also have the actual Word formatting options available. In this way you can make the content bold or italic, for example, or change the font size or text colour.
If you would like to choose an appealing design when creating your table, you can try out the “Quick Table” option when inserting it. Here, Word provides you with tables that have already been formatted and that can be helpful in various situations.
Insert Excel Table in Word
For simple comparisons or lists, Word tables are enough. They can be created quickly and are easy to customise. However, if you have more complex requirements, and would like to, for example, have recourse to mathematical formulas and abundant data analyses, Excel would be more to your benefit. The Office suite’s table calculation software is specifically designed for such tasks. Its advantage is that it makes it possible to incorporate an Excel table into a Word document.
For this Microsoft provides you with two different versions: Either you integrate an existing Excel table into the document, or you create a new Excel table directly in Word. For the first approach, you must first create a table in the calculation program. Then you can select this table, copy it and insert it into Word. In word processing, you then format the table so that it is consistent with the rest of the document.
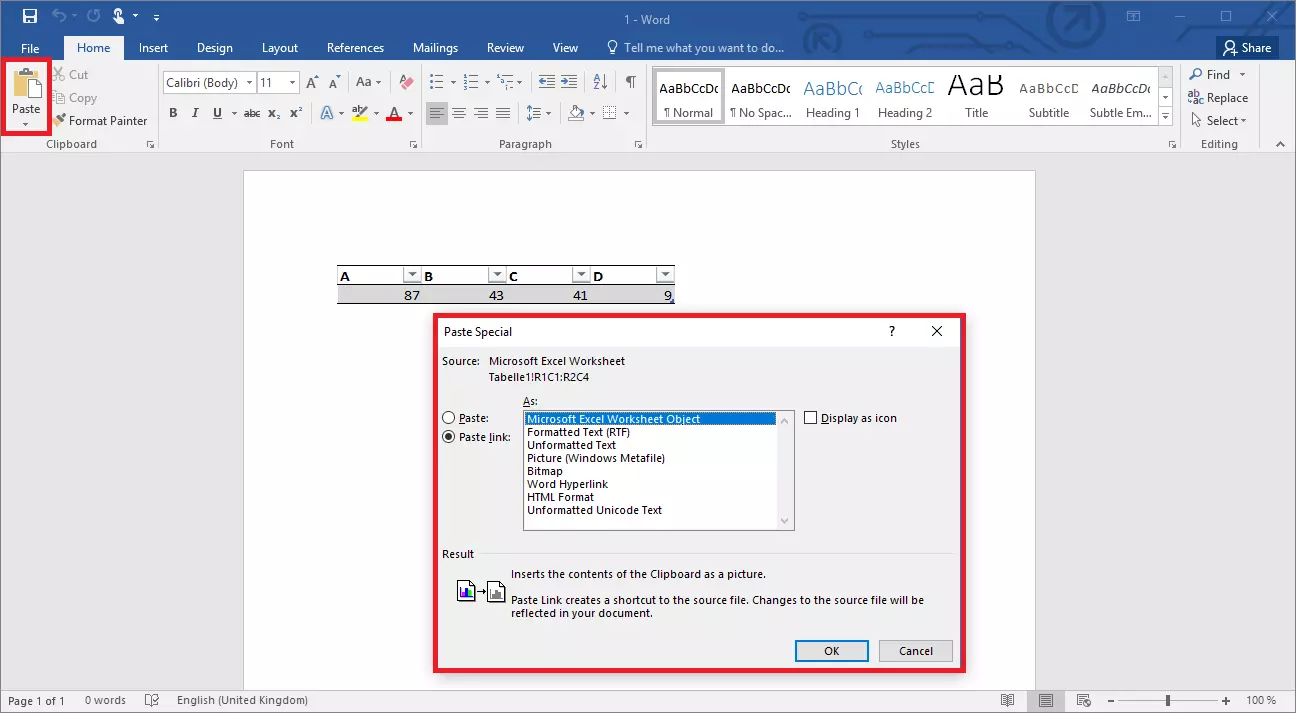
There is however another option that lets you incorporate an existing Excel table. If you link both files to each other, the table in the Word document inherits the changes that you make in Excel. For this as well, you select and copy the table in Excel. However, in the Word document you don’t simply paste the data as you normally would (for example, with the ctrl + V key combination), but instead use a special feature. In the “Start” tab you’ll see the “Insert” item all the way to the left. If you click here on the “Paste content…” option, you’ll be able to integrate the table as a link. Choose “Microsoft Excel Worksheet Object” from the list and confirm your decision.
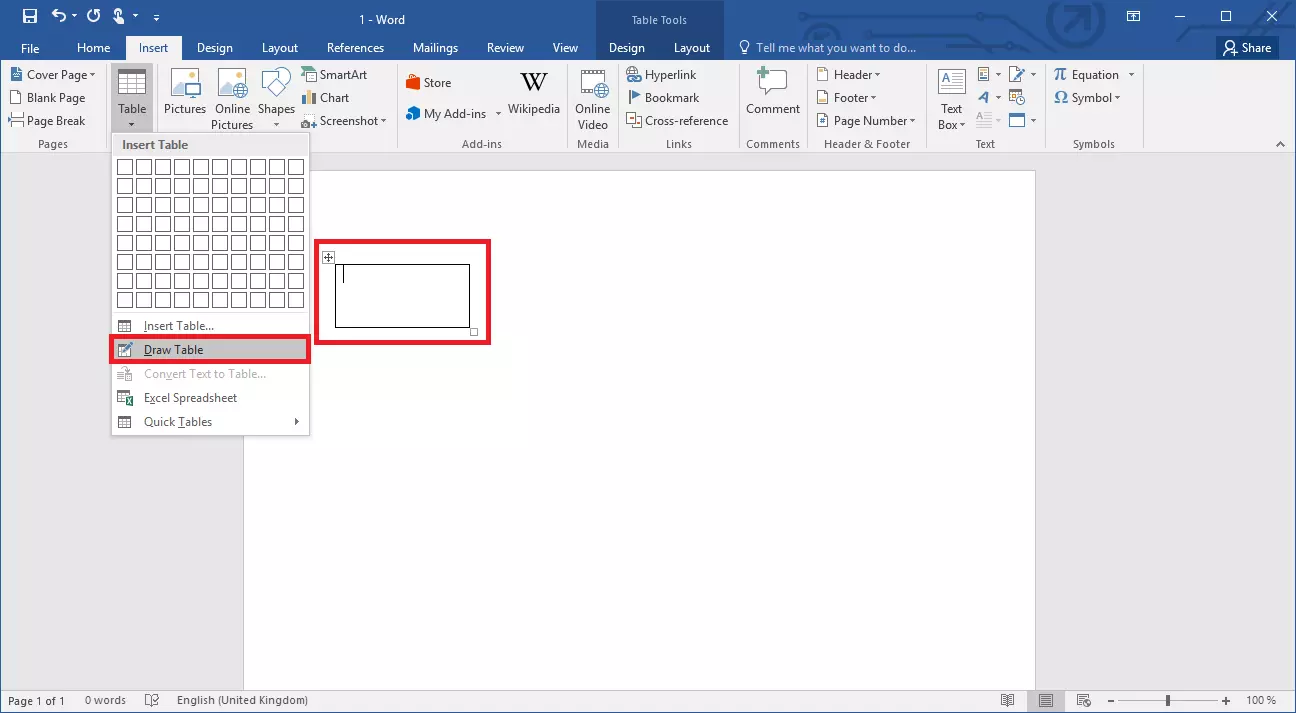
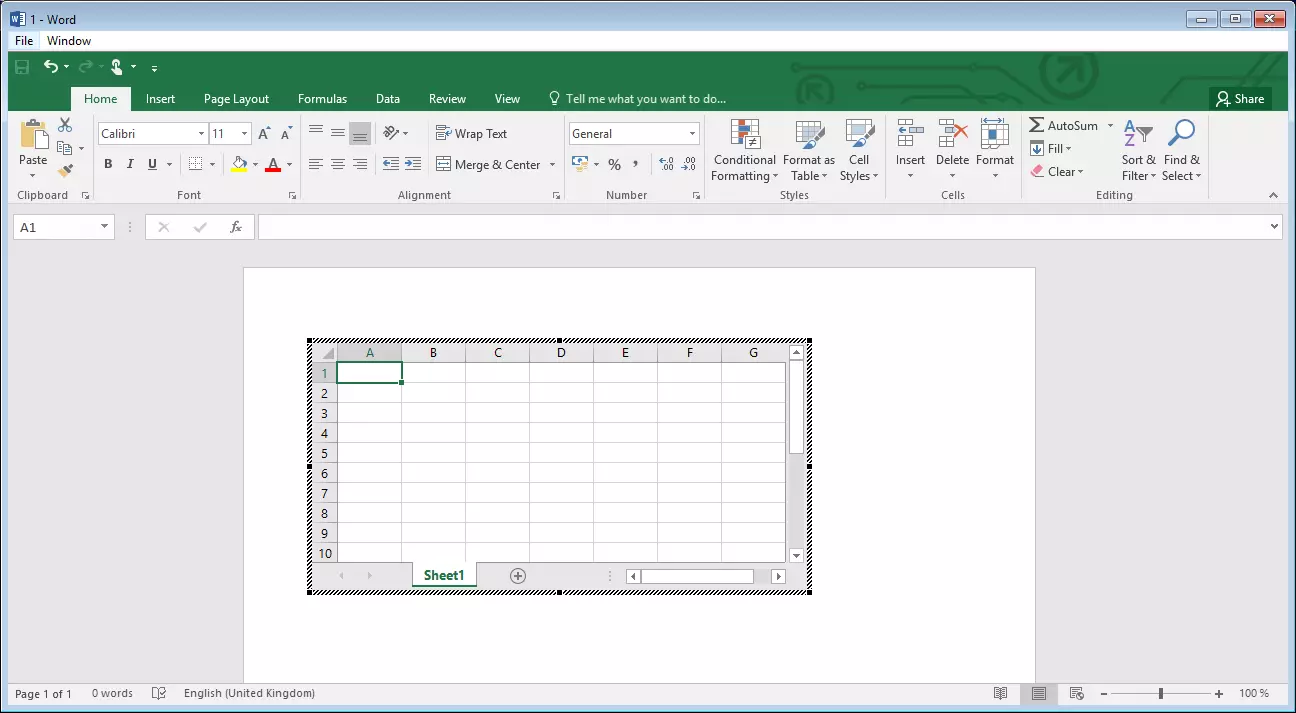
However, Word also gives you the option of creating an Excel table directly in the document—with all the features that one is also familiar with from table calculation. For this you’ll find the “Excel Calculation Table” feature in the table menu. Word now generates an Excel-style table and completely transposes its features: Word’s characteristic blue ribbon becomes the green Excel menu. You can make use of the Excel features if you have activated the table.
Would you also like to take advantage of the Office suite’s wide range of features? With Microsoft 365, IONOS provides you with the complete Microsoft package in the cloud.


