How to remove a password from an Excel file
Once you have activated password protection in Microsoft Excel, there are several ways to remove the Excel password from the file. Removing Excel sheet protection is easy with the right approach.
- Up to 50 GB Exchange email account
- Outlook Web App and collaboration tools
- Expert support & setup service
How to remove a password from an Excel file quick guide
- Open the file and enter the password.
- Go to File > Info > Protect Workbook > Encrypt with Password.
- Delete the password.
- Save the file.
The following instructions apply to Microsoft 365 and Word versions 2021, 2019 and 2016. We cannot guarantee that these instructions will also work for older Excel versions.
Step-by-step instructions on how to remove password protection from an Excel file
With the following steps, you can remove password protection and encryption from an Excel file if you know the password or have it stored in your password manager. Once you have removed the password from the Excel file, it can be opened without a password.
Step 1: Open the password-protected file by entering the password.
Step 2: Then select File > Info > Protect Workbook > Encrypt with Password from the menu.
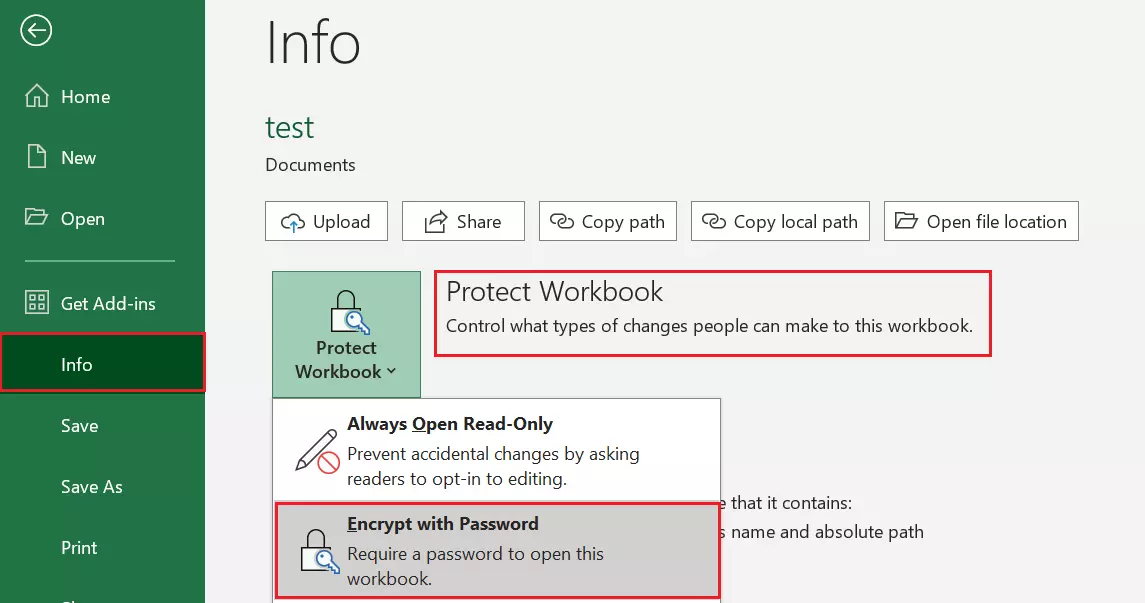
Step 3: In the dialog window, delete the existing password. After doing this, you won’t receive any more prompts to enter a password when you open the workbook.
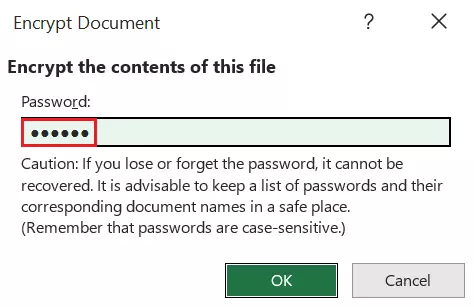
Step 4: Once you save the Excel workbook, password protection is removed. The file can now be opened without a password.
Use Excel regularly and want to save some time? Memorise a few useful Excel shortcuts or take a look at our other Digital Guide articles on other Excel topics.
Step-by-step instructions on how to unprotect an Excel sheet
It takes just a few clicks to unprotect a single Excel worksheet and allow anyone to edit it again.
Step 1: In the Review menu, select the Unprotect Sheet option.

Step 2: If the worksheet was protected with a password, you must now enter the password.
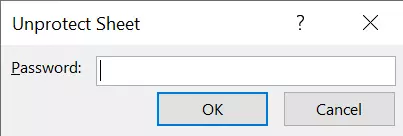
Result: If you’ve entered the correct password, the Excel sheet will now be unprotected. Any user can now edit the worksheet as they please.
What to do if you’ve lost the password to your Excel file
Removing an Excel password only works if you know the password. But what should you do if you no longer have the password to an encrypted Excel file? The bad news is that the password protection of an encrypted Excel file cannot be cracked because it is comparable to that of an encrypted ZIP file.
Your only option is to try to guess or recover the password. Theoretically, you could attempt to crack the password with a brute force attack, i.e., by automatically trying all combinations. However, this only works if you originally chose a particularly short and trivial password such as ‘1234’. If, on the other hand, you created a secure password, all attempts of this nature will be futile.
If you want to be sure that Excel and all your other Office programs are always up to date, opt for the tried-and-tested Microsoft 365 Business package from IONOS. With this package, each user can access the Office programs on up to 5 different devices. You also benefit from IONOS HiDrive cloud storage, which allows you to access your files from any end device.
How to unprotect an Excel sheet without a password
Things aren’t quite as hopeless if you want to unprotect a single Excel worksheet but no longer know the password. There is actually a trick for this. However, it involves file manipulation, and there’s no guarantee it will work with all current and future versions of Excel. Of course, we assume that you will only attempt this if you are authorised to do so.
Step 1: Before performing any of the steps below, make a copy of the Excel file in question. Carry out the following steps using the copied version, because if you make a mistake while modifying the file, you still have the unmodified original version and can start over.
Step 2: Open the copy of the file with 7-Zip. The 7-Zip program comes preinstalled on Windows 10, so all you need to do is right-click on the file and select Open from the 7-Zip menu. If 7-Zip is not installed on your system, you can download it online for free.
Excel files in .xlsx format are actually compressed files in ZIP format. Their contents can be viewed by opening them with any conventional unzipping program. In our example, we use the 7-Zip program.
Step 3: Open the xl folder inside 7-Zip.
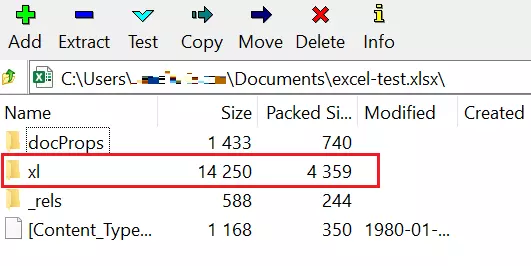
Step 4: Now open the worksheets folder.
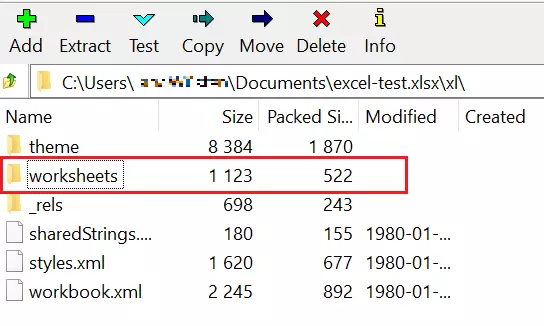
Step 5: Now you can view one or more files like sheet1.xml, sheet2.xml, etc. These files correspond to the individual worksheets of your Excel file. Let’s assume your protected worksheet corresponds to the sheet1.xml file. If you have more than one worksheet, you may need to determine which Excel sheet you need to remove the password protection from.
Now, edit the file using a text editor. The easiest way to do this is to right-click the file in 7-Zip and then click on Edit. Alternatively, you can select it and press the [F4] key.
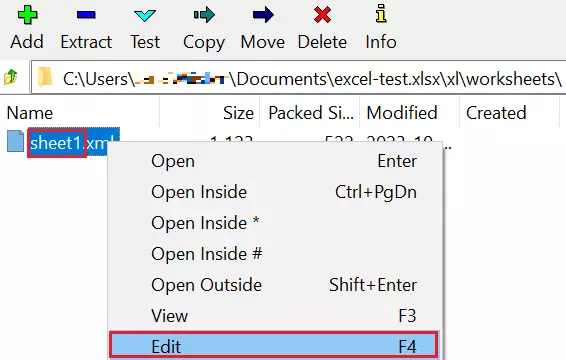
Step 6: The file is now open in the Windows editor. As you can see, XML files are not exactly reader-friendly because they are usually not intended for human eyes. Make sure that text wrap is enabled in the text editor (Format > Wrap Text) so that the text does not scroll out sideways.
Now, look for the string <sheetProtection in the text and select all text up to the closing />:
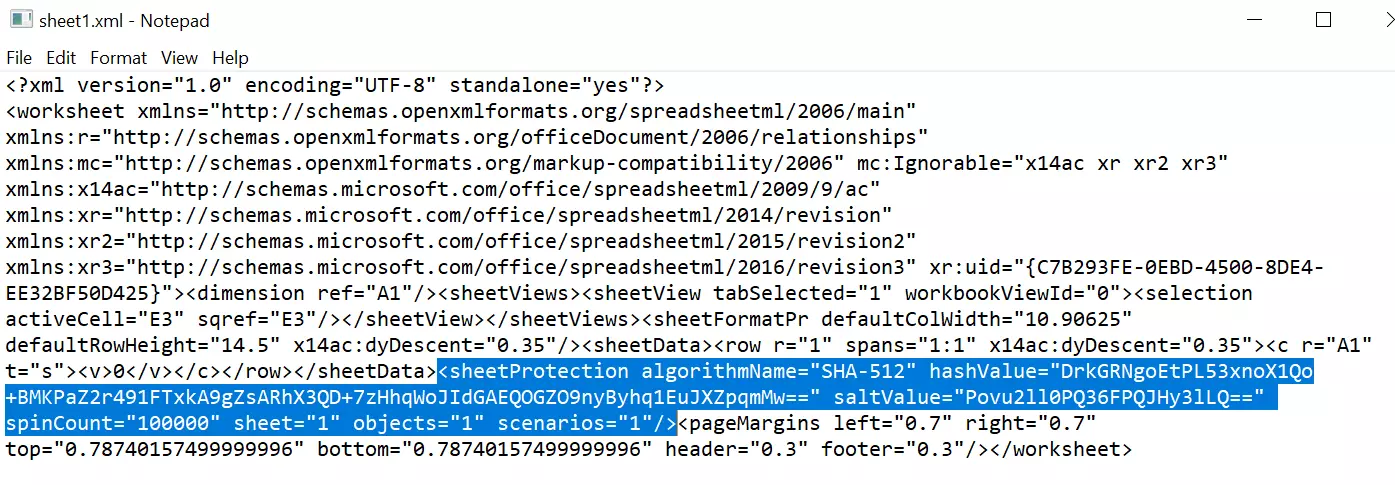
This XML entry represents the sheet protection.
Step 7: Delete the entry you have selected, starting from <sheetProtection all the way up to the next />. Be careful not to delete anything else so as not to damage the structure of the XML file.
Step 8: Close the text editor. To save the changes, you need to confirm them. Since you opened the file in 7-Zip, 7-Zip will now ask: ‘The file sheet1.xml has been changed. Should it be updated in the archive?’ Confirm the changes so that they are applied to the Excel file and close 7-Zip.
Result: You can now open the modified copy of the file in Excel. You will find that the sheet protection has been removed and the worksheet can now be edited again.
While this method lets you remove Excel sheet protection, you cannot find out which password was previously used. As shown in the text editor, the password is stored internally using hash values, making it impossible to be worked out.
Changing an Office file’s source code should only be attempted as a last resort. It is important to create backup copies in case the file is destroyed. Even if, at first glance, the change was successful, it is best not to continue using the Excel file in question, but to set it up again if necessary. Please also remember that you are liable for any damage that results from changes you have made to the source code.

