How to insert a picture in an Excel cell
Excel is an important and helpful program that you can use to list complicated information in a clear and organised table. If you want to insert a picture in Excel, size and line spacing can cause problems. In this article, you’ll learn how to insert a picture in Excel and how to lock it to a cell.
- Up to 50 GB Exchange email account
- Outlook Web App and collaboration tools
- Expert support & setup service
Why does a picture move about in Excel?
Would you like to make a table more interesting by adding an image? Or perhaps a chart or graph is essential to understanding your table? With Excel, you can integrate pictures into your document. However, once the picture has been integrated, it often does not stay in its intended place. As soon as you insert lines or reorganise the table, the inserted picture may move and then have to be repositioned manually. By taking the right steps beforehand, you can prevent this problem from happening and ensure that all your pictures stay in the right place.
How to insert an image in Excel
First, select the picture that you want to use and save it. Then proceed as follows if you have Excel version 2016 or later:
- Open the Excel document you want to insert the image into.
- Click on the Insert tab and select Illustrations.
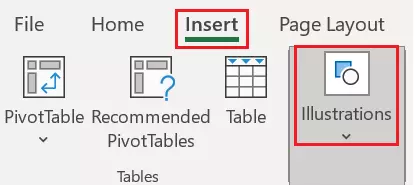
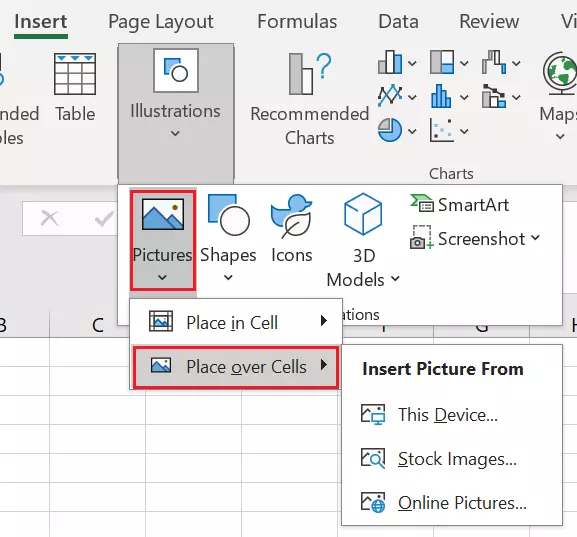
- Click on Pictures and click on the option Place over Cells. Search for the picture that you want to insert. Alternatively, you can search for the picture in Explorer or Finder and copy it using the right-click context menu or a [Ctrl] key shortcut (for Mac users, the Command key) and then inserting it in the Excel document. It is also possible to insert images using the drag-and-drop feature.
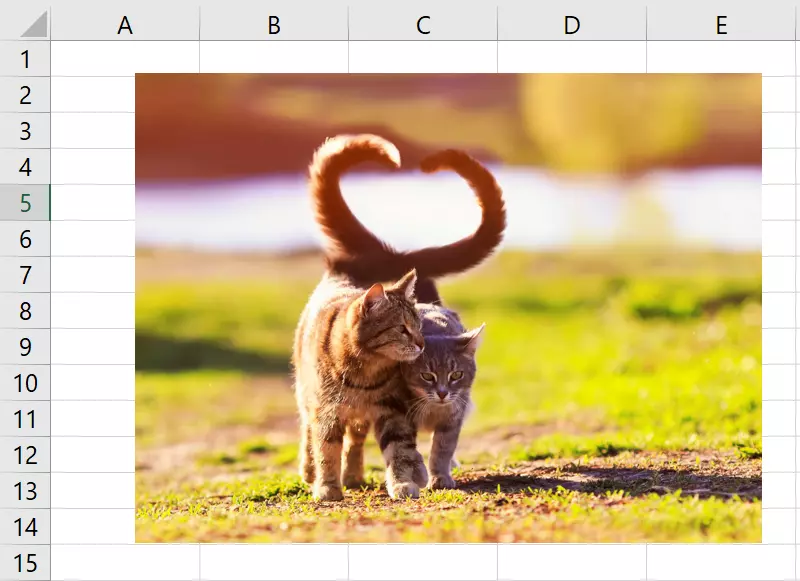
The corresponding picture is now in the table, but it is neither the right size nor in the right place.
With Microsoft 365, you can use the latest versions of Excel, Word and all other Office applications on up to five different devices. 1 TB cloud storage provides the space you need for all your documents.
- Up to 50 GB Exchange email account
- Outlook Web App and collaboration tools
- Expert support & setup service
How to position a picture in Excel
Now, we’ll position the picture and make sure that it fits into the table well. To do this, click on the picture and drag the corners until it fits into the cell that you want it to. If you want to keep the picture in its original size, change the size of the lines and columns instead. You can also move and adjust the picture as you like. If you keep the [Alt] button pressed during the positioning, the picture will automatically be aligned with the table lines and will stop hovering over the table.

How to lock the picture to a cell in Excel
Although you can now insert a picture in Excel, the problem of it moving still remains.
- Right-click on the picture and select the Size and Properties option from the context menu.
- Here you will find the Properties tab.
- In this tab, there is the option Move and size with cells. Select this option.
Now, if you make any modifications to the table, the picture and cell will remain locked to each other. If you change the size of the cell, for example, the picture will change with it. If you do not want this to happen, select the option Move but don’t size with cells. With this option, the picture in Excel is locked to the cell position but will not be affected by any changes made to the size of the cell. The third option, Don’t move or size with cells, means that the picture will not be locked to a cell.
You can also insert your Excel image directly within a cell by selecting the Place in Cell option instead of the Place above Cells option when selecting the image.

If you want to save Excel documents in a central and secure location, HiDrive cloud storage is the best option. With it, you can share and edit your documents online in a secure cloud.
Free or locked picture? You can choose!
You can insert a picture in Excel and choose whether it should be locked or movable. The modifications in Excel will be retained, even if you convert the document from Excel to PDF. Most Excel alternatives also give you the option to insert the picture in a cell and lock it.
If you would like to learn about more helpful Excel tips, why not take a look at our other articles on Excel:

