Inserting, editing and deleting comments in Word
If somebody has given you a Word document to read through and you don’t want to give your feedback via email or in person, comments are an obvious and practical solution. The built-in comment function lets you add notes to the Word file directly without having to create a separate document containing your thoughts and suggestions. Other users can then either reply directly to your comments in the document, or edit or delete them as necessary.
If more than one person inserts comments in a Word document, the various user names or user codes are shown in different colours so you can see who has written each comment. Every comment also has a time stamp indicating when it was inserted.
Read on to find out how to insert comments in Word, and how to edit or delete comments after reading them.
Inserting comments in Word: a step-by-step guide
The Word comment function is activated by default, so it is there for you to use whenever you want to add notes for another reader of the document. Once you’ve found a term or passage that you want to comment on, the first thing to do is select the corresponding word or words. If you don’t select any text, Word will automatically insert the comment wherever the cursor is positioned.
Now go to the “Insert” tab and click on “Comment” in the ribbon:
Word now displays the comment – or rather, the empty comment field – in a separate section to the right of the document. This is where you are going to add your comment. If you can only see a small speech bubble symbol, left-click on it to open the comment field. Alternatively, you can display the side panel (which is hidden in this view) by opening the “Review” tab and then doing either of the following steps:
- Go to the “Comments” part of the ribbon and click on “Show comments”.
- In the “Tracking” part of the ribbon, select “All Markup” in the first drop-down box.
When you add a comment, the text you selected will be given a coloured background to make it easier for readers to see the context:
Editing comments in Word
A Word comment can be edited in different ways depending on whether you inserted it yourself or whether it appears in a document created by somebody else (in which case you must have the necessary access rights).
For example, you can change the text in a comment by clicking on the comment and making the necessary changes.
However, if you want to keep the original text and add a further comment, you should use the ‘Reply’ function instead. To do this, right-click on the comment and select “Reply To Comment” in the context menu. In some versions of Word there is also a “Reply” button on the comment itself:
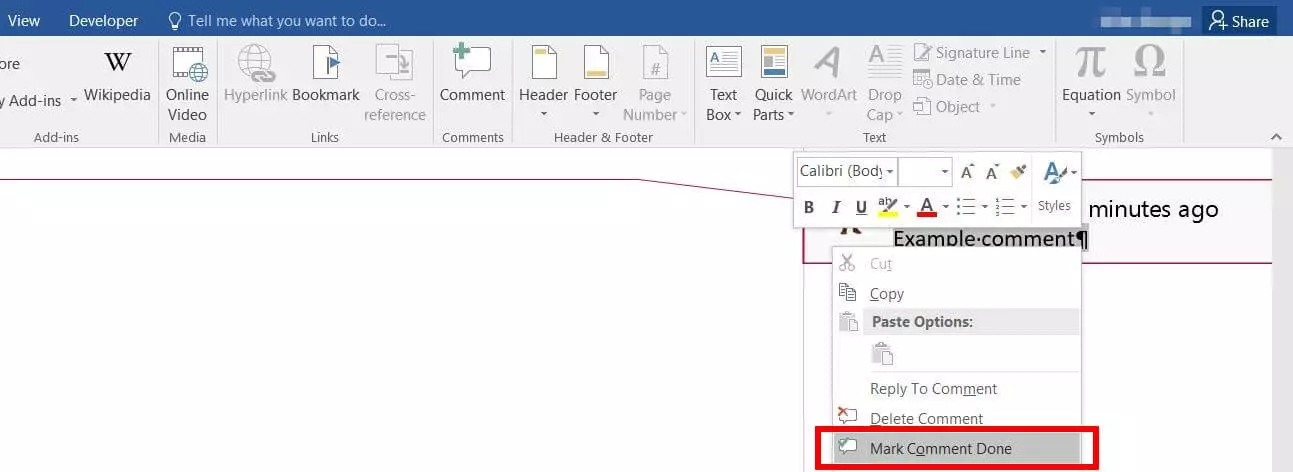
Finally, you can also mark a previously inserted comment as ‘done’ (or ‘resolved’) to make it clear that you have taken it into account. To do this, proceed as before by right-clicking on the comment to open the context menu. This time, select “Mark Comment Done”. You will see that the comment is now greyed out.
In some versions of Word, the context menu says “Resolve Comment” instead of “Mark Comment Done”, and there is a “Resolve” button on the comment itself which does the same thing.
Deleting comments in Word
If simply hiding or resolving comments isn’t sufficient, for example because you want to make the document easier to read, or need to hand it over to a customer, you can also delete comments whenever you want. As soon as you delete a comment, both the comment itself and the corresponding coloured highlighting disappear from the document. To delete a comment, right-click on it and select “Delete Comment” from the menu.


