How to set up WordPress redirects
Websites are hardly static, but tend to change for different reasons. For your content to always remain accessible, or visitors not ending up on an empty page and search engines not ignoring you by mistake, a domain redirect in WordPress is vital. Find out how to redirect a page in WordPress, which options are available, and why redirects are important.
- Free website protection with SSL Wildcard included
- Free private registration for greater privacy
- Free 2 GB email account
Why are WordPress redirects important?
The simplest way to explain just how important a redirect in WordPress can be is to show what would happen without it. If a page or post is no longer online and a user clicks on the corresponding URL or a link, they will land on an error page. This leaves the impression that a website owner is unprofessional and results in higher bounce rates. Pages that cannot be found also have a negative effect on search engine ranking.
Your dream domain awaits! Register your desired domain quick and easy with IONOS. Wildcard SSL, domain lock, and 2GB email are included.
WordPress 301 redirect
The solution is a 301 redirect for your WordPress site. If a redirect is set up for a page that has either been deleted or moved, the server sends the browser the HTTP status code 301, which causes a new, previously specified page to be displayed. This new page is either the relevant post under a new URL, a similar article, an article overview, or the homepage of your website. The redirects help users find the desired page or stay on your website.
When do you need a redirect in WordPress?
There are several scenarios when a redirect becomes necessary in WordPress. On the one hand, it’s useful when pages are outdated, redundant and thus are deleted. A user who searches for a URL, should not land on an error page. Where content is current, but the respective post has been moved to a new URL, a WordPress redirect becomes all the more important. This commonly occurs after you restructure your website or change the WordPress domain. In that case, redirection helps users find the post they are looking for.
But even when a page has neither been deleted nor migrated, sometimes a WordPress redirect is necessary. Namely, if you purchase a SSL certificate and switch your website from HTTP to HTTPS the old URL will no longer be accessible. In order for the content to remain accessible, a redirect to the new WordPress site must occur. The conversion to HTTPS in WordPress is recommended for all website owners, because the certificate boosts security for visitors and can have a positive effect on your search engine ranking.
More security for your website: a SSL certificate from IONOS provides optimal protection and improves your Google ranking. Conveniently choose the one that suits you best!
How to manually set up a redirect in WordPress
You have several options to create a WordPress redirect. The most direct option is via the .htaccess file. In principle, this method is not difficult, but you should create a backup first. Since you’re about to modify your website code, any error could result in limited access to your site. Once you have created a backup, the next steps are as follows:
- First log in to your web server via FTP.
- Open the .htaccess file in the root directory of the WordPress installation. If you cannot find the file, select the ‘show hidden files’ option.
- If you want to redirect the entire domain, e.g. because you’ve swapped to a new URL, enter the following code in the .htaccess file. This will automatically redirect all subpages to the new domain.
RewriteEngine On
RewriteBase /
RewriteCond %{HTTP_HOST} ^(www\.)?old-website\.com$ [NC]
RewriteRule ^(.*)$ http://www.new-website.com/$1 [R=301,L]
A 301 redirect for a specific WordPress article works in a similar manner. The code is as follows:
redirect /old-content https://new-website.com/new-content- Stress-free, no matter your skill level with easy AI tools
- Full customisation with themes and plugins
- Hassle-free updates and less admin
Setting up a WordPress redirect with a plugin
However, if you have no experience with page code or prefer not to take any risks, you can use a plugin for a WordPress redirect. The simple user interface not only ensures that you can create the redirect to the new WordPress site in just a few clicks, but also helps to prevent errors. Two popular and recommended plugins are Redirection and Simple 301 Redirects. Below we explain how they work, step by step.
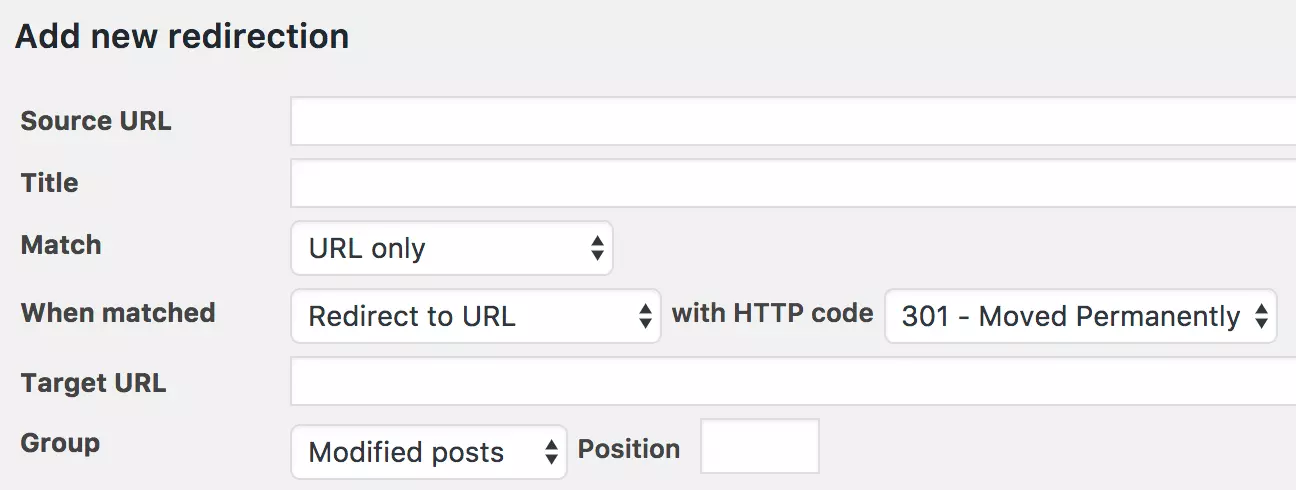
Redirection
- First install the WordPress plugin for redirecting and activate it.
- You can find the plugin in the dashboard under ‘Tools’ and ‘Redirection’.
- To redirect to a new WordPress site, enter the old site under ‘Source URL’ and then enter the new site in ‘Target URL’.
- Now click ‘Add redirection’. If a user heads to the old URL, they will automatically be redirected to the new page, an article overview, or your homepage, depending on which redirection you have set up.
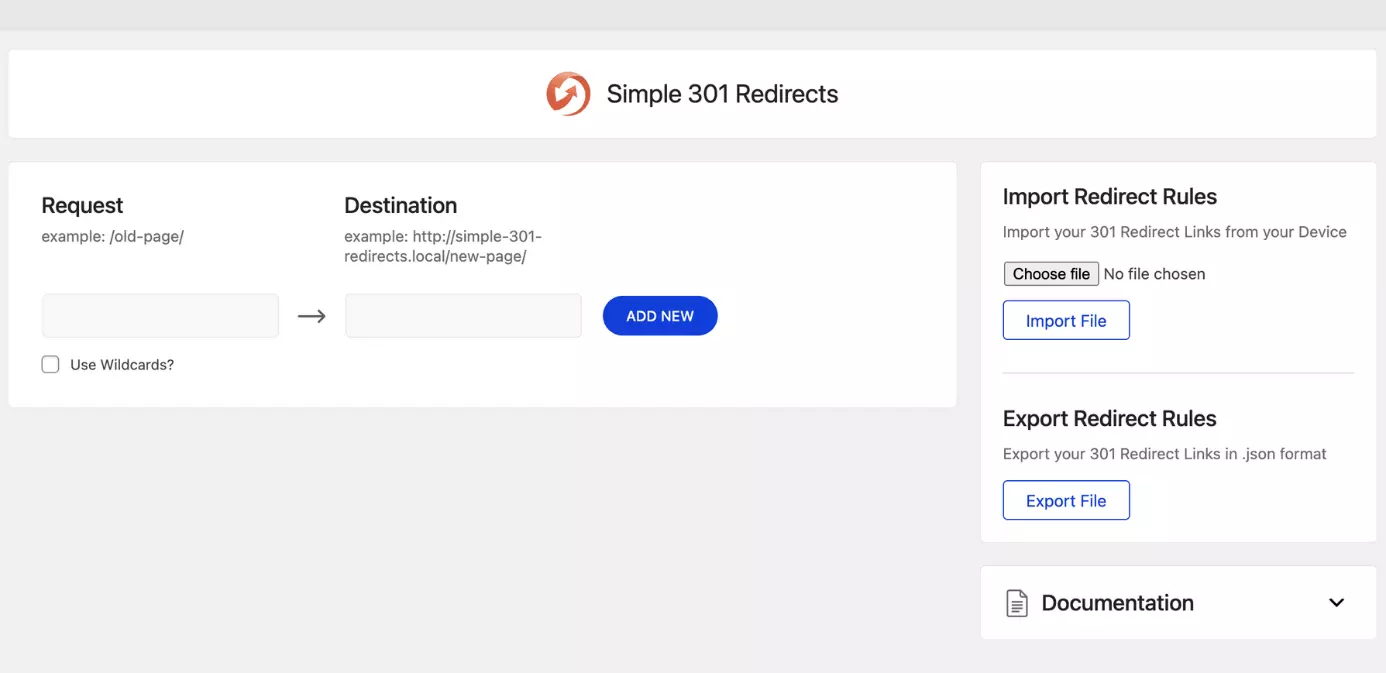
Simple 301 Redirects
- Once again, first install and activate the Simple 301 Redirects WordPress plugin.
- You can find the plugin in ‘Settings’ and ‘301 Redirects’.
- The plugin provides two input options. Under ‘Request’ you enter the old URL, under ‘Destination’ the new one. Importantly, enter the relative URL without the domain in ‘Request’. So instead of https://old-website.com/old-content simply enter /old-content.
- If you have set up a redirect, an additional line will automatically appear so that you can create as many redirects to new WordPress pages as you want.
Conclusion: WordPress redirects are a must have
To maintain a professional web appearance, there’s no way of avoiding a WordPress redirect. After all, you want your old content to be accessible when swapping to a new domain. The easiest way to redirect for WordPress is a plugin. Using popular plugins is very intuitive, and multiple redirects are created quickly and easily.
How to get started on WordPress with ease? WordPress Hosting from IONOS has plenty of benefits. Secure up to three domains free of charge, benefit from built-in security features and choose from different plans that suit your online presence!


