How to set the best WordPress image size for quick loading
The content management system WordPress offers the possibility to use individual image formats in addition to standard image sizes. We present important steps to customised image sizes, based on WordPress 6.0.3.
The default image sizes in WordPress
The file size of images embedded on a website has a great impact on its loading speed. Optimal image formats shorten the loading time and reduce the memory load on the server. The WordPress CMS offers a set of standardised image sizes on the server when uploading media.
| WordPress standard image sizes | Size (L x H) in pixels | Aspect ratio |
|---|---|---|
| Preview images | 150 x 150 | Can be deactivated |
| Medium | 300 x 300 | Retained |
| Large | 1024 x 1024 | Retained |
| Original image | As uploaded | Retained |
Let your name do the talking. Have it your way with domain registration.
Save WordPress images in the backend and adjust sizes
These image sizes are defined in the WordPress settings and can be adjusted there within certain limits. To do this, go to ‘Settings’ > ‘Media’ in the backend.
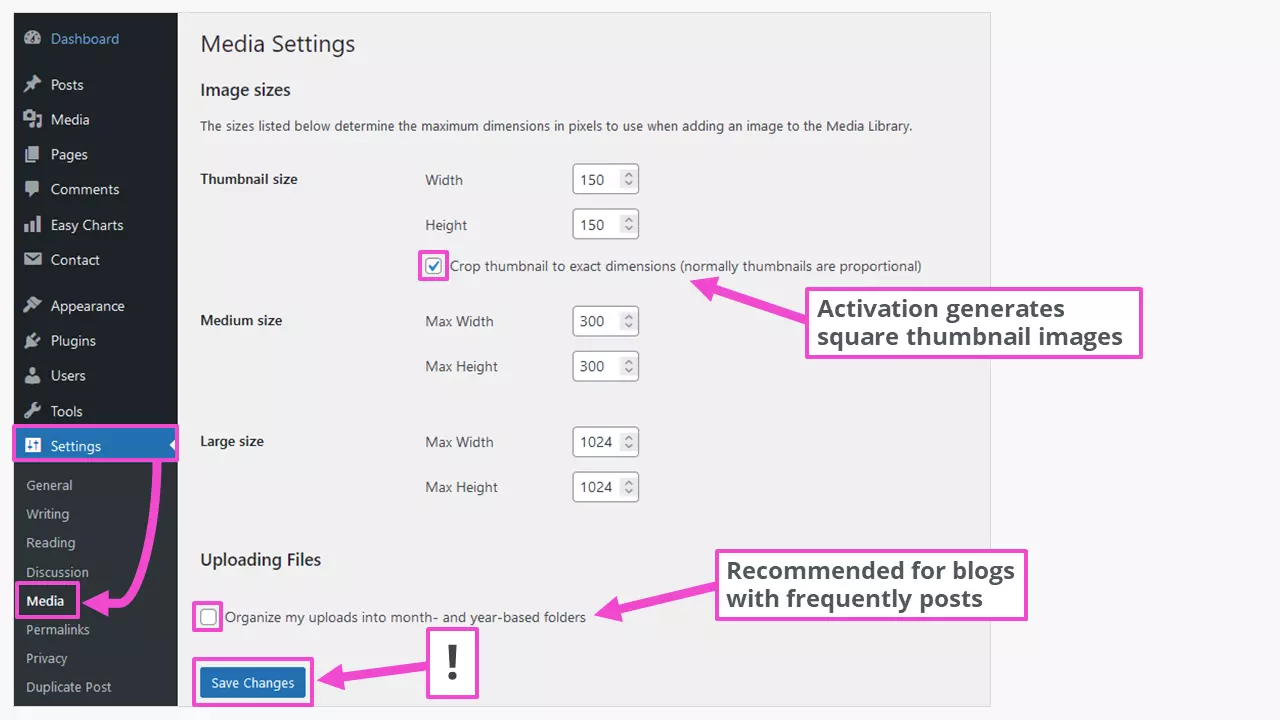
After the media upload, there are additional files in the media library. The directory for this is https://mydomain.com/wp-content/uploads/ or https://mydomain.com/wp-content/uploads/2022/11/ (if month- and year-based folders are enabled). For example, an image is in the following files:
- sample-image-1024x683.jpg
- sample-image-150x150.jpg
- sample-image-1536x1024.jpg
- sample-image-2048x1365.jpg
- sample-image-300x200.jpg
- sample-image-620x413.jpg
- sample-picture-scaled.jpg (2.560 x 1.707 px)
- sampleimage.jpg (the original)
This provides the best image sizes for most WordPress pages or posts. Images for upload to the media library should not be larger than 1,920 pixels at the long edge of the image. They can be resized before uploading with free image editing programs to avoid unpleasant surprises. That applies to WebP image format, which is not natively supported by all browsers.
These are the recommended image sizes for use in WordPress themes:
| WordPress image sizes | Size (L x H) in pixels |
|---|---|
| Logos | 200 x 100 |
| Preview images | 150 x 150 |
| Background images | 1920 x 1080 |
| Post images in portrait format | 900 x 1200 |
| Post images in landscape format | 1200 x 900 |
| Header images (banner) | 1048 x 250 |
| Slider images (theme dependent) | Up to 1920 x ca. 600 |
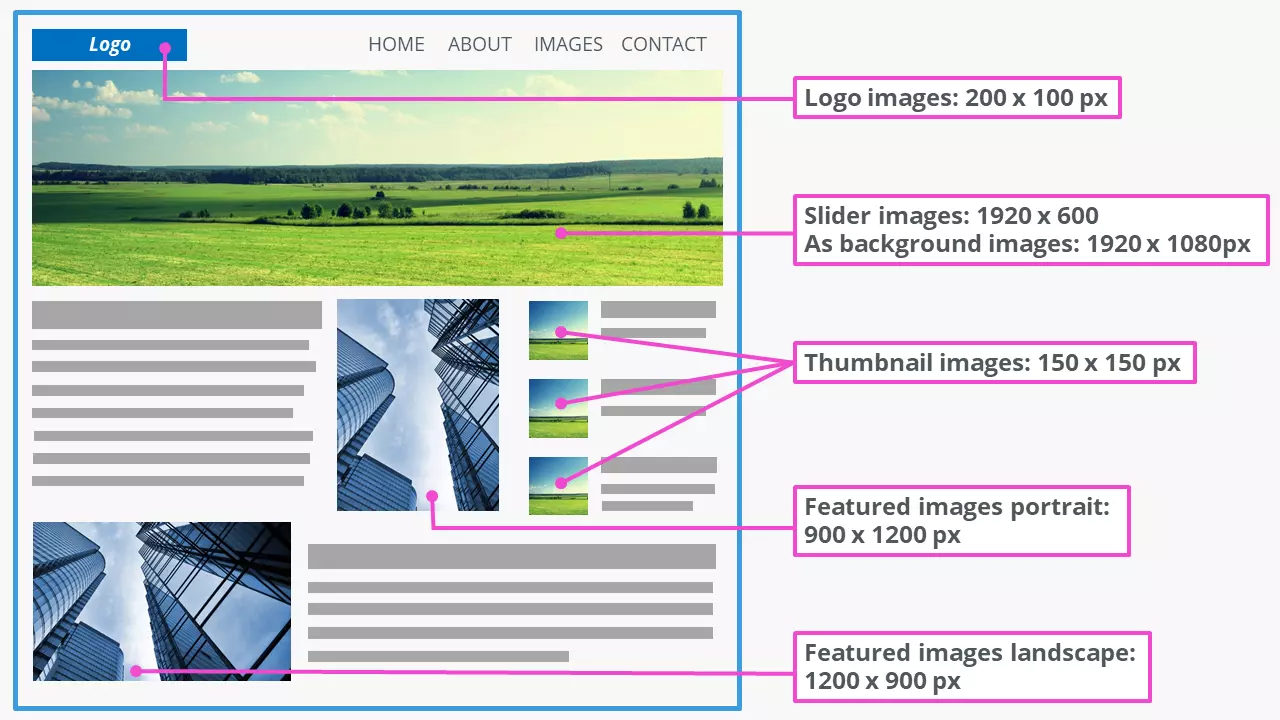
The concrete required image dimensions depend on the components and structure of a WordPress theme. They can be found in the documentation of the respective theme.
Resize images in the WordPress media library
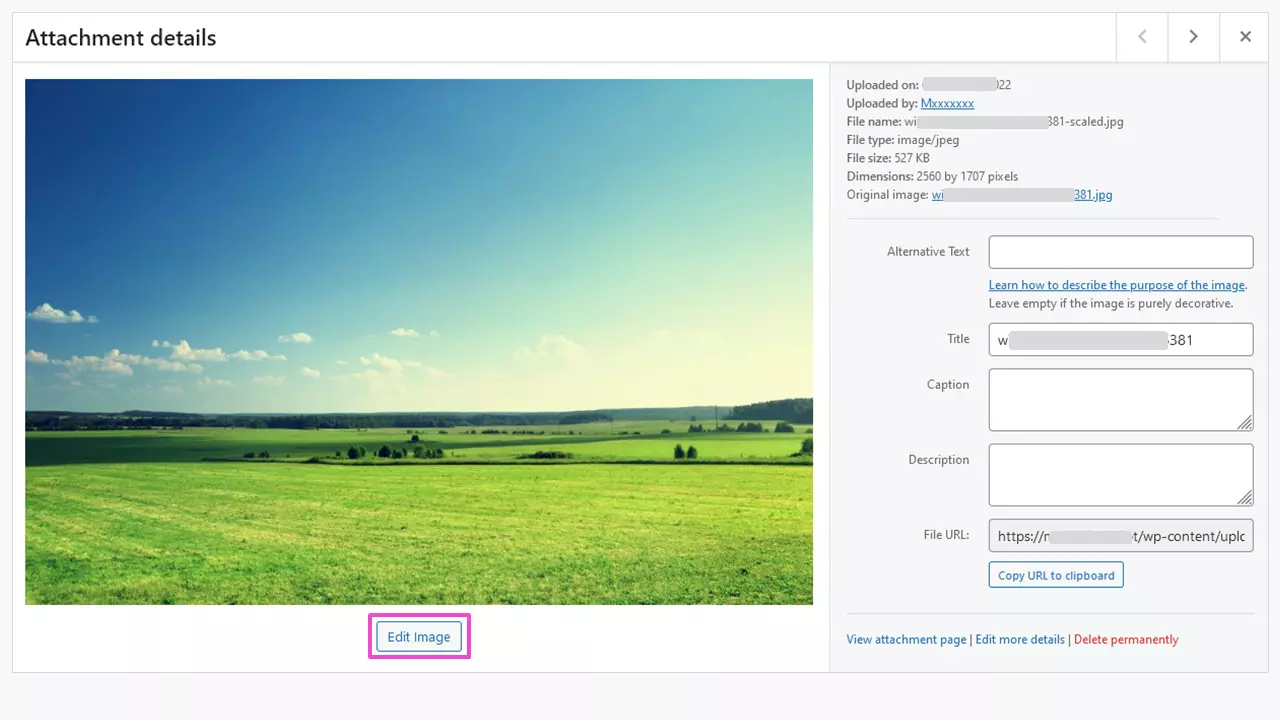
WordPress image sizes can also be adjusted. Besides changing the original image dimensions, cropping, rotating and flipping are possible. For example, to create a slider photo from an image with larger dimensions in the media library, proceed as follows:
Step 1: Select image in the media library and click ‘Edit image’
Step 2: Set editing method and size
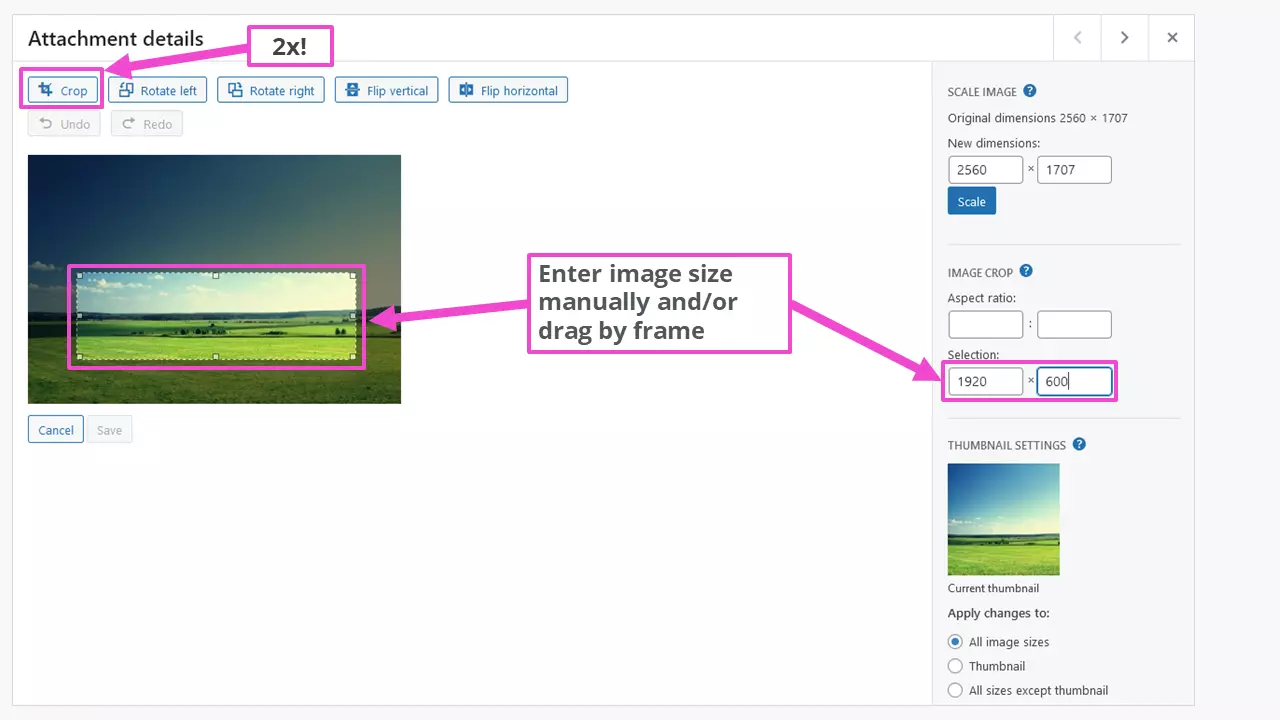
It is worth noting that the crop button must be used twice: once to activate the function and then a second time after setting the image dimensions to perform the operation.
Want to store files as safely as possible? Use HiDrive Cloud storage. You can rest assured your data is safely stored to UK GDPR compliant standards.
Step 3: Save image to media library
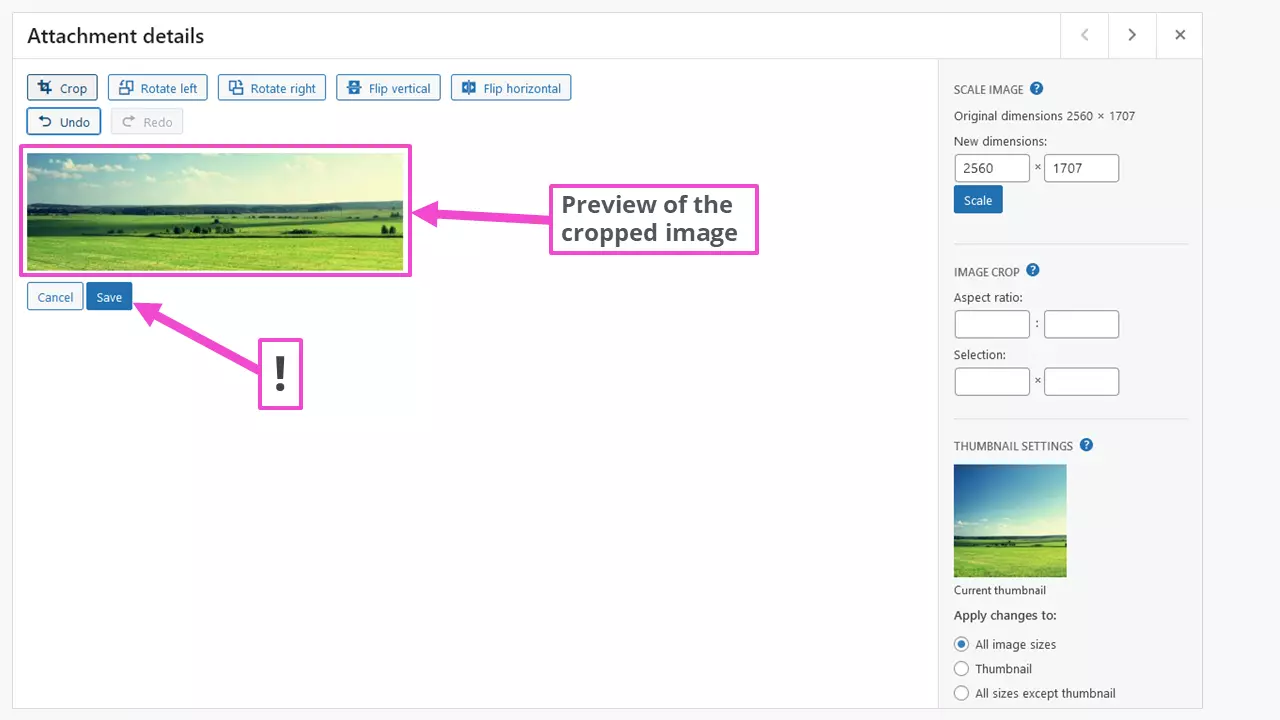
After saving the scaled image, the upload folder contains the file
- preview-image-scaled-e1667121439976.jpg
in another five formats with the automatically assigned ID …-e1667121439976. The newly created image sizes can be selected from the media library in the Gutenberg editor when inserting or exchanging them. The pixel dimensions of the image are then also available there.
If your chosen WordPress theme doesn’t offer sliders, you can take a look at the range of WordPress slider plugins.
Adjust image size when inserting into the WordPress content
The images from the WordPress media library are inserted into the content. This enables sizes to be adjusted afterwards within broad limits. The WordPress Gutenberg editor offers much more extensive possibilities compared to the classic editor TinyMCE.
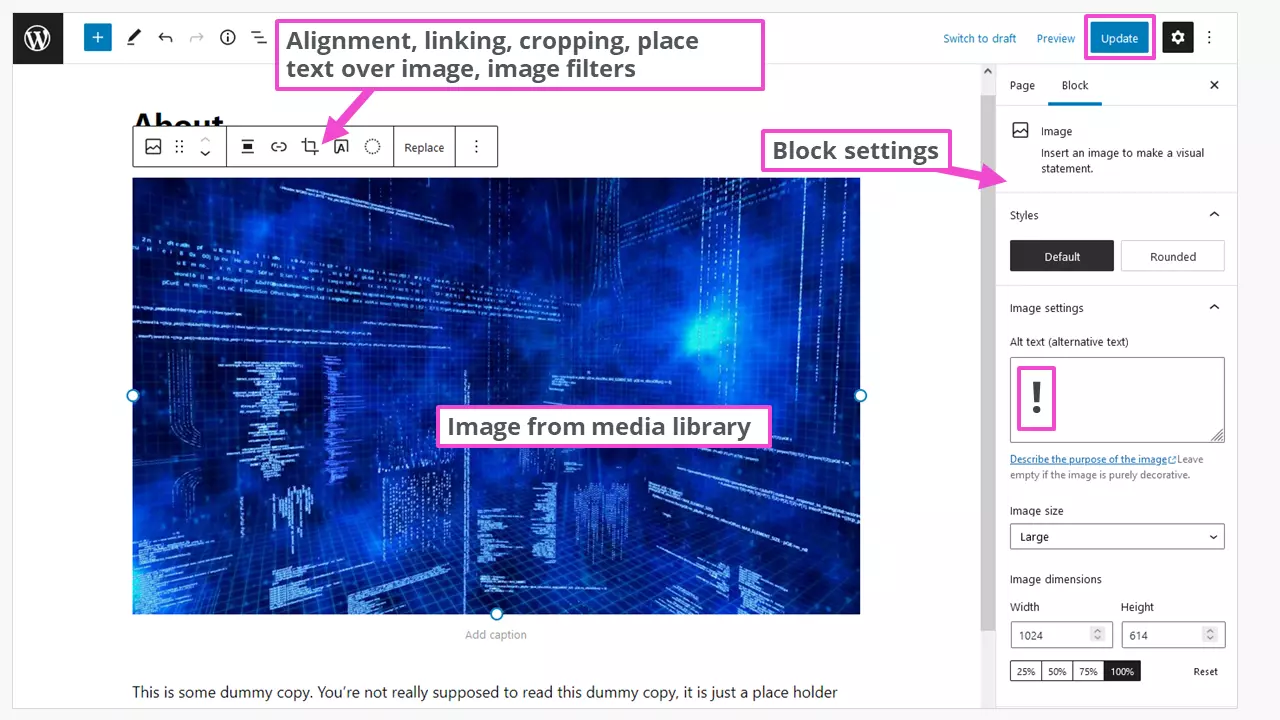
If you want to save your custom settings for later reuse, you can use the Gutenberg ‘Add to reusable blocks’ section and also lock it against accidental modification. This is a huge labour saver if you frequently publish new posts.
For profession-specific sites, such as a photographer’s website, additional image formats may be needed to perfectly represent your vision. Our guide ‘compress images’ gives further help to adjust image sizes, e.g. for WordPress gallery plugins.
WordPress lazy loading is another way to improve website loading times. In this case, images are loaded only when they enter the visible area while scrolling the web page.
Disable WordPress default sizes for images
The easiest way to disable the default image sizes is to use the ‘Disable Media Sizes’ plugin. In its settings, all seven generated image formats are also listed.
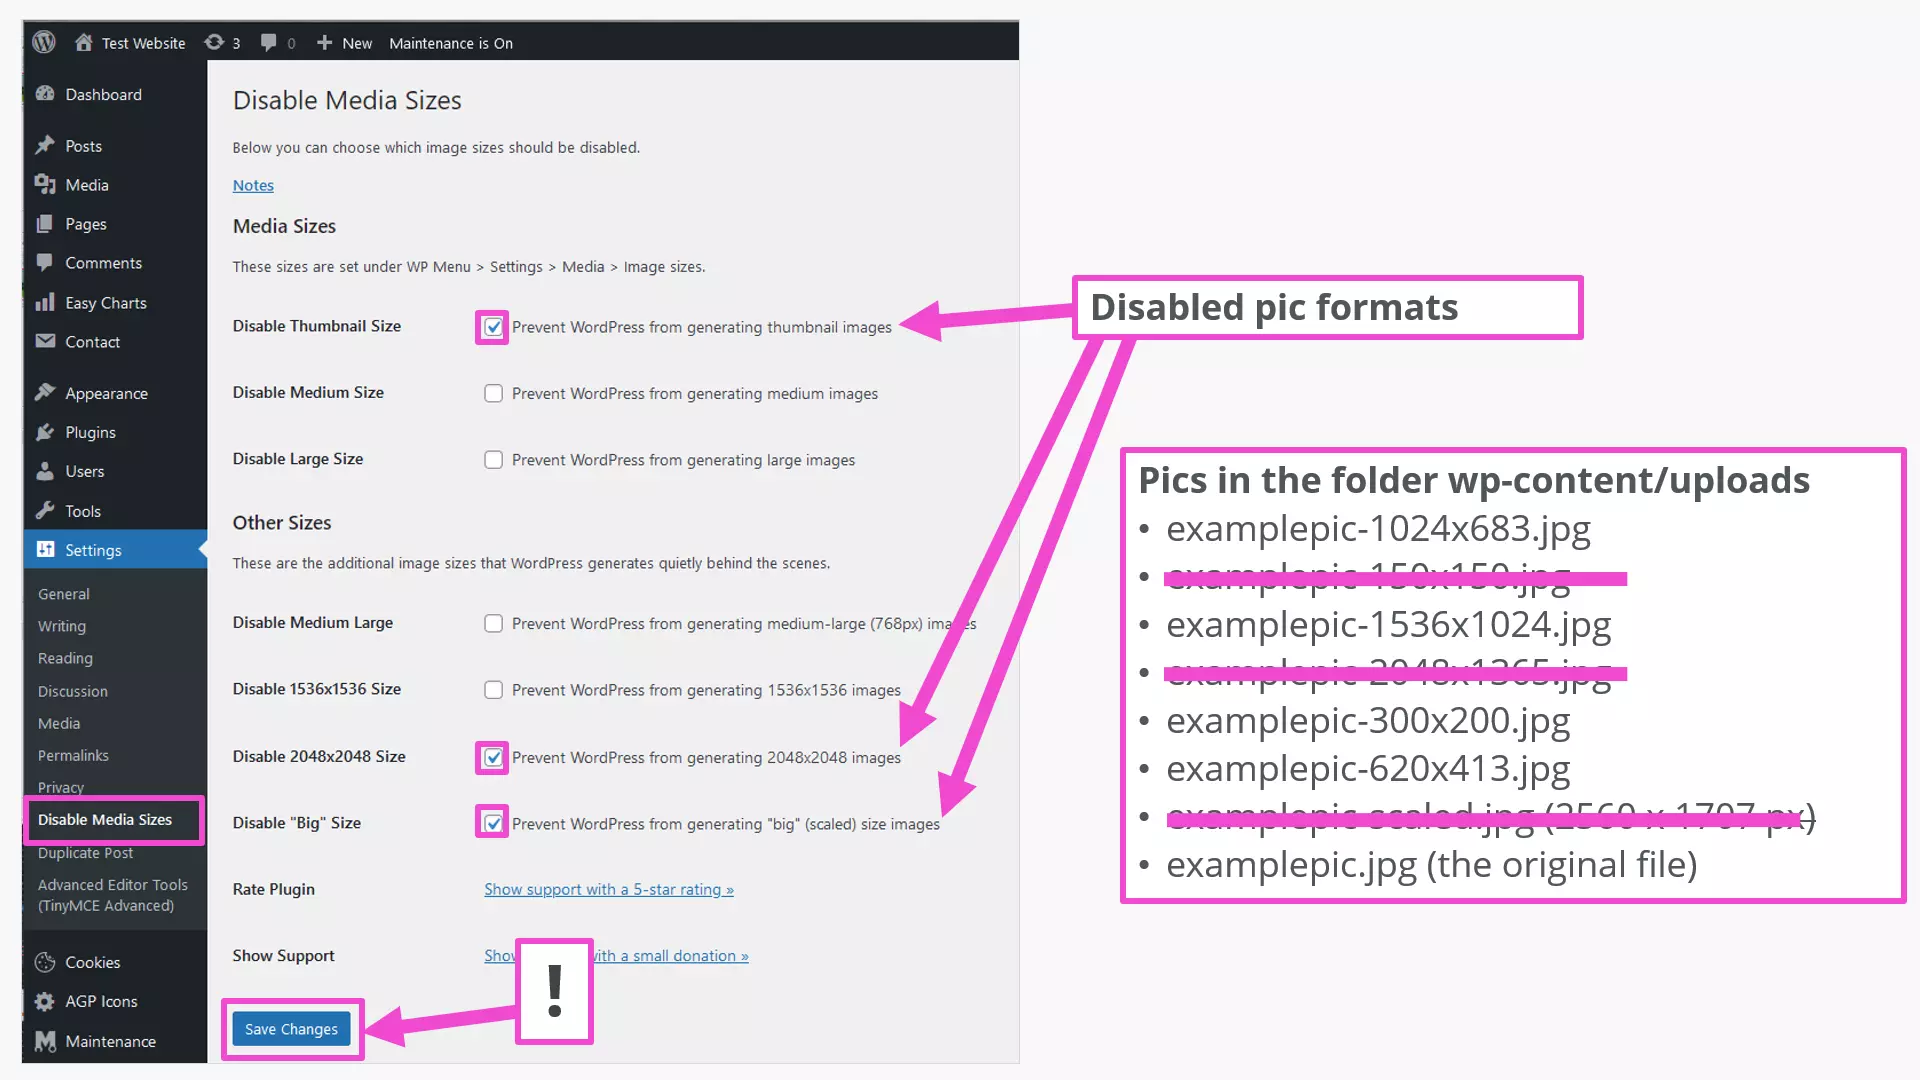
With the plugin settings shown, the deselected formats are not generated at all. The upload of the original image cannot be ‘switched off’. This is an advantage if you want to generate other formats later after all.
Adding further image formats or suppressing them is also possible with entries in the WordPress core files functions.php and index.php. However, this should be reserved for experienced programmers. A first overview of the programming language can be found in our PHP beginner tutorial.
Further optimise images for WordPress with plugins
In practice, images are mainly used as JPG and PNG. The file sizes of these image formats can be further adjusted with image editing programs. In Photoshop, there is a query for quality when saving or exporting. The disadvantage of this method is that each image must be ‘touched’ individually and then uploaded. Plug-ins are a more elegant solution. These often have a wide range of functions, so a close look at the documentation of the plugin used is advisable.
High installation numbers and good ratings have, for example, the following WordPress plugins for adjusting WordPress file and image sizes:
- EWWW Image Optimizer: Supports the formats: JPG, PNG, GIF, PDF, WebP, SVG
- TinyPNG: Supports JPG, PNG, WebP
- Imagify: Supports JPG, PNG, PDF, GIF, WebP
- Regenerate Thumbnails: not updated for some time now
- Image Regenerate & Select Crop: likewise
Remember before trying plugins: A WordPress backup protects against data loss if something really goes wrong.
Summary: Optimise WordPress image sizes
With the on-board tools of WordPress, many optimal image sizes can already be achieved. With plugins more extensive possibilities are available. The intervention in the PHP code of a WordPress site should be reserved for programming professionals. And finally: Keep the image SEO in mind when optimising.

