How to protect WordPress login with .htaccess
Learn how to effectively protect the administration area of your WordPress blog from hackers and brute force attacks with .htaccess directory protection.
You can improve the security of your website by activating password protection for the directory /wp-admin and thus for the file wp-login.php using a .htaccess file. Afterwards two different logins are necessary to call the WordPress-Admin.
- Stress-free, no matter your skill level with easy AI tools
- Full customisation with themes and plugins
- Hassle-free updates and less admin
What is a .htaccess file?
A .htaccess file is a configuration file that you can use to make directory-specific settings on a compatible web server (e.g. the Apache web server used in IONOS hosting). This includes the possibility of protecting directories on the web space with a password query.
To create a .htacces file, all you need is a text editor such as Notepad.
Enable directory protection for /wp-admin
When you log on to your dashboard, WordPress loads the required pages - or files - from the /wp-admin subdirectory. This is therefore the appropriate place to set up directory protection.
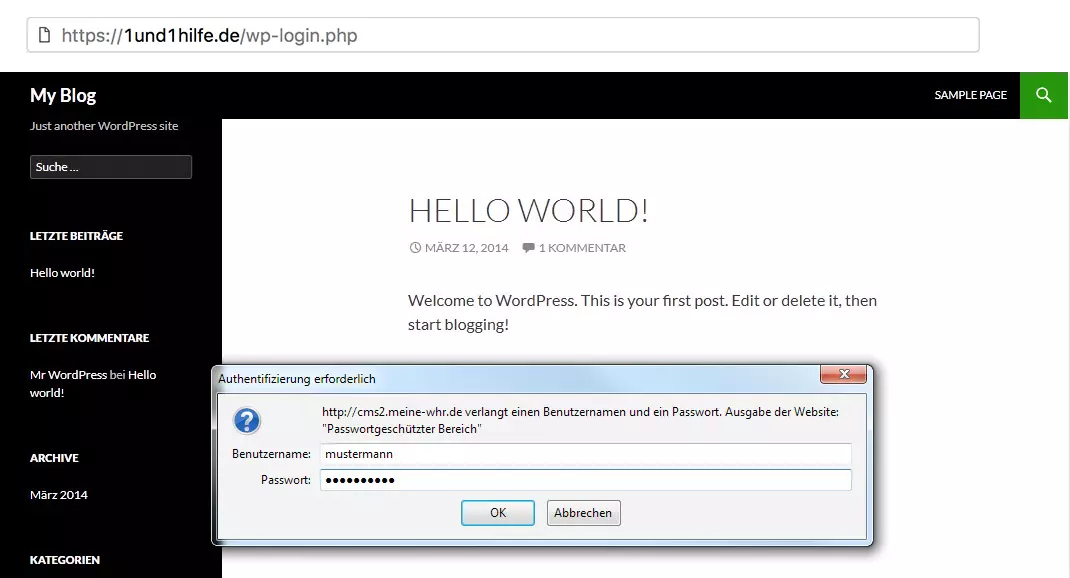
If directory protection is activated, an additional login window opens after clicking the login button, here's what it looks like:
Below you will learn how to set up this additional password protection for your WordPress blog.
Create the files .htaccess and .htpasswd
In addition to .htaccess, a file with the name .htpasswd is also required for the conversion. This contains the user name(s) and password. However, start by creating the .htaccess file first:
If you are already using a .htaccess file for the /wp-admin directory for other reasons, you would overwrite it later in this guide. However, you can simply download your previous .htaccess, add the new lines there, adjust them and then upload the file again.
Create .htaccess:
- Create a file called .htaccess (the dot is important!) locally on your PC using a text editor.
-
Copy the following lines of code into your .htaccess file:
AuthType Basic
AuthName "Protected Area"
AuthUserFile /homepages/xx/xxxxxxxxx/htdocs/[Ordner]/wp-admin/.htpasswd
require user [Username]
Enter path to WordPress installation
Now it is necessary to adapt the copied code to your WordPress installation:
- The character string /homepages/xx/xxxxxxxxxxx/htdocs/ is an example of the document root, i.e. the absolute path to your Internet presence (i.e. the top directory level). You can find it in your Control Panel.
- Replace [Folder] with the directory path where your WordPress installation is located. If you have installed your WordPress blog e.g. in a directory of the same name "wordpress", replace "[folder]" with wordpress. Pay attention to upper and lower case.
- Replace the text [Username] with any username, for example user, test or similar. You can also specify multiple names separated by spaces to allow multiple people access.
- You can replace the password-protected area text with any text, for example, Only for Insiders or similar.
The edited .htaccess could look like this:
Create .htpasswd
Create a new file on your PC called .htpasswd (don't forget the dot).
Enter the username(s) and password in the following form:
[Username]:[EncryptedPasswort]You can easily generate the encrypted password yourself online. Enter the search term "generate .htpasswd" into a search engine and tools and websites will be suggested to you with which you can quickly generate the encrypted password yourself.
If you set up multiple users, each user name must begin on a new line.
The following example contains the users user and test:
upload .htaccess and .htpasswd to webspace
After you have created and adjusted the .htaccess and .htpasswd, you have to upload them to the /wp-admin directory below your WordPress directory on the web space. The password protection is then immediately active.
Important: Upload these two files in ASCII (text) mode to the folders on your web space (an appropriate option should be included in your FTP program, if not, it will automatically be done correctly).
Uploading with FileZilla
In the following we will show you how to upload data to your webspace using the example of the FTP program FileZilla.
- Launch FileZilla.
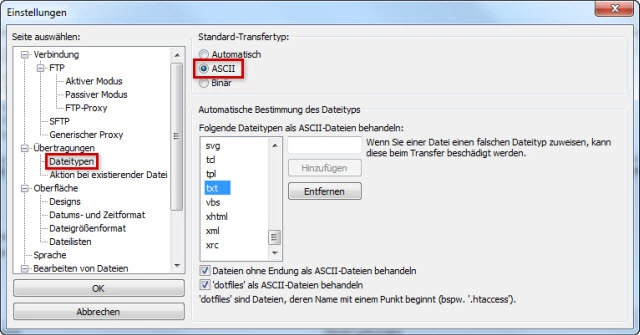
- Call up the settings there via Edit > Settings and set the default transfer type ASCII under Transfers > File Types. The file type txt is already preset for the file types.
- Establish an FTP connection to the web space:
- - Server: Automatically created IONOSsubdomain
- - Username: Your FTP username
- - Password: Your FTP password
- - Port: No specification necessary
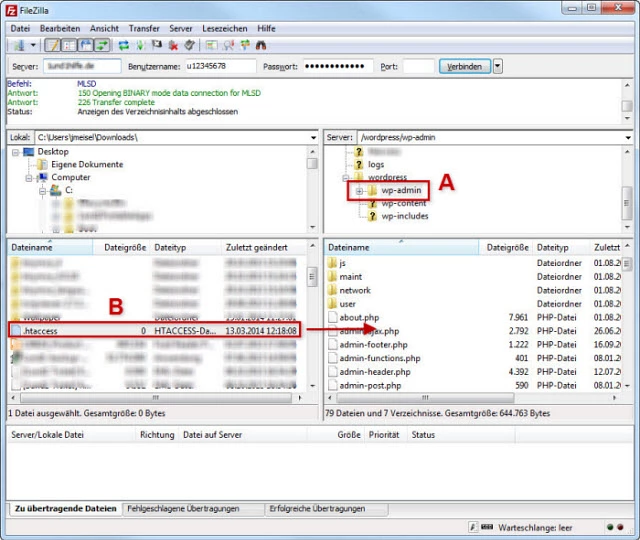
- Search and open the directory /wp-admin (A) on the webspace and copy the .haccess and . htpasswd files from your PC to the directory by dragging them with the mouse (B):
The password protection is then immediately active. If you want to disable this later, delete the .haccess and htpasswd files from the directory on your web space.
If the password protection does not work
If the password protection does not work, these are the most common sources of error:
- Is the file path to the ".htpasswd" file specified in the ".htaccess" file correct?
- Does the username(s) in the ".htaccess" and ".htpasswd files really match (case sensitive)?
- Have you also entered the password in the encrypted form (crypt) in the file .htpassd?
- Did you upload the files to the correct directory (/wp-admin)?
- Have you also entered the password in the most encrypted form in the .htpassd file?


