How to increase the WordPress upload size limit
WordPress’s file upload limit is usually 4 to 128 MB, which ensures server efficiency. This limit can be increased in different ways, however. You can contact your web hosting provider, adjust the configuration values in the wp-config.php or php.ini file, or choose one of the alternative options.
- Free website protection with SSL Wildcard included
- Free private registration for greater privacy
- Free 2 GB email account
WordPress upload limit: definition and scope
The WordPress upload limit is the maximum size of files you can upload to your WordPress website. It is usually between 4 and 128 MB (although this depends on the host). You can find the exact limit in the backend of your WordPress website. The reason for the upload limit is because when you try to upload files that are too big, it can cause the server to time out and in the worst-case crash. Therefore, its purpose is to preserve the site’s performance and prevent (cybercriminal) users from impairing it.
Do you want to launch a website? Take advantage of WordPress hosting from IONOS to start your professional website today — including a domain, SSL certificate, and even more.
When and why increase WordPress upload size?
It makes sense to increase the default upload size in WordPress if you want to upload files that are too large. This can happen when building websites that should have high-resolution photos, longer videos, etc. Photographers who plan to sell their photos online know how important it is to upload images in optimal quality.
Instructions: How to check and increase your WordPress upload limit size
Check WordPress upload limit
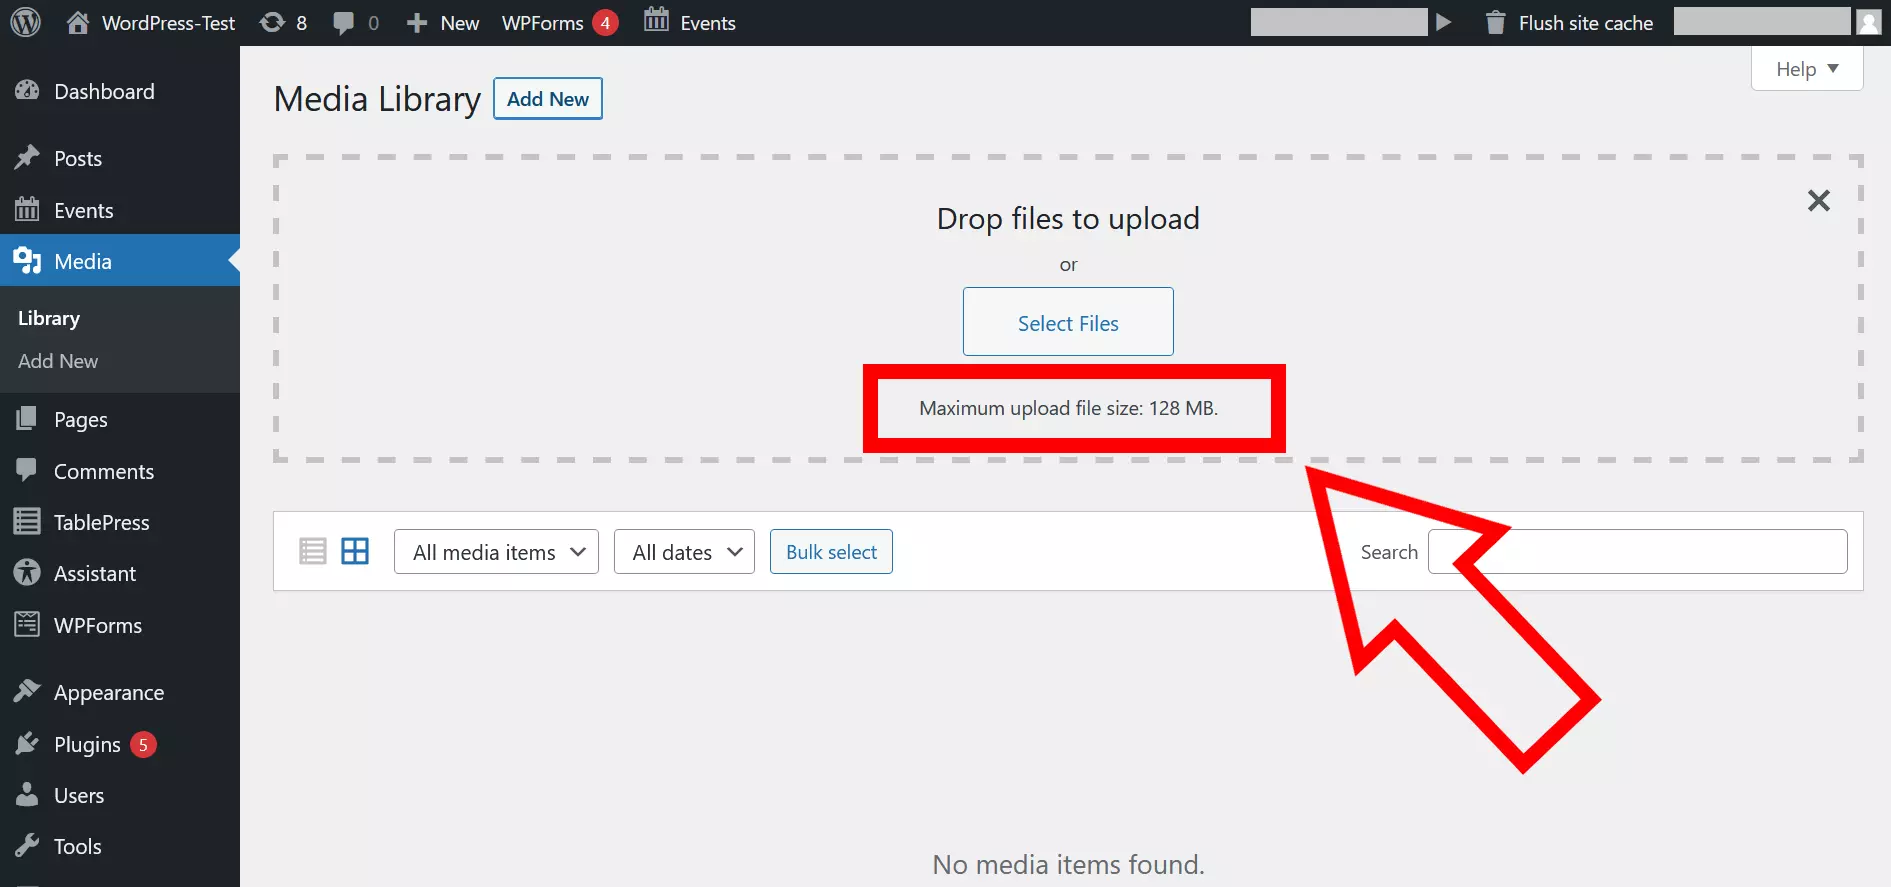
As mentioned, you can find out what the limit of uploadable files is in the WordPress backend. To do this, tap on ‘Media’ and ‘Add file’. Below the uploader, you’ll find the maximum file size for uploads. In our case this is 128 MB. If this is exceeded, then the following error message will be displayed: ‘[File name] exceeds the maximum upload limit for this site.’
Another way to check the WordPress upload limit is via ‘Tools’ and ‘Site Health’. There you will see all the important information listed in the report, including the maximum file size.
Register your domain at IONOS and benefit from various advantages such as 24/7 customer service and comprehensive SSL protection.
Increase the WordPress upload size
If you want to increase the WordPress upload size, you have several options to choose from, which we will present to you in detail:
- Contact the support of your web hosting provider
- Increase the upload limit for a WordPress multisite
- Edit the wp-config.php file
- Edit the php.ini file
- Access the PHP options in the cPanel
Contact the support of your web hosting provider
The simplest method that can be used to increase your WordPress upload size entails contacting your host. Depending on the provider, this can be done by phone, email, chat, or contact form. It is advisable to mention what your desired upload size is. Check the size of the files you want to upload so that you’ll know what limit to request. IONOS has all the contact information on its extensive contact page.
Increase the upload limit for a WordPress multisite
If you run a WordPress multisite, which is a network of various WordPress websites, then you can adjust the upload limit for the whole network. To do this, open the settings in your WordPress backend and access the network settings. Here you have the option ‘Maximum upload file size’ where you can enter your desired WordPress upload limit. Be sure to specify the value in kilobytes (e.g. 200000 KB would be 200 MB) and save your changes.
Are you not satisfied with your current web hosting provider? Then why not consider migrating your WordPress site? This can be performed either manually or with the help of a plugin. A WordPress domain migration can also be brought quickly underway.
Edit the wp-config.php file
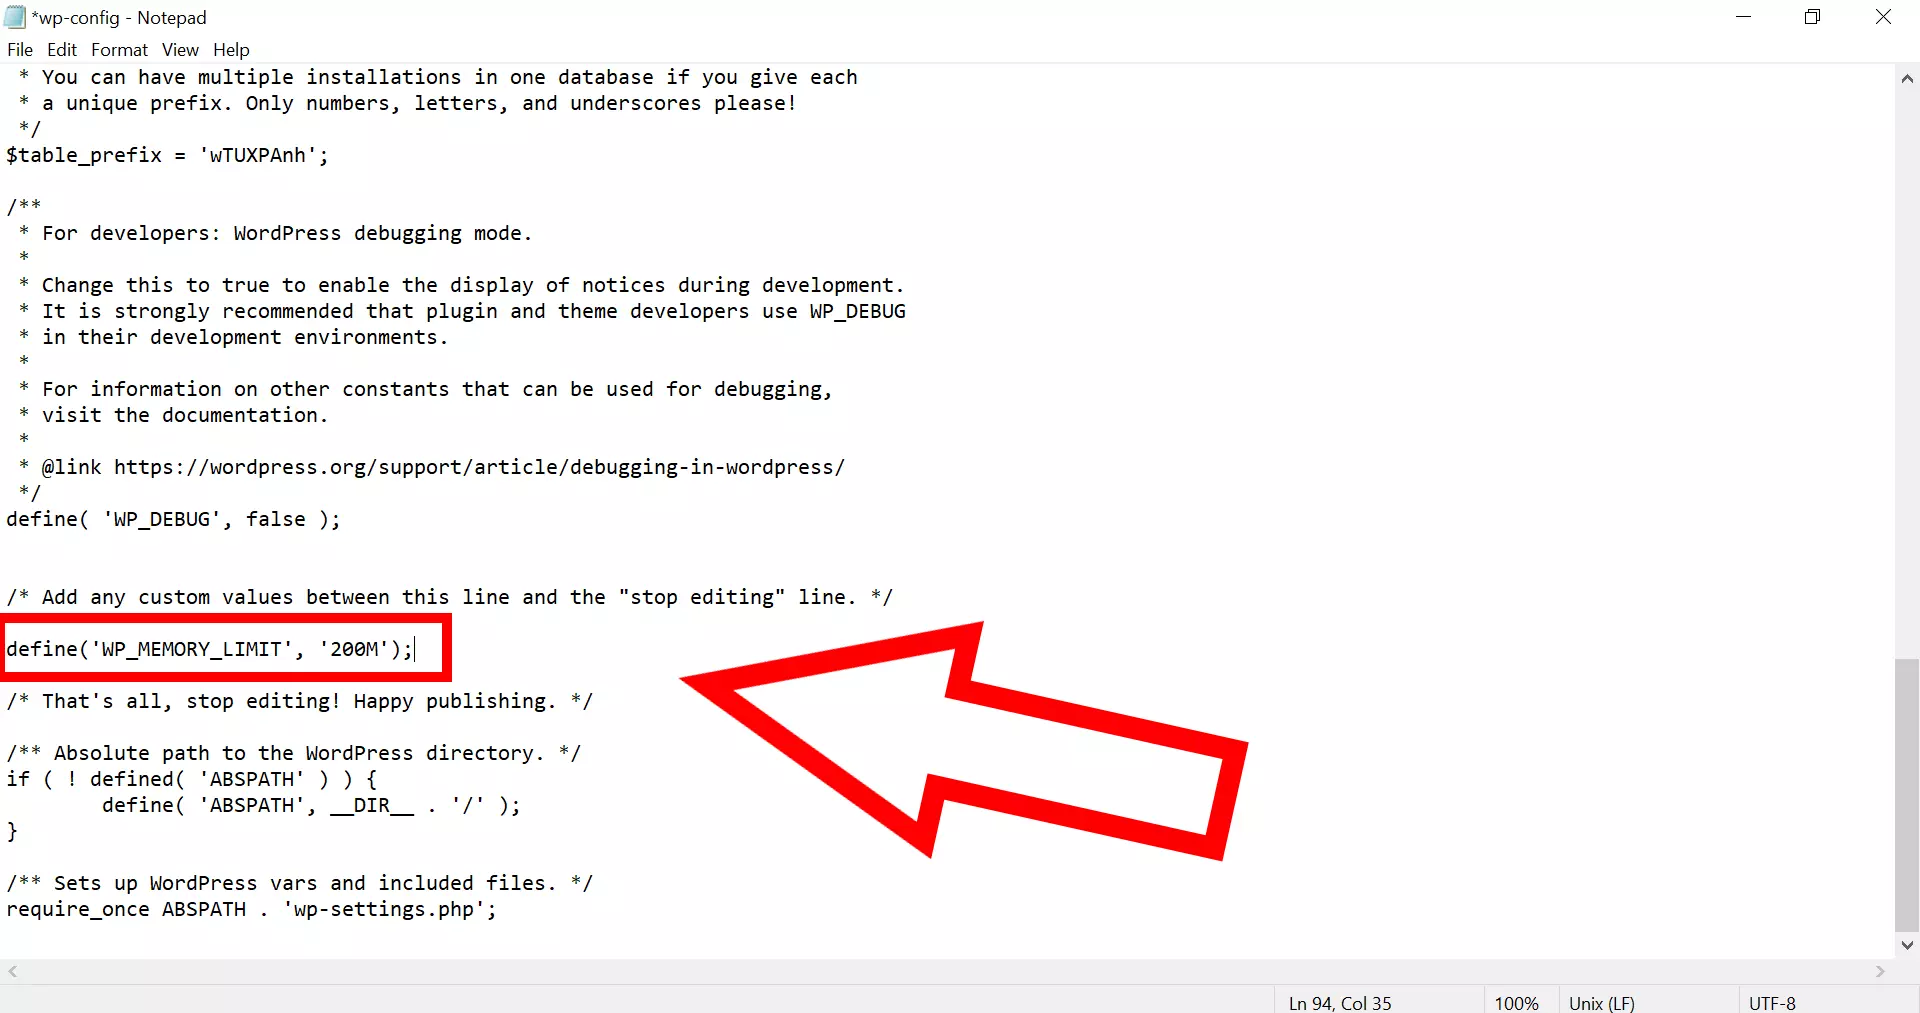
The WordPress upload limit can also be increased using the WordPress wp-config.php file. This file can be found in the main folder of your WordPress installation and is only accessible via FTP.
Enter the following code in the file:
define('WP_MEMORY_LIMIT', '200M');Edit the php.ini file
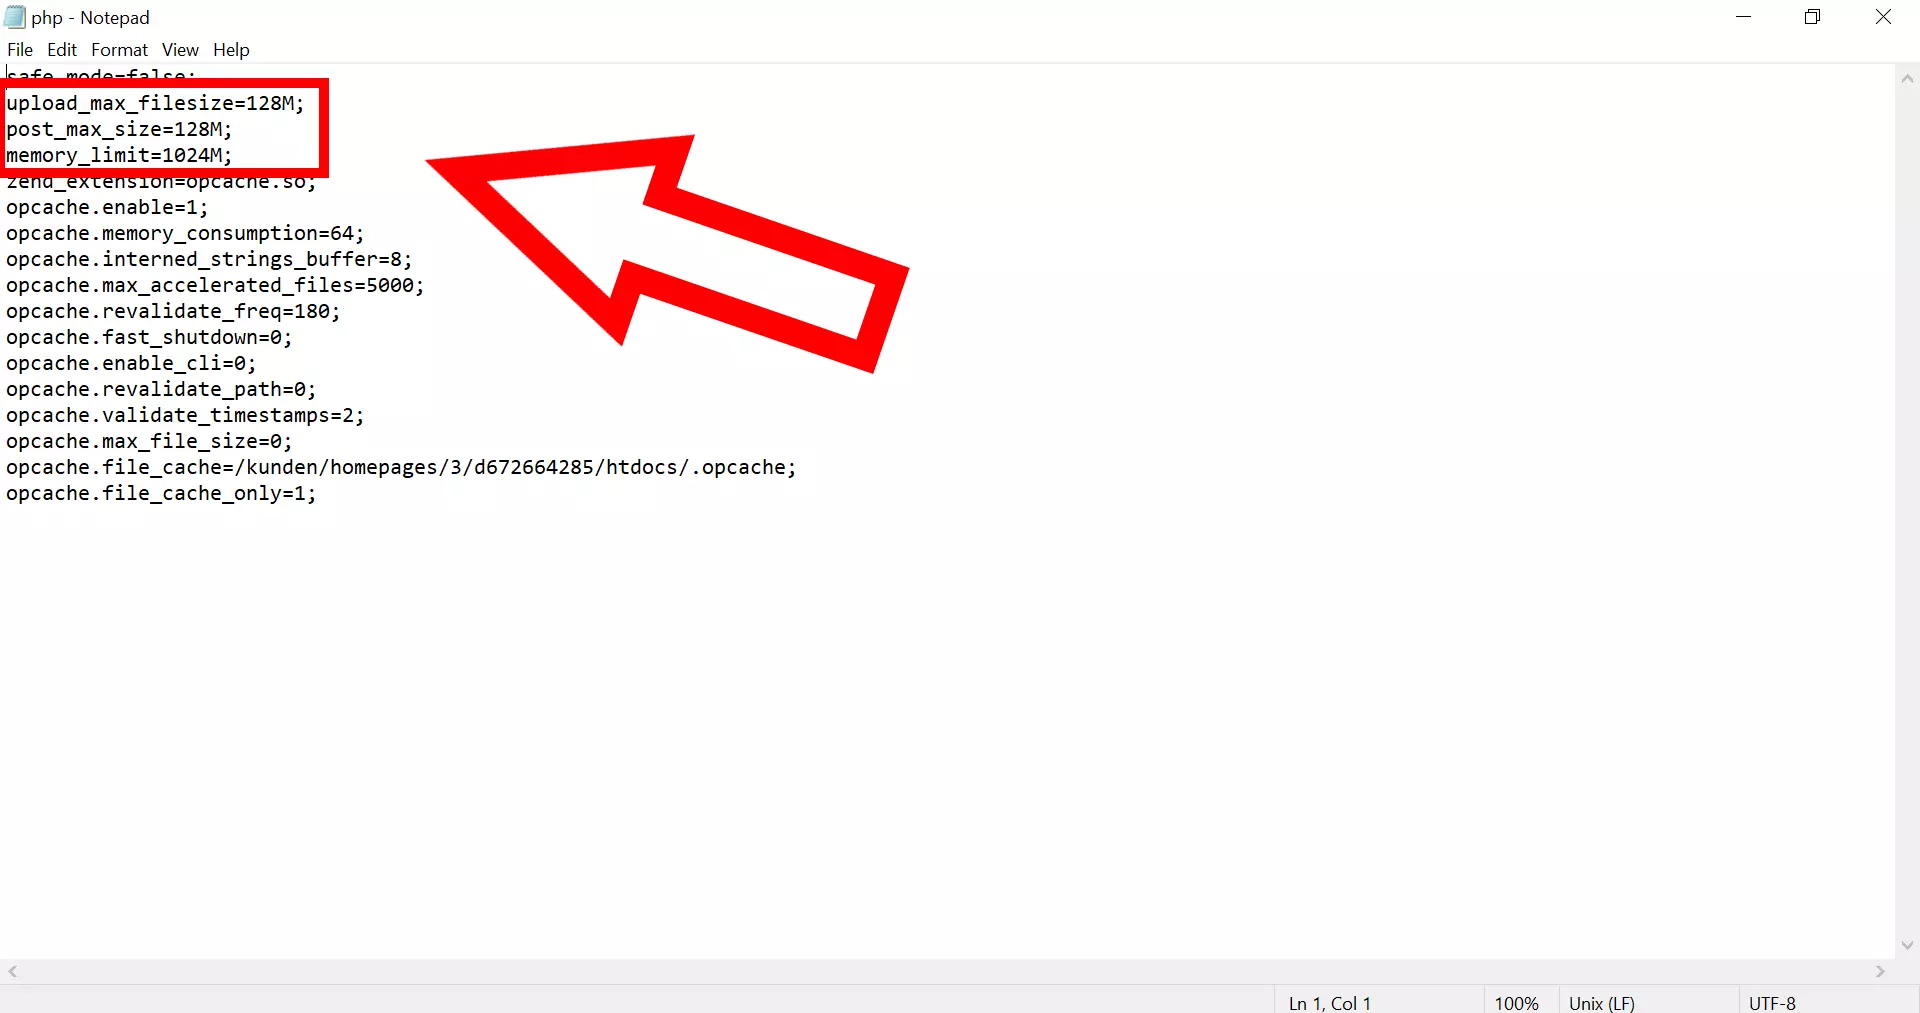
Another configuration file that can be used is the php.ini file, which you may have to create first via FTP or SSH. Here is where the following configurations (possibly with other values) will be displayed:
upload_max_filesize=128M;
post_max_size=128M;
memory_limit=1024M;Access the PHP option in the cPanel
If you are using the cPanel configuration tool, there is another way you can increase your WordPress upload size. To do this, first search for ‘Select PHP version’ and then select the PHP options. Now you just need to adjust the configuration values mentioned in the previous section and save your changes.
You can create a WordPress site in just a few steps. However, unexpected problems or errors can always occur. These can be found quickly thanks to WordPress debug mode, but they often aren’t fixed as quickly. Therefore, it is a good idea to create a test environment — known as a WordPress staging site. It is also advisable to create a backup of your WordPress website regularly.
If you want to upload very large files to WordPress that exceed the upload limit, there are various ways you can increase the limit to make the upload possible. The easiest way is via web hosting provider support. Otherwise, you can set the desired configuration values yourself. For example, if you plan to create a WordPress blog that will contain high-resolution photos, long videos, etc., you will most likely need to increase the WordPress upload size.


