How to set up an Outlook read receipt
If a sent email remains unanswered, you will no doubt ask yourself whether it actually arrived and has been read. To do this, you can set up a read confirmation in email clients such as Outlook. This prompts the recipient to acknowledge receipt of the message.
How to set up Outlook read receipts quick guide
- First compose your email as usual.
- Click on Options.
- Tick the box next to Request a Read Receipt.
- Up to 50 GB Exchange email account
- Outlook Web App and collaboration tools
- Expert support & setup service
Your options for setting up Outlook read receipts
If you want to use read receipts in Microsoft Outlook to know when your messages have been read, you have two setting options. You can either make the read receipt the default, which automatically requests it for all emails sent, or you can send only selected messages with a read receipt.
Please note that a read receipt in Outlook and other email programs carries no legal weight. For critical matters, such as terminations or cancellations, always ensure you request a written confirmation of your communication.
The latter is particularly useful if you regularly send emails to certain people (friends, colleagues, business partners, etc.). In this case, asking repeatedly whether people have received an email, if they have not yet responded, can be irritating for everyone involved. In the following instructions for Outlook versions 2021, 2019 and 2016 as well as for Outlook 365, you will learn how to set up read receipts for your entire message traffic and how to use read receipts only in selected emails.
- Write perfect emails with optional AI features
- Includes domain, spam filter and email forwarding
- Best of all, it's ad-free
How to set up Outlook read receipts
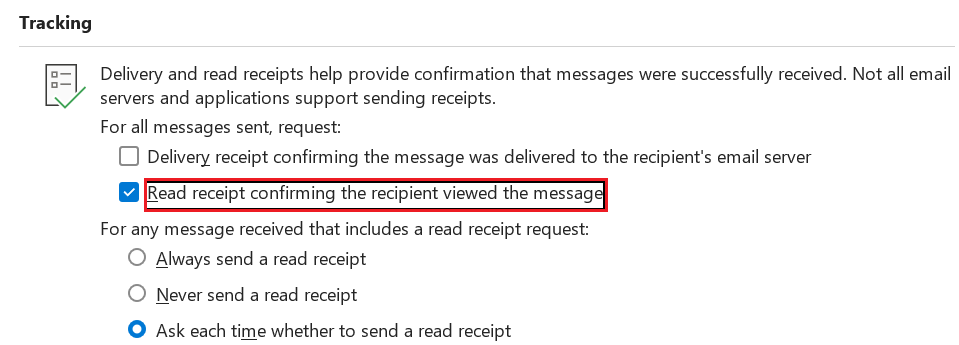
You can request read receipts for your entire email traffic in Outlook in just a few steps. The corresponding setting option can be found in the Outlook Options section, which can be opened via Options in the File tab:

In the next step, select Options then the Mail menu item and scroll down to the Tracking section. Tick the box Read receipt confirming the recipient viewed the message and confirm your selection with OK.

How to set up read receipts in Outlook for individual messages
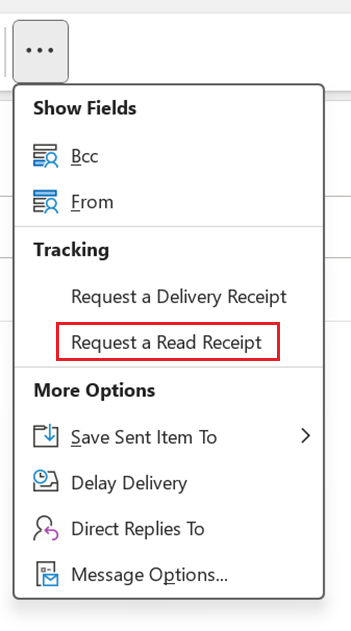
If you want to request a read receipt for a specific message, you should first compose the email.
Click on the Options tab and then on the three dots to display further options. Now select Request a Read Receipt, which successfully sets up the Outlook read receipt request.

- Fast drag and drop editing
- AI-powered text generation
- Seamless syncing with IONOS eCommerce

