How to change the sender name in Outlook step by step
From time to time, it may be necessary to change the sender name in Outlook, for example following a department change, when the name of a department changes, or you change your last name after marriage. This means you’re able to make changes without having to create new email accounts. Likewise, Outlook sender names can be amended so that names are assigned to a department, for example sales@domain.com can be combined with the employee’s name. In this guide, we’ll show you four ways to change the sender in Outlook.
How to change the sender name in Outlook quick guide
Here’s an overview of the process for changing the sender in Outlook:
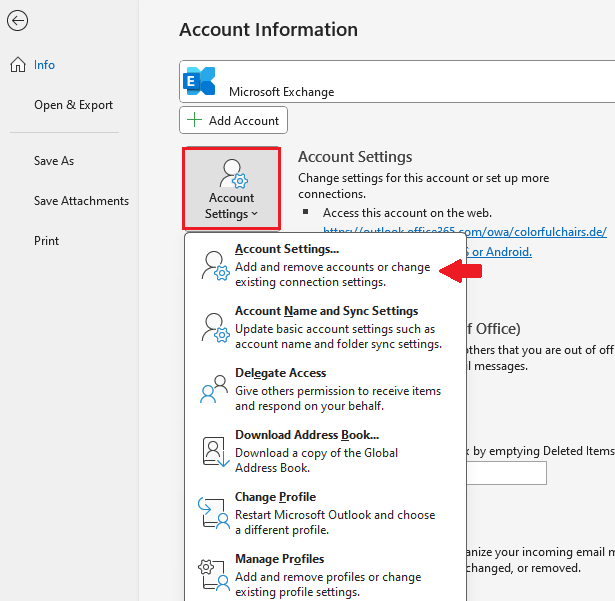
- Go to File > Account Settings in Outlook
- Highlight the account you want to change and then click on Change…
- Please enter your desired information in the Your Name field under User Information
- Confirm the process with Next and complete it
- Up to 50 GB Exchange email account
- Outlook Web App and collaboration tools
- Expert support & setup service
How to change the sender name in Outlook in the account settings
The Outlook email client makes it easy to swap out which information you include in an email. To change the name of the sender displayed next to the email address, proceed as follows:
Step 1: Open Account Settings
Step 2: Select the account you want to change
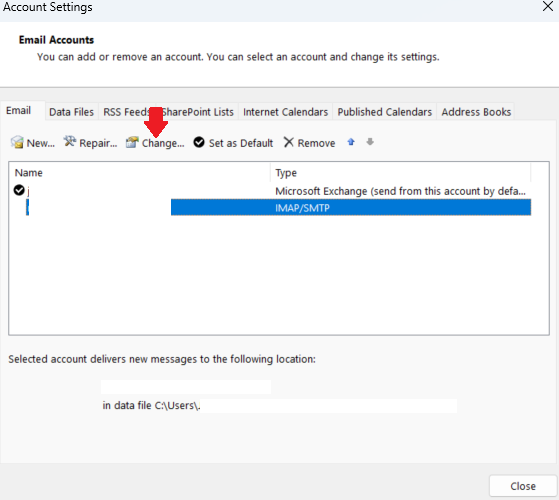
Mark the email account you want to amend (in the image it is the default account with the tick) and click on Change.
- Up to 50 GB Exchange email account
- Outlook Web App and collaboration tools
- Expert support & setup service
Step 3: Enter the new name.
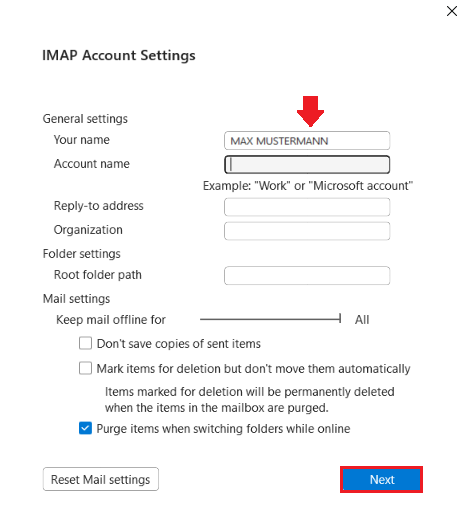
In the pop-up window Change account select the Your Name window below User Information. Here, you can enter a name that will appear alongside the sender’s email address. Choose Next to proceed.
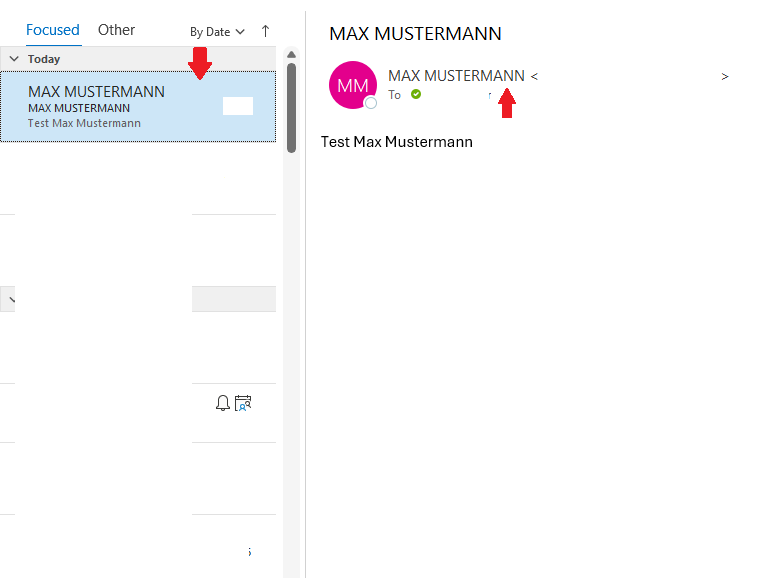
Step 4: Check the result
- Write perfect emails with optional AI features
- Includes domain, spam filter and email forwarding
- Best of all, it's ad-free
If you now send an email with the changed sender to another account, the new name MAX MUSTERMANN will appear in the preview and the field where the email is displayed.
Beware that criminals often use the same method. Changed sender names in Outlook can generate greater trust, which is why phishing emails end up being opened by some people. Our guide on how to protect your email address provides important information on this. Since internet criminals are always coming up with new tricks, our article on smishing may be an interesting read.
How to change an Outlook sender name when creating the email
If you want to write a new email and select a different sender, at least one more email account must already be set up. You can learn more about this in our corresponding articles:
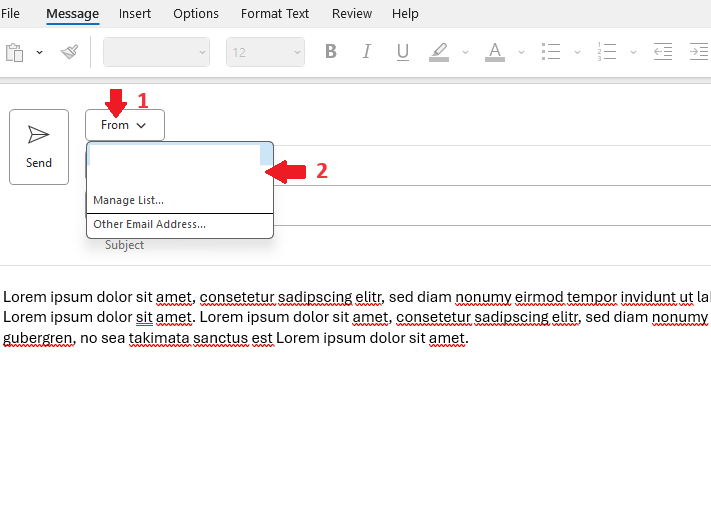
To change the Outlook sender before the email is sent, select From (1) in the drop-down menu and then the sender email address (2) you’d like to use from the list. This is the address that will send the message, and the email address that the recipient will see in their emails.
How to change the reply address of an email
In business communication you may prefer for the recipient of an email not to reply to the sender address, but to an alternative email address. To use this alternative reply address, you don’t have to change the sender in Outlook. In the email that you are composing, simply activate the Direct Replies To (1) selection under Options (1).
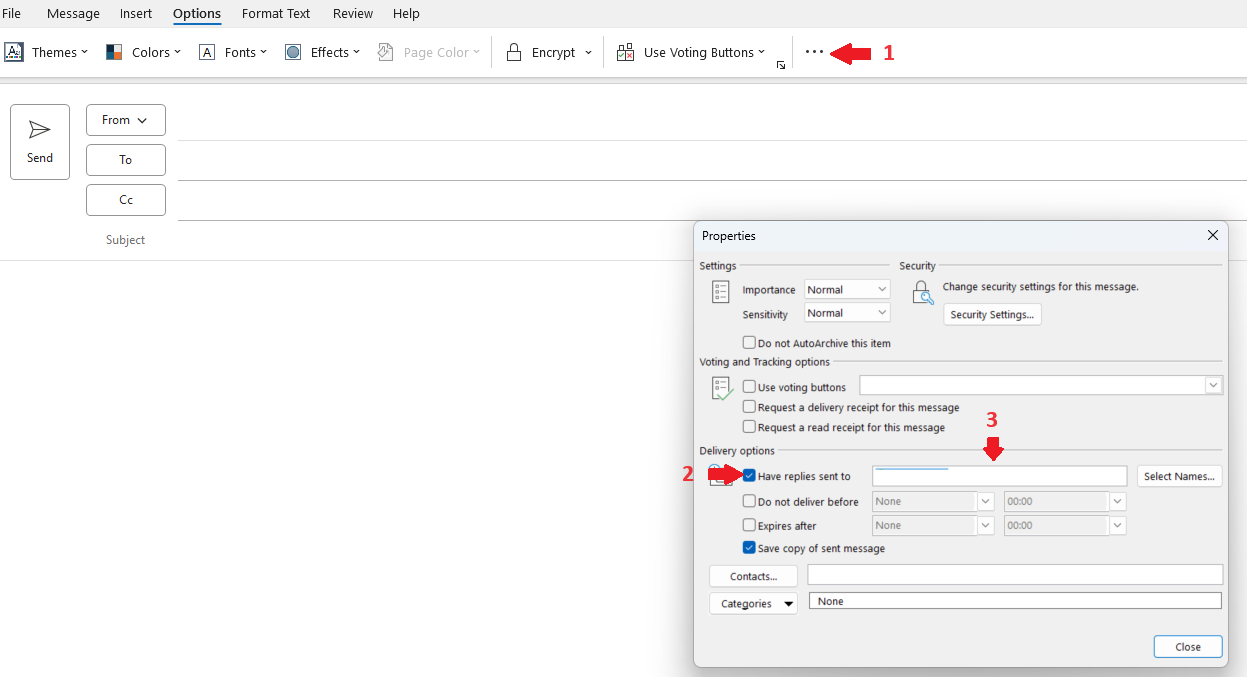
In the Properties pop-up menu, tick the Have replies sent to box (2) and enter the desired email address (3) in the field next to it. Saved addresses are available under Select Names…, but any (valid) email addresses can be used. This is useful, for example, when temporarily working from home or outside of the office environment. This means that the recipient won’t need to be made aware of other email accounts. If the recipient clicks on the email to reply, the stored reply address will appear in the To… address field.
Stay up to date everywhere and on all devices with Microsoft 365 Business from IONOS.
How to customise Outlook account name and change reply address permanently
When using multiple email accounts in a single Outlook client, it is often clearer for the changed sender names to also be displayed in the folder area.
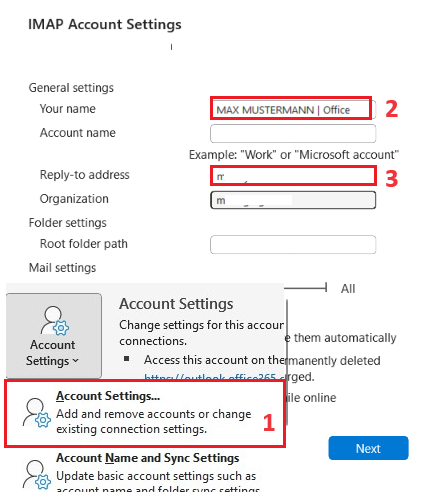
To display this in the Outlook folder area (1), again select the account to be changed as described at the beginning. When the account settings window opens, select the account whose name you want to change and click on Change. In the menu that now appears, enter the desired name for the account (2). You can also use a name plus email address or any other name. If you enter an email address under Reply-to address (3), this will be used permanently when replying to a sent email in the To… address field.
The email client Outlook offers several options to change senders so that preferred sender information is displayed to the recipient. The procedure for changing this is the same across new and older versions of Outlook.
- Fast drag and drop editing
- AI-powered text generation
- Seamless syncing with IONOS eCommerce

